Keep the useful image. Cover the private detail.
Image Blur & Redactor
Cover names, messages and other details in a local image. Add precise opaque areas or use blur and pixelation as visual effects, then download a flattened image.
The useful context stays visible
Show the point, not every detail.
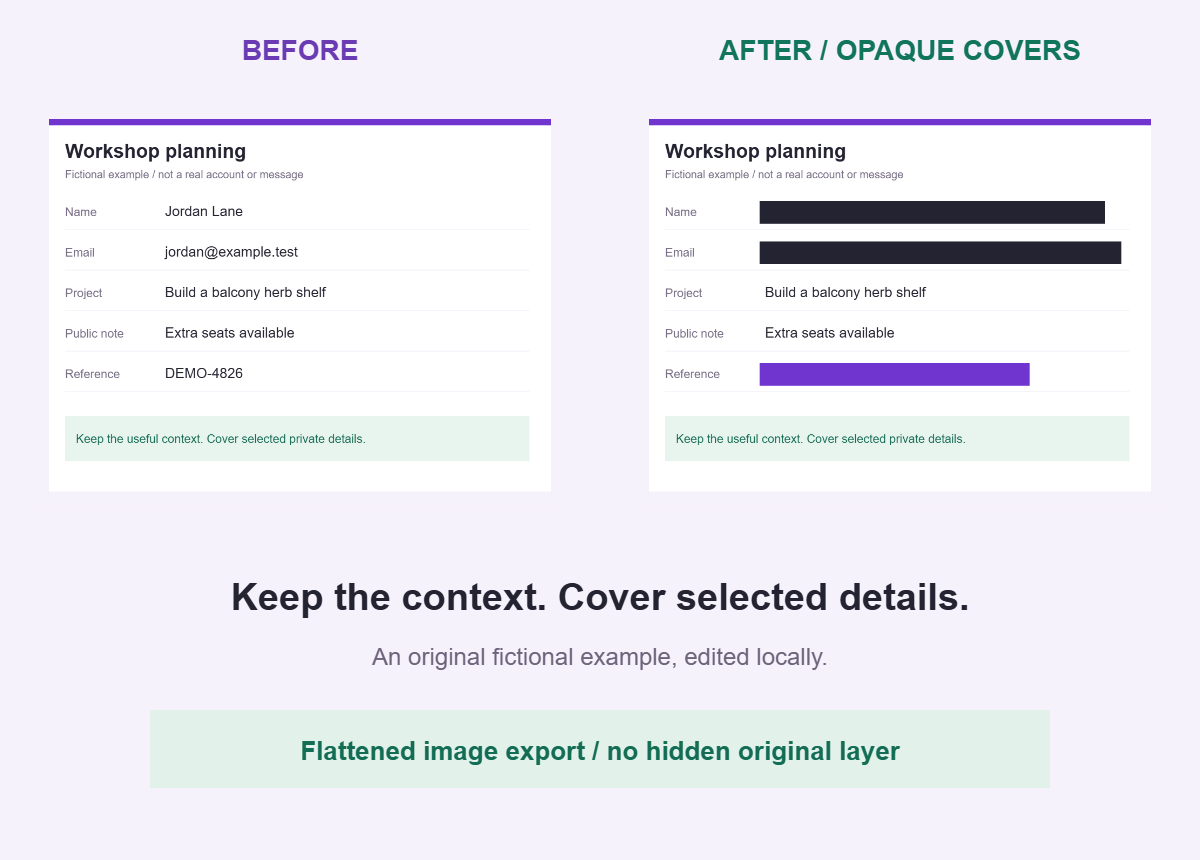
A fictional example, not a real message or a platform screenshot. The after image is the actual flattened output.
Start with a local still image
Choose the detail you want to cover.
Use opaque covers for sensitive details. Blur and pixelation retain visual information; they are not secure substitutes for covering it.
Your image and areas
No image selected.
Positions refer to the prepared image. Solid covers have no transparency; Strength is inactive for them. All solid covers are painted after visual effects.
Your edited image
Choose an image or load the fictional example.
Nothing is uploaded. Draw an area or use the position fields. Preview outlines are not exported.
The original remains available in this browser for editing. Review the downloaded image for missed details; this tool does not detect private information.
Your source stays local. Still PNG, JPEG or WebP up to 15 MiB, with source checks up to 12,000 px per edge and 40 MP. Preparation may reduce it to 2,048 px per edge, 4 MP and a 2 MiB PNG. Up to 20 rectangular areas; no face detection, OCR, automatic scan, video editing or PDF redaction.
PNG preserves the edited raster; JPEG is lossy and uses a white background for transparency. Saved settings contain dimensions and areas, not the image or filename. Choose the intended image before reopening its settings; matching dimensions are not proof of identity. PDF shows the edited image and may still expose other visible details. No autosave or cloud backup; reloading requires reselecting your file. Ordinary website resources still load.
How the edit is applied
Precise areas. Fresh pixels. A deliberate review.
Prepare the image
A bounded, normalized local image becomes the editing canvas. The original file is not changed.
Choose the right treatment
Visual effects soften detail. Opaque covers replace the selected pixels and are painted last.
Check the flattened file
Export a fresh PNG or JPEG, then inspect the actual image before it leaves your device.
Start with the picture you actually need to share
A useful redacted image still answers a question. Perhaps a colleague needs to see where an error appears, a customer needs a delivery update, or a reader needs an example of a crowded interface. Decide what that person must understand before drawing any rectangles. Then identify details that do not help them: contact information, account identifiers, unrelated messages, or background paperwork. The goal is not to cover the largest possible part of the picture. It is to produce a clear image that carries the intended explanation without carrying details that belong somewhere else. Keep that purpose beside you throughout the edit.
Imagine a fictional support team at Clearpath Studio preparing a screenshot for a public troubleshooting article. The screenshot is 1600 by 1000 pixels. It shows a failed appointment confirmation, a useful error message, a customer name in the header, an email and booking reference band, and a notification preview at the bottom. The team wants readers to recognize the error state and Retry button. All project details in this example are invented. The name, field band, and notification add nothing to the instructions. Those become three planned cover areas, while the error heading, explanation, and button must remain visible in the finished picture.
Write a short acceptance sentence before you begin: “The reader can locate the confirmation error and Retry button, but cannot read the customer fields or unrelated notification.” This is more useful than a vague instruction to make the screenshot private. It tells a reviewer what to check and gives you a reason to reject an overly broad rectangle. Look beyond obvious text as well. An avatar, a small account badge, or a distinctive background document may identify the same person. Review the entire visible frame manually. The editor does not discover faces, read text, or decide which details matter for your intended audience.
Prepare one suitable local source
Use Choose image to select a still PNG, JPEG, or WebP from your device. A source can be up to 15 MiB, with a maximum edge of 12000 pixels and a maximum area of 40 megapixels before preparation. These checks work together; passing the file size limit alone is not enough. The prepared working image is limited to a 2048 pixel edge, four megapixels, and a two MiB PNG, so a larger source may be reduced. Inspect the preparation dimensions shown by the tool. They describe the image you will edit and export, not a promise to preserve every original pixel.
For Clearpath Studio, the 1600 by 1000 screenshot is a convenient working size if it also meets the prepared byte budget. Check whether the small error description remains legible after preparation. If the source is reduced, do not assume that a narrow line of text will survive comfortably just because it looked sharp in the original. Reconsider the source capture if the useful content becomes too small. This editor does not crop, rotate, or enlarge the output. The Image Resizer can handle a separate framing task, but return to the actual image you intend to cover and inspect its new layout.
Load example lets you try the workflow on a fictional screenshot before selecting your own image. It is a practice source, not a scan of an account. Choosing a valid replacement image resets the existing areas after confirmation, while canceling a choice or submitting an invalid source keeps the committed work. Save useful settings before deliberately switching sources. The source file itself remains unchanged on your device. Original pixels are held locally while the page needs them for editing and the Before view; they are not written back into that source. A fresh output is a separate file that you must download and review.
Choose an effect that matches the reason for editing
Solid cover is the default for sensitive details because it paints an opaque rectangle over the selected pixels. Blur and Pixelate are visual treatments that retain information from the picture, so they are not secure substitutes for covering a private value. In the support screenshot, use Solid cover for the email, booking reference, and notification text. A blur may look quieter at a glance while still leaving useful clues about what was there. Keep the distinction practical: if the detail must not be readable in the shared image, cover the whole detail and inspect its edges instead of judging how soft it looks.
The four solid color choices are Ink, White, Violet, and Forest. Every choice is fully opaque; there is no transparency setting to tune. Choose a color that makes the edited area easy to recognize without competing with the explanation. Clearpath Studio uses Ink consistently across its three rectangles. A white cover could blend into a pale interface, but that visual neatness should not make a reviewer overlook the covered area. The selection outline is only an editing aid. It does not appear in the downloaded image, and an area label does not become a caption printed across the screenshot either.
Strength applies to Blur and Pixelate, not Solid cover. It accepts values from 2 to 64 in prepared image pixels. For blur, it controls the radius; for pixelation, it describes an approximate block size because a rectangle must divide into whole grid cells. If you use an effect on a nonsensitive decorative patch, compare the result at a normal viewing size and in the actual downloaded file. Do not treat the number as a percentage or a privacy score. Its appearance depends on the prepared image and the size of the selected area, not on the name of the destination platform.
Place rectangles around complete details
Use Draw area to drag a rectangle across a detail, or Add area to start with a centered rectangle. Select an existing item through Area to edit, then use Move area when its whole position needs to change. The numeric X, Y, Width, and Height fields provide a keyboard alternative and allow adjustments to one decimal place in percentages. X and Y describe the upper left position within the prepared image. Width and Height describe its share of that image. Give the rectangle a short label that identifies its job, such as “Customer fields,” without copying the sensitive value into the label.
In the fictional screenshot, suppose the combined email and booking reference sit inside a band that can be covered with X 7.5, Y 12, Width 48, and Height 9. On a 1600 by 1000 working image, that rectangle starts at pixel 120 horizontally and 120 vertically, and spans 768 by 90 pixels. These are illustrative coordinates for this invented layout, not a preset for other screenshots. Check the actual edges against every character. A separate bottom notification might need X 60, Y 86, Width 36, and Height 10. That leaves a four percent margin at the right and bottom.
Leave a little room beyond the visible strokes rather than tracing letters tightly. Descenders, punctuation, shadows, and a second line can extend beyond the first boundary you notice. For an angled object in a photograph, the rectangle may need to include more background to cover every corner. The tool supports up to twenty areas, so use separate rectangles when one large cover would hide useful material between details. Each rectangle must stay inside the image and cover at least one prepared pixel on each edge. If a draft does not meet those conditions, correct the fields before relying on the preview or attempting an export.
Review the edited image as a whole
Switch between Before and After deliberately. Before shows the original preview and is useful for locating details you still need to address. After shows the edited result you intend to share. Do not take a screenshot of the editing workspace as the deliverable; it may show the Before view, selection outlines, or unrelated page content. Inspect the full picture in After, then focus on the boundaries of every rectangle. Read the surrounding text as someone unfamiliar with the task would read it. A covered account number is only one part of the review if a nearby heading repeats that same account identifier.
The editor first replaces pixels inside the solid areas, so an overlapping visual effect cannot spread those original details elsewhere. Visual effects are then applied in their listed order, and all solid covers are painted again last. This also prevents a later blur from softening an opaque cover placed earlier in the area list. Overlapping solid areas follow their own list order for the visible color. That behavior is useful when a broad decorative effect and a precise cover share part of the picture. It does not decide whether your chosen rectangles are complete. For Clearpath Studio, all three areas are solid, so the practical review is whether each sensitive band is fully covered without obscuring the Retry button or the complete error instruction.
Ask another person to check the image against the acceptance sentence, not against a count of areas. Three rectangles do not prove that three private details were the only ones present. In this example, a reviewer notices a repeated booking reference in the browser tab captured at the top. Add a fourth cover or prepare a more appropriate source capture, then inspect the result again. Keep the visible error wording intact. If the cover changes the apparent meaning of the interface, explain the omission in the surrounding article. An edited screenshot should not suggest that hidden content was absent from the original screen.
Download and open the real deliverable
Download PNG is the first choice when crisp screenshot text and the exact prepared raster matter. The output is a newly drawn, flattened image, without editing handles, original layers, or the source image attached behind it. Source EXIF, XMP, and other ancillary metadata are not copied into that fresh output. This describes how the file is made, not whether everything still visible is appropriate to share. Open the downloaded PNG independently and inspect it at its actual dimensions. Check each cover again, especially where small letters or thin interface lines sit close to an edge. Review the useful content for legibility too.
Download JPEG creates a lossy alternative at the tool quality setting of 0.94, with a white background for transparency. JPEG can change the appearance of small text and sharp boundaries, so review that file separately even if the PNG looked good. Choose the format your recipient actually needs instead of sending both by habit. For Clearpath Studio, PNG is the approved article asset because the screenshot contains small interface labels. If a later publishing system produces another rendition, inspect that rendition as well. A successful local download does not show how an external composer, document editor, or website will display the final image.
If presentation is the next job, start that job from the reviewed edited image. The Screenshot Beautifier can add a frame or background after the private details have been covered. Decoration is not a substitute for this step, and passing a different original into another editor would undo the purpose of the handoff. If file size needs attention, use the Image Compressor on the approved result and inspect the compressed file before replacing it. Keep a clear version name in your own folder so the person assembling the article selects the reviewed asset, not a similar looking source.
Keep settings and review files useful without oversharing
Save settings records the platform context, prepared dimensions, and area choices in JSON. It contains no image bytes, original filename, or source image attachment. You need to select the source separately when rebuilding the edit. Matching dimensions are required when importing settings against a loaded image, but equal width and height do not establish that two pictures are the same. A different screenshot can have identical dimensions with every field moved. After Open settings, inspect every rectangle against the selected source. If dimensions differ, the settings import is refused rather than automatically scaled into positions that merely appear plausible.
For the support article, the editor keeps a settings file alongside the approved PNG in a restricted production folder. The original screenshot stays in its existing separate location, not in the shareable review package. Labels such as “Header fields” and “Bottom notification” make the area inventory understandable without repeating private values. Copy review, Download text, and Download CSV are useful when another editor needs an inventory rather than the image itself. Read those exports before sending them. A harmless image cover does not make a label harmless if someone typed an email address or internal reference into that label during preparation.
Download PDF provides an edited image proof and the complete area inventory, with settings and review JSON attachments that exclude the original image. It never includes the Before image or an original image attachment. The proof still shows every pixel you left visible, and the inventory carries labels and coordinates, so review the whole document before sharing it. It is a preparation record, not a certified redaction audit. If the report cannot fit the supported page or file budget, use the offered alternatives rather than expecting an incomplete inventory to stand in for the full review. Send only the materials the recipient actually needs.
Finish with a clear publishing handoff
Save the edited image and any settings you need before leaving the page. There is no autosave, hosted project, or account storage behind the editor. Navigation clears working image resources; a restored page may offer Restore image for a retained local File, but that is an explicit action rather than a saved online project. A reload can require selecting the source again. Keep your own dependable source storage and your approved output separate. If you change an area after downloading, obtain and review a new output. An earlier file in your downloads folder does not update just because the current preview changed.
The Clearpath Studio handoff includes one approved PNG and a short note: “Public troubleshooting image, customer bands and notification covered; error wording and Retry button retained.” The reviewer is named in the team task, and the article editor checks the exact inserted image before publication. No original screenshot is bundled for convenience. If the article needs an image description, write it from the edited result. The Alt Text Writer can help organize that separate wording task. Describe the useful error state and the visible covers without restoring the private details in a caption, description, or surrounding explanation.
The finished result is one still image that you have inspected, not a promise about who can identify a situation from all remaining context. Check the intended audience and destination outside this tool, including the words that accompany the image. The editor does not fetch a source URL, connect a social account, or post the result. When repeated account work becomes the larger task, explore SMTasker as a separate workflow for supported account routines. Keep the image review under an explicit owner. That separation makes the handoff easier to trust: the recipient knows which file is approved and what it was prepared to communicate.
Work through a real sharing decision
Platform and image-review guides
Different examples, the same local editing workflow. Each guide links back to the tool and the other guides.
Instagram Image Redactor
Prepare a clear image for your Instagram audience without exposing every detail visible in the original.
Read the guideTikTok Still Frames
Review a supplied cover or still frame before it becomes part of a short-video workflow.
Read the guideYouTube Image Privacy
Keep the point of a thumbnail or community image while covering selected private details.
Read the guideFacebook Image Redactor
Make a useful community update easier to share without carrying over unnecessary personal information.
Read the guideLinkedIn Image Redactor
Prepare a professional example with carefully chosen evidence and deliberately covered identifiers.
Read the guideThreads
Give a discussion image enough context to be useful, without including every detail of the source.
Read the guideX (Twitter)
Keep an informative image focused on the point you want the accompanying post to make.
Read the guideSnapchat Photo Staging
Review an image you control before choosing the people or surface you want to share it with.
Read the guideMake a discussion screenshot understandable while removing selected identifying details from the image.
Read the guideChoose the Right Effect
Understand which treatment replaces pixels and which visual effects still leave information behind.
Read the guideScreenshot Review
Work through a complete local edit and a final check of the actual downloaded image.
Read the guideQuestions about editing private details
Does the tool find private text or faces automatically?
No. You inspect the image and place up to twenty rectangles manually. Draw area, Move area, and the numeric position fields control those areas.
Which effect should I use for a sensitive detail?
Use the default Solid cover and check that the entire detail is inside its opaque rectangle. Choose its color for clarity, not as a measure of protection.
Can the settings file reopen my original image?
No. Settings contain area choices and prepared dimensions, but no image or original filename. Select the source separately and review every imported area, even when dimensions match.
Does the PDF include the unedited picture?
No. It includes the edited proof, area inventory, and image-free settings and review JSON attachments. Remaining visible content and area labels still need review before sharing.
Can I redact a video or an existing PDF here?
This editor processes one supplied still PNG, JPEG, or WebP. It does not edit video frames as a sequence or redact the contents of an existing PDF.
From approved asset to daily work
Keep your account routine organized
Use SMTasker for separate supported account actions. This local editor does not automatically import, host, or publish your reviewed image.