Mastering the Automations Dashboard
Once your growth stack is running, the Automations dashboard becomes your daily command center. At a glance, it tells you what’s working, what’s stalled, and what needs attention across every account you manage.
If you haven’t started any automations yet, you need to do that first, read here: Run Your First Phone Automated Actions.
The users who scale smoothly and the users who constantly firefight aren’t using different features. They’re using the dashboard differently. This guide walks you through every column, the filters and view controls that turn a 50-row list into a focused view, and the per-row Copy Settings tool that replicates a tuned configuration across accounts in one click — plus a 5-minute daily review routine you can copy directly.
The Dashboard Columns: What Each One Tells You
When you open Automations, each row represents a single tool running on a specific account. Here’s what each column means at a glance:
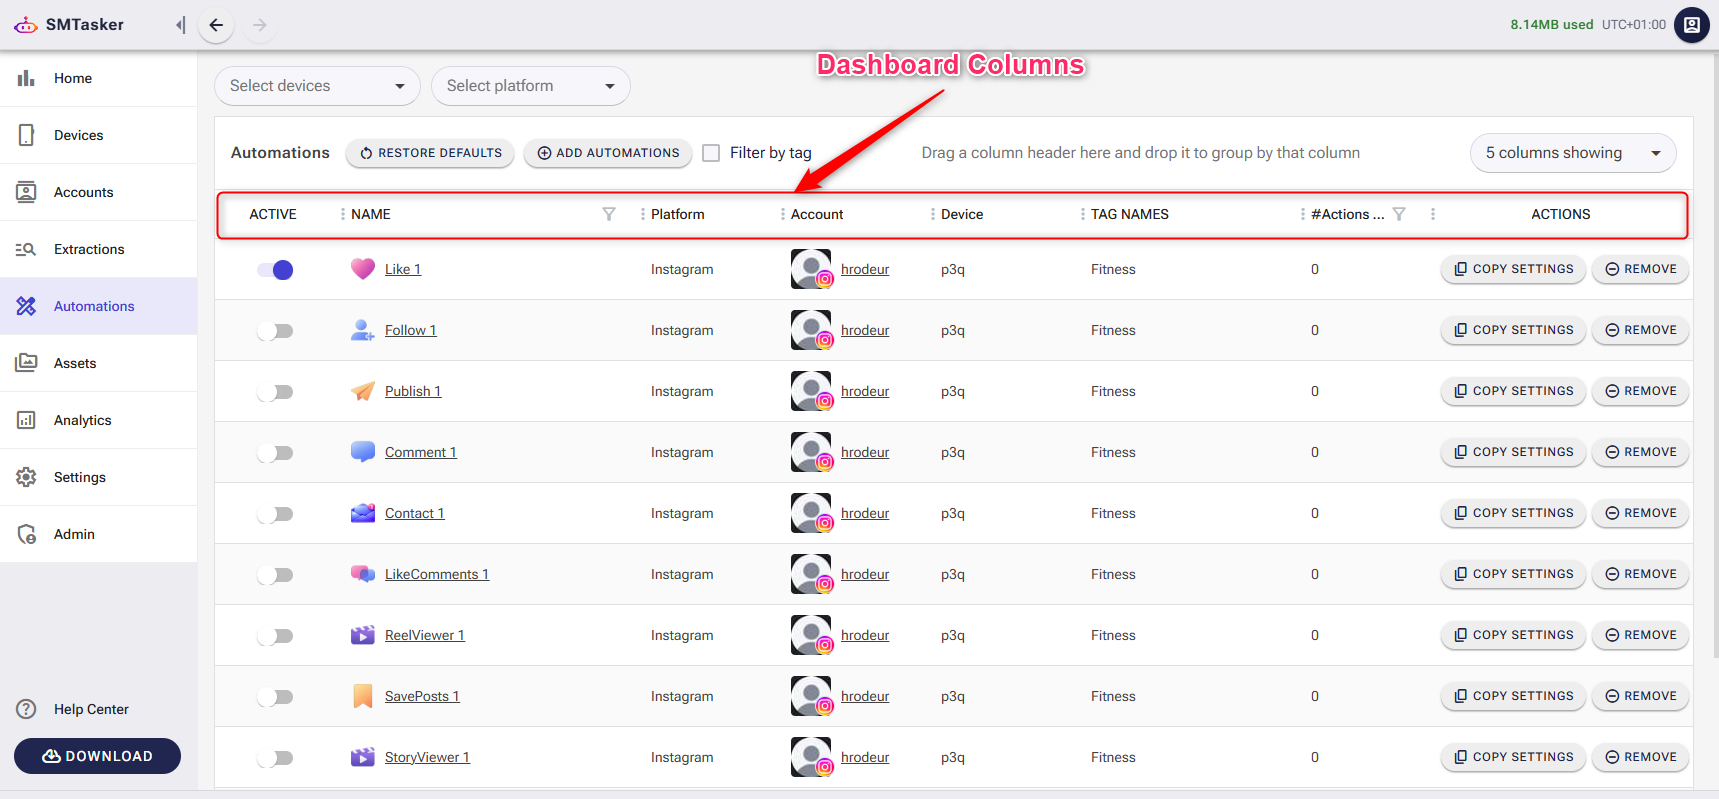
| Column | What It Shows | How To Use It |
|---|---|---|
| Active | An ON / OFF toggle for the tool | Turn a tool on or off in one click. At a glance, see which tools are currently running across your portfolio. |
| Name | The name of the tool — Follow, Like, Comment, Story Viewer, and so on | Spot which tool types are running across your account portfolio — and which are missing on accounts where they should be active. |
| Platform | Instagram, TikTok, Threads, etc. | Filter the dashboard to see all tools running on one platform at once — useful when managing accounts across multiple networks. |
| Account | The username of the account this tool is running on | Sort by Account to group every tool tied to the same username — fastest way to review or pause an entire account’s setup. |
| Device | The connected phone running this automation | When a phone goes offline, this column instantly tells you which tools are affected. |
| Tag Names | Any tags assigned to this automation | Group automations by campaign, client, or objective. Filter by tag to focus on one segment of your portfolio at a time. |
| #Actions Today | The number of actions this tool has executed today | The single most important diagnostic column. A tool sitting at 0 actions during active hours is stalled and needs investigation. Use it to confirm every tool is doing its job each day. |
| Actions | Per-row utility menu — copy this tool’s settings to another account’s tool, or remove the tool from the list | Replicate a tuned setting (limits, sources, Active Days) to another account’s matching tool in one click. Use Remove to clean up retired tools. |
Filtering Your View
A 50-row dashboard becomes unmanageable fast. The Automations page gives you four filters that work together — use them to turn the full list into a focused view in seconds.
Filter by device
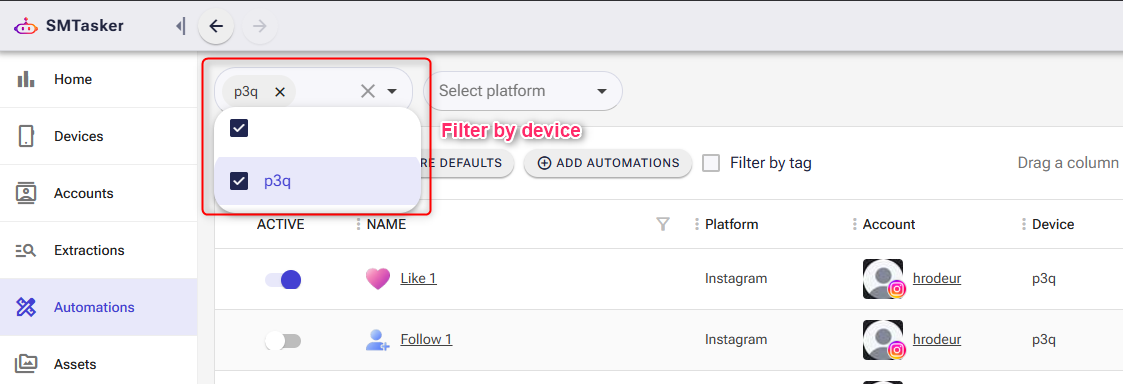
Open the Select devices dropdown at the top of the page and check the phones you want to see. The dashboard instantly narrows to automations running on those devices only.
When this saves time:
- A phone goes offline — filter by that device to see every affected automation in one shot.
- You’re balancing load across multiple phones — see how many tools each device is currently running.
- You’re troubleshooting a specific device — focus on its tools without scrolling past unrelated rows.
Filter by platform
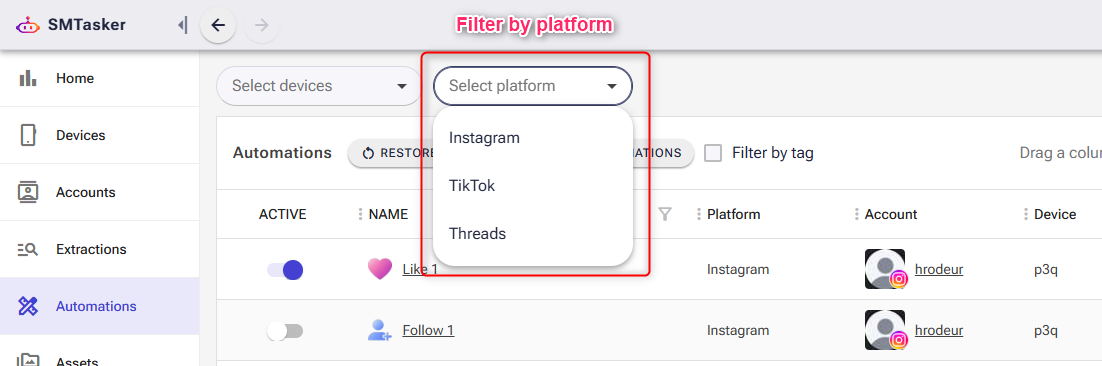
The Select platform dropdown shows Instagram, TikTok, and Threads. Pick one (or more) to filter the view to that network only.
Use it when a platform-specific issue lands — a new Instagram restriction, a TikTok update — and you want to assess only the affected automations. Also useful when you manage cross-platform clients and want to do a per-network sweep before checking the next platform.
Filter by tag
Tags are assigned at the account level — when you tag an account, every automation on that account inherits the tag. Toggle Filter by tag at the top of the dashboard to slice the view by these labels.
How to use tags effectively:
- By campaign — tag accounts as “Q4 Launch”, “Outreach”, “Warm-Up” to filter your dashboard to one campaign at a time.
- By client — agencies tag accounts as “Client-A”, “Client-B” to focus on one client’s portfolio in one click.
- By niche — tag accounts as “Fitness”, “Beauty”, “Crypto” for cleaner per-niche reviews.
Filtering by Automation Name

The Name column features an advanced filter that lets you isolate specific types of automations based on how you’ve named them. Since the filter only scans the text in the Name column, it’s the fastest way to group similar tasks across your portfolio.
How to configure the filter
- Open the filter — click the funnel icon in the Name column header.
- Set your pattern — use the Contains or Equals operators to find specific strings of text.
-
Use dual logic — stack two conditions joined by And to narrow your results. For example:
- Condition 1:
Contains: Follow - Condition 2:
Contains: Fitness
- Condition 1:
- Apply — click APPLY to refresh the list, or CLEAR to reset.
Workflow examples
| Goal | Filter Logic | Result |
|---|---|---|
| View all Like tasks | Contains: Like |
Shows “Like 1”, “LikeComments 1”, etc. |
| Find a specific sequence | Equals: Publish 1 |
Hides everything except the exact “Publish 1” task. |
| Filter by version | Contains: v2 |
Shows only updated “v2” tasks. |
Pro tip: for a clean dashboard, use consistent naming like [Action]_[Niche] (for example, Comment_RealEstate). That way, the Name filter can instantly pull up every “Comment” task or every “Real Estate” task across all your accounts in one click.
Grouping, Pagination & Display Options
Group by any column
The toolbar shows the hint “Drag a column header here and drop it to group by that column.” Drag any column header (Account, Platform, Device, Tag Names) into the group area to organize the dashboard into collapsible groups.
When this is useful:
- Doing a per-account review — drag Account column header to see every account’s tools as a collapsible block.
- Per-device check — drag Device to group all tools running on each phone.
- Tag audit — drag Tag Names to see how each tag is distributed across your portfolio.
Show or hide columns
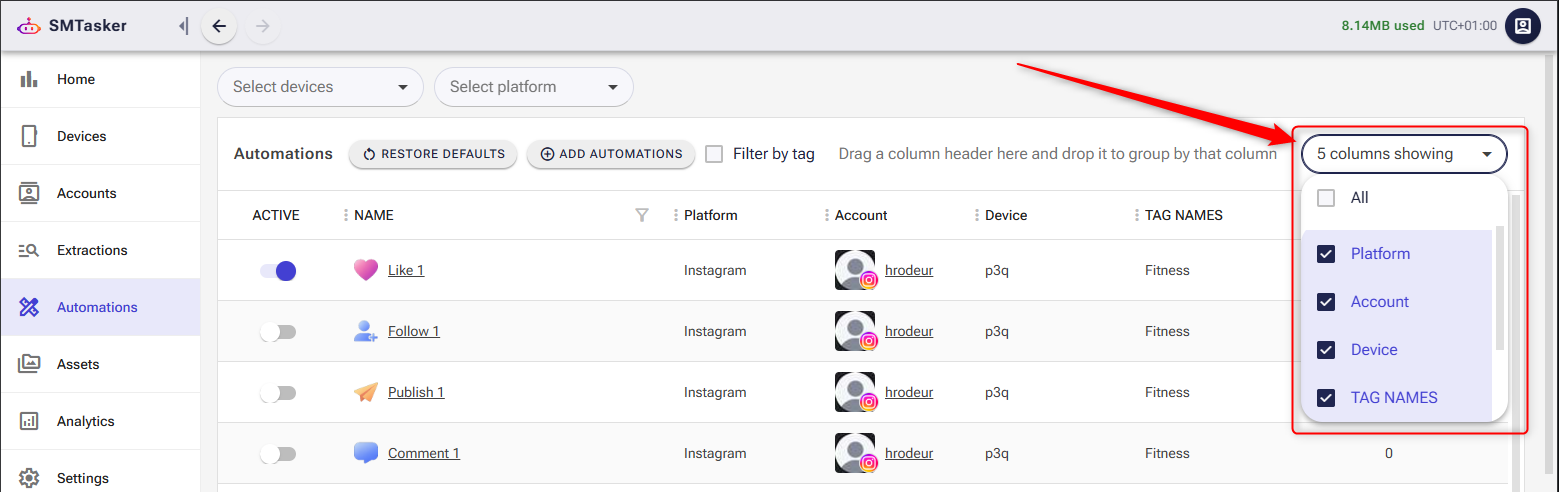
Click the columns showing dropdown at the top right of the dashboard to toggle individual columns on or off. Hide what you don’t need today (for example, hide Device if you only have one connected phone) to make the table easier to read on smaller screens.
Pagination and items per page
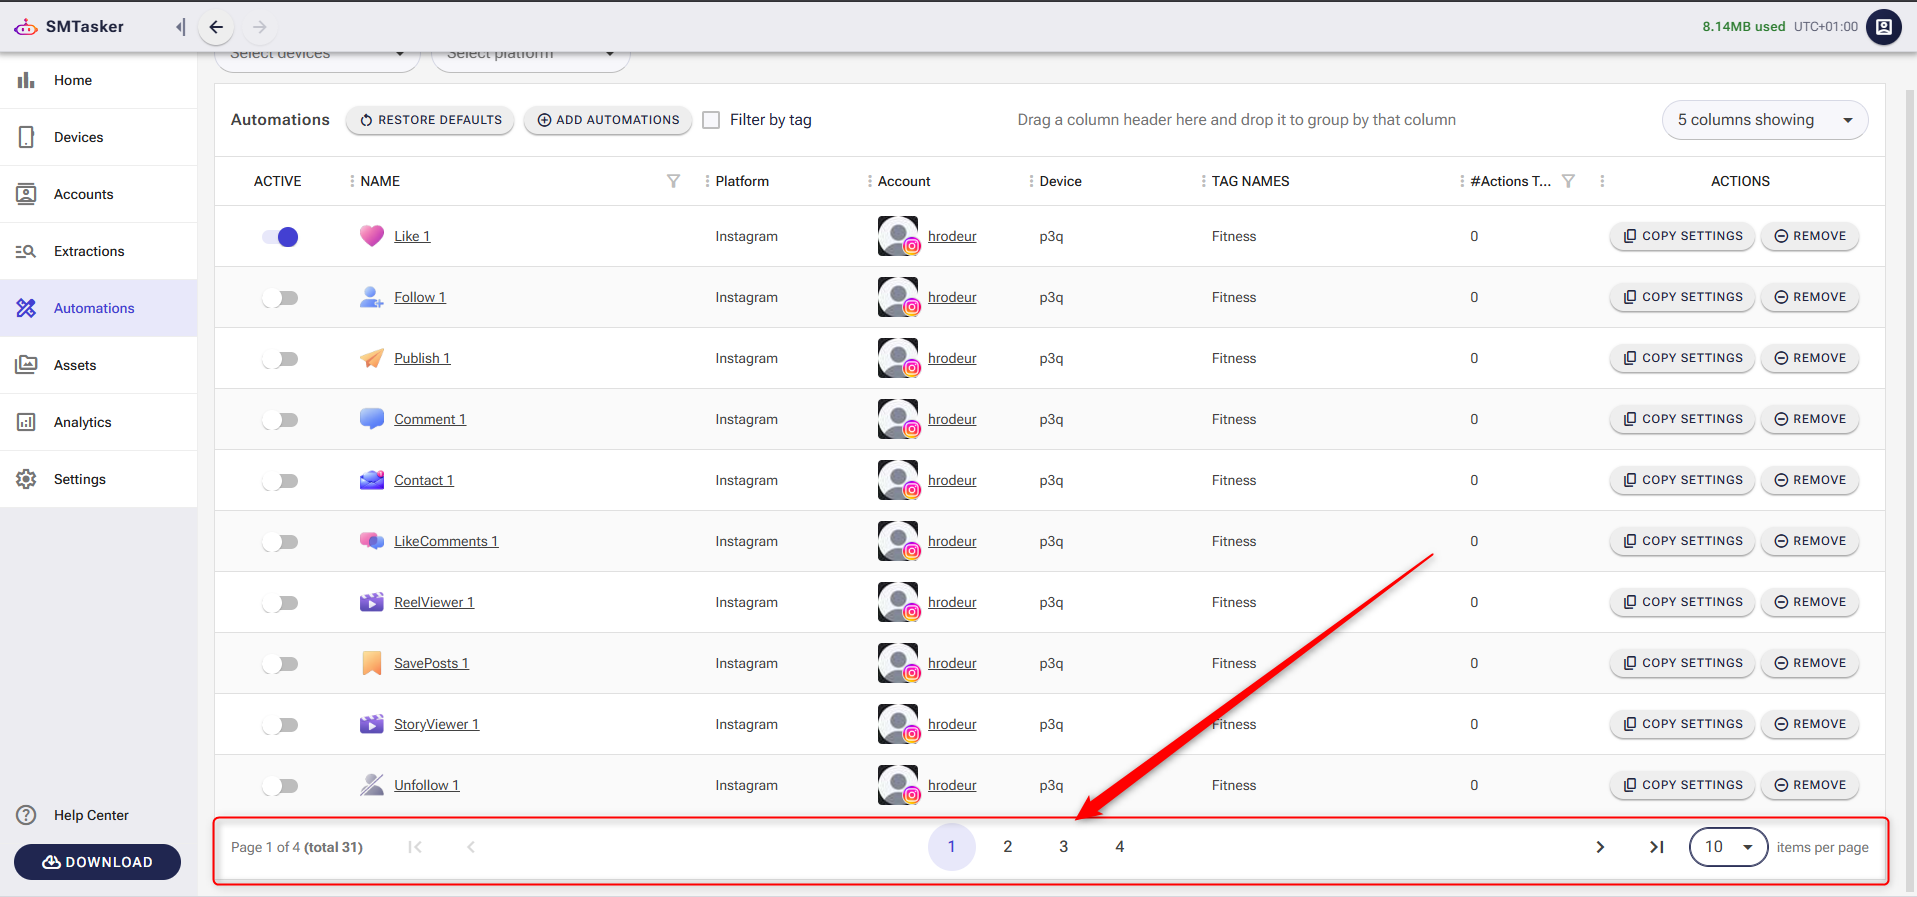
The table paginates at 10 rows per page by default. The bottom toolbar shows:
- The current page and total row count (“Page 1 of 4 (total 31)”).
- Page-number buttons plus first / previous / next / last navigation.
- An items per page dropdown — switch to a higher number if you want to see more at once.
For portfolios under ~30 tools, bumping items per page lets you see the entire dashboard on one screen — no clicking through pages.
Restore Defaults
The Restore Defaults button at the top of the page resets your view — column visibility, filters, sorting, grouping — back to the original state. Useful when you’ve experimented your way into a confusing layout and just want to start over.
Quick Navigation From the Dashboard
Two columns on the dashboard double as shortcuts. Both save you the click of opening a side menu and drilling down.
Click the tool name to open tool settings
The tool name in the Name column is a link. Click it to jump directly into that tool’s settings page, where you can:
- Adjust limits, Active Days, and other behavior settings.
- Connect or update sources (the lists feeding the tool).
- Configure Engage with Profile and Interaction Level — see Understanding Human-Like Behavior Settings.
Click the account name to open account settings
The account username in the Account column is also a link. Click it to navigate to that account’s settings page, where you can manage account-level configuration, view restrictions, and access account-level features that affect every automation on the account.
Adding and Removing Tools
Adding new tools to an account
If a tool is missing from an account — for example, you’ve decided this account needs a Comment tool — click the + ADD AUTOMATIONS button at the top of the dashboard. Pick the account and the tool types to add, and the new automations appear as fresh rows on the dashboard, ready to configure.
The first thing to do after adding a tool is open its settings (click the tool name) and connect sources before flipping the Active toggle to ON — see Building Your Growth Stack for the full setup workflow.
Removing tools
The Actions column on each row has a REMOVE button. Use it to retire a tool that’s no longer needed — for example, after a campaign ends or when you’re rebuilding an account’s stack from scratch.
Important: Remove deletes the tool’s configuration. It is not a temporary halt. To temporarily pause a tool without deleting it, use the Active toggle in the first column instead.
Copy Settings: Replicating a Tuned Tool to Other Accounts
Once you’ve tuned a tool’s settings on one account — limits, Active Days, sources, engagement options — Copy Settings lets you push that exact configuration to the same tool type on other accounts in one operation. It is the difference between configuring 10 Follow tools individually and configuring one, then deploying it.
To open Copy Settings, click COPY SETTINGS in the Actions column of the row you want to replicate. A dialog opens titled Copy Settings From [Tool Name] To Other Tools.

The dialog has three parts:
1. Pick the target tools
The left side of the dialog shows a searchable list of every tool of the same type across your portfolio. Search by Account, Tool, or Tag name to narrow the list, then check the targets you want to push the settings to. Use Select All / Select None for bulk selection.
2. Pick what to copy
Four checkboxes near the top of the dialog control what gets pushed:
| Option | What It Does | When to Use It |
|---|---|---|
| Copy Start/Stop Status | Pushes the Active ON/OFF state to targets | Off by default. Leave it off if you want to review each target before flipping it on. |
| Copy tool settings | Pushes the tool’s behavior settings — limits, Active Days, etc. | On by default. The core of what Copy Settings does. |
| Copy automation sources | Pushes the source list assignments | On by default. Turn off if target accounts need different targeting. |
| Make target sources identical | When copying sources, replaces the target’s sources entirely with this tool’s sources | Check this for clean replication. Leave unchecked to add this tool’s sources to the target’s existing sources instead of replacing. |
3. Pick which specific settings to copy
The right-side panel lets you pick exactly which individual settings to push. Settings are grouped — for the Like tool, you’ll see a Basic Settings group (per-hour limit, per-day limit, Active Days) and a Like Engage group (Enable engagement, EngagementLevel). Check or uncheck individual settings, or use Select All / Select None per group.
This granularity matters: you may want to push a tool’s limits to other accounts but keep their Active Days customized per-account. The right panel makes that possible.
When the dialog is configured, click OK to apply.
The golden rule of Copy Settings: validate the source tool before replicating. Run it for 48–72 hours on the source account, confirm clean activity in the #Actions Today column, then push the settings to the rest of your portfolio. Pushing an unvalidated configuration is the fastest way to spread a misconfiguration across every account.
Common Dashboard Mistakes
| Mistake | Why It Hurts | What to Do Instead |
|---|---|---|
| Ignoring the #Actions Today column | Stalled tools sit unnoticed for days; accounts stop growing while you think they’re running | Check “#Actions Today” every morning; investigate zeros first |
| Forgetting Filter by Device when a phone goes offline | You scroll through every row looking for affected tools instead of filtering in two clicks | Filter by the offline device immediately to see every impacted automation in one view |
| Using Copy Settings before validating | A misconfigured source tool replicates across every selected target at once | Validate the source for 48–72 hours before pushing settings to the rest of your portfolio |
| Removing a tool when you wanted to pause it | REMOVE deletes the tool’s configuration; it isn’t a temporary halt | Use the Active toggle to pause a tool; only Remove when retiring it permanently |
| Not using Filter by Tag on a growing portfolio | Dashboard becomes an unmanageable flat list; hard to find the rows you need to act on | Tag accounts by campaign, client, or niche from day one and filter aggressively |
What to Do Next
- Building Your Growth Stack: The Pro Setup Workflow — If you haven’t built your first automation stack yet, start here. The dashboard is most useful once there’s something running on it.
- The Follow Tool: How to Build a Targeted Audience on Autopilot — Now that the dashboard is under control, go deep on the most-used tool in SM Tasker.
- Sources and Targeting Mastery — The dashboard tells you whether a tool is running. This article tells you whether it’s running on the right targets.
- Safety Features Built Into Your Automations — When you spot a tool stalled at 0 actions, this article explains the safety triggers that may be at play.
Bottom Line
The Automations dashboard rewards the users who check it regularly and know what they’re looking for. Tools sitting at 0 #Actions Today, an offline phone you didn’t notice, and an untagged portfolio are the three things that quietly kill growth operations. Build the habit of a 5-minute daily scan and you’ll catch problems in minutes rather than discovering them days later when the damage is already done.