Critical Event Notifications: Webhooks and Telegram Messages
Get Telegram alerts or send webhook events when a phone goes offline, an account needs attention, a tool stops or publishing fails. A step-by-step setup guide.
A phone goes offline, an account needs verification, or a scheduled post fails. Critical event notifications let SMTasker alert you, so you know where to look without repeatedly checking the dashboard.
This walkthrough starts with Telegram messages, then covers webhooks for sending alerts to another system. You can use either channel or both.
Choose how you want to receive alerts
- Telegram: receive a message in your own chat or a team group. Start here if you simply want to be notified.
- Webhook: send event details to a receiving service—for example, a workflow your team has built to create support tickets. You will need a compatible receiver. Jump to the webhook setup if yours is ready.
SMTasker lets you select these five events separately for each channel:
| Event in SMTasker | What to check when it happens |
|---|---|
| Tool stopped automatically (with error code) | The affected tool and the error code explaining why it stopped. |
| Account challenge or verification | The account that needs a verification step. |
| Account logged out | The account that needs to be signed in again. |
| Publishing failed | The failed publishing task and its details. |
| Phone offline | The phone’s connection to SMTasker. |
Step 1: Open Critical event notifications
In SMTasker: click Settings in the left sidebar, open API & MCP Access, then scroll down past the API-key section to Critical event notifications.
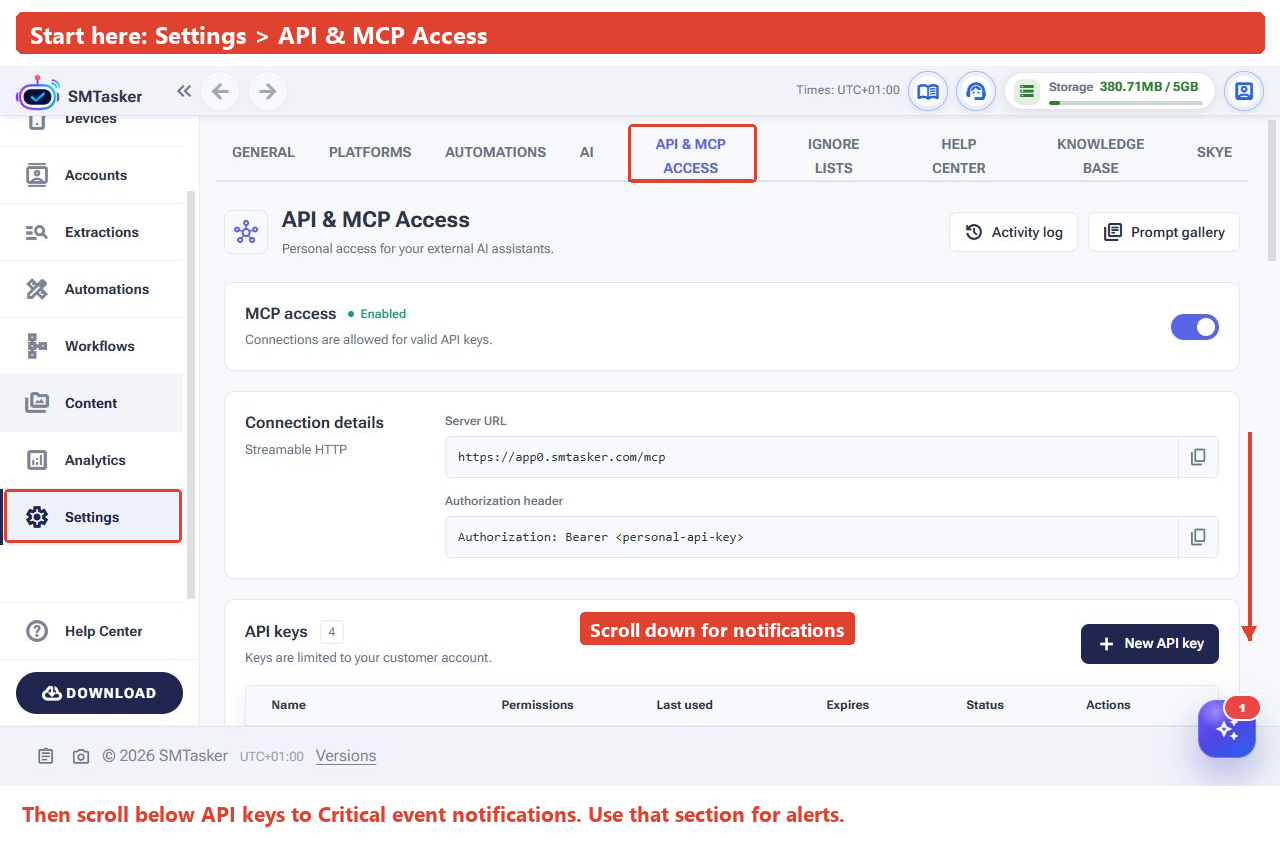
For the Telegram route below, have Telegram open as well. We will use a private chat for the first setup. A team group is an alternative.
Step 2: Create your Telegram notification bot
A bot is the Telegram account that sends your SMTasker alerts. You do not need to write a program for this setup.
- In Telegram: open the official @BotFather chat.
- Send
/newbotand follow its prompts. Choose a name such as My SMTasker Alerts and an available username ending inbot. - BotFather gives you a bot token. Keep it privately—you will paste it into SMTasker in Step 4.
- Open your new bot’s chat and press Start, or send
/start.
Use a dedicated bot for these alerts to avoid conflicts with another integration. See Telegram’s BotFather instructions for the official creation process.
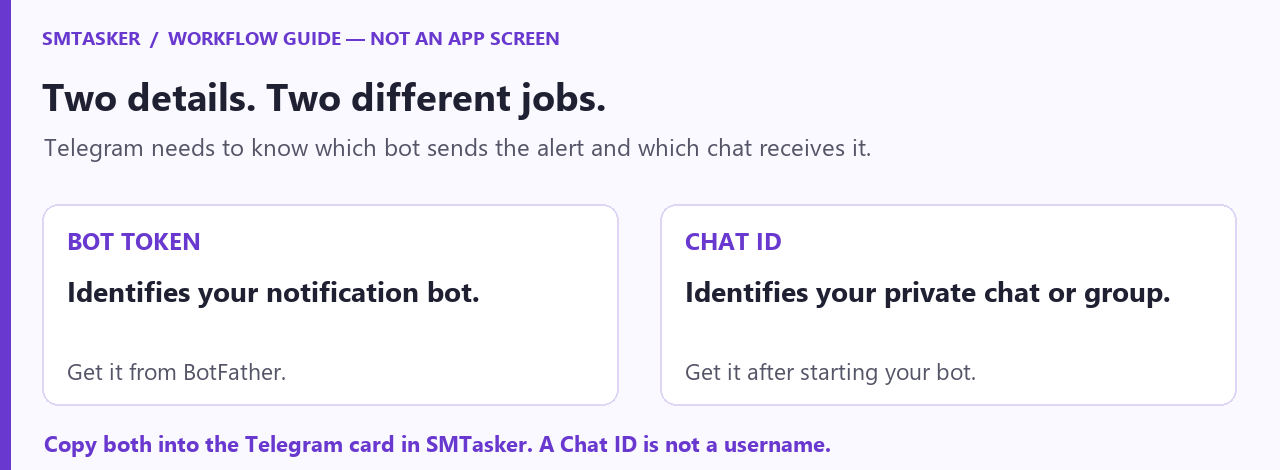
Want alerts in a team group instead?
Add your bot to the intended group and make sure it can send messages there. In that group, send /start@YourBotUsername, replacing YourBotUsername with its actual username. Then find that group’s Chat ID in the next step.
A command addressed to the bot works with Telegram’s group privacy mode; you do not need to turn privacy mode off just for this step. Telegram explains which messages bots receive.
Step 3: Find your Telegram Chat ID
The Chat ID is a number—not your phone number or @username. Telegram can show it in the details of the message you just sent your bot.
- Open a private/incognito browser window.
- Paste the address below into the address bar. Replace
YOUR_BOT_TOKENlocally with your token, keeping the wordbotimmediately before it. Open the address directly, not as a search.
https://api.telegram.org/botYOUR_BOT_TOKEN/getUpdatesFind message → chat → id in the response. Copy that number for the intended chat, including any minus sign. Do not copy update_id or message_id. Close the private window afterwards.
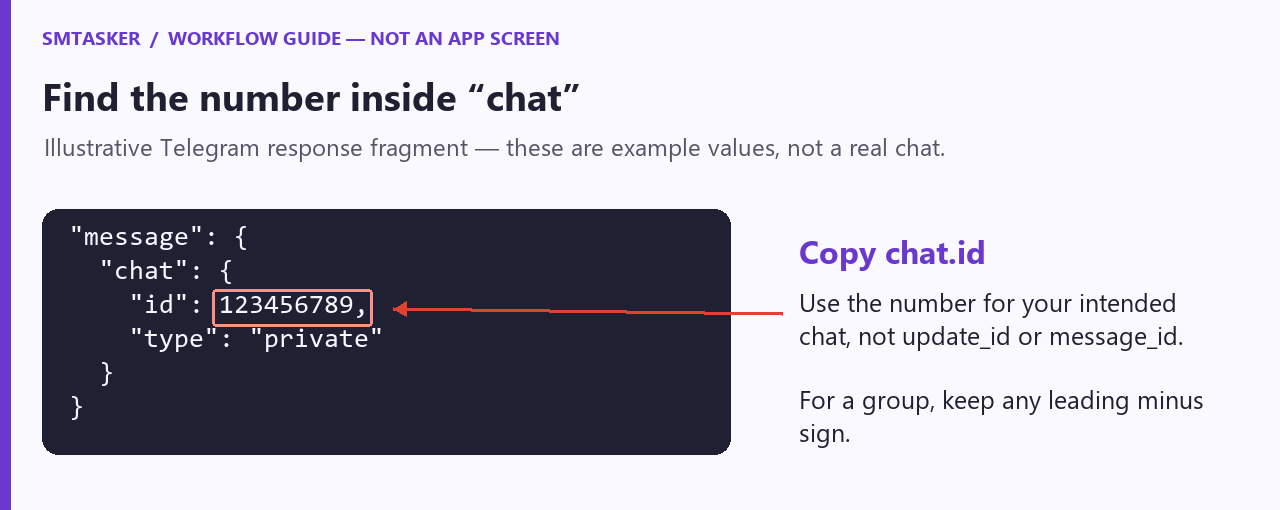
If result is empty, send another message to your bot and refresh. If Telegram reports a webhook conflict, use a fresh dedicated bot or get help; do not remove an existing integration. See the official getUpdates reference.
Step 4: Connect Telegram in SMTasker
Back in SMTasker: under Critical event notifications, use the Telegram card on the right.
- Paste the token from BotFather into Bot token.
- Paste your private chat or group number into Chat ID.
- Set Group events for to 0 for this first setup. This requests alerts without a grouping delay.
- Turn on the switch at the top of the Telegram card.
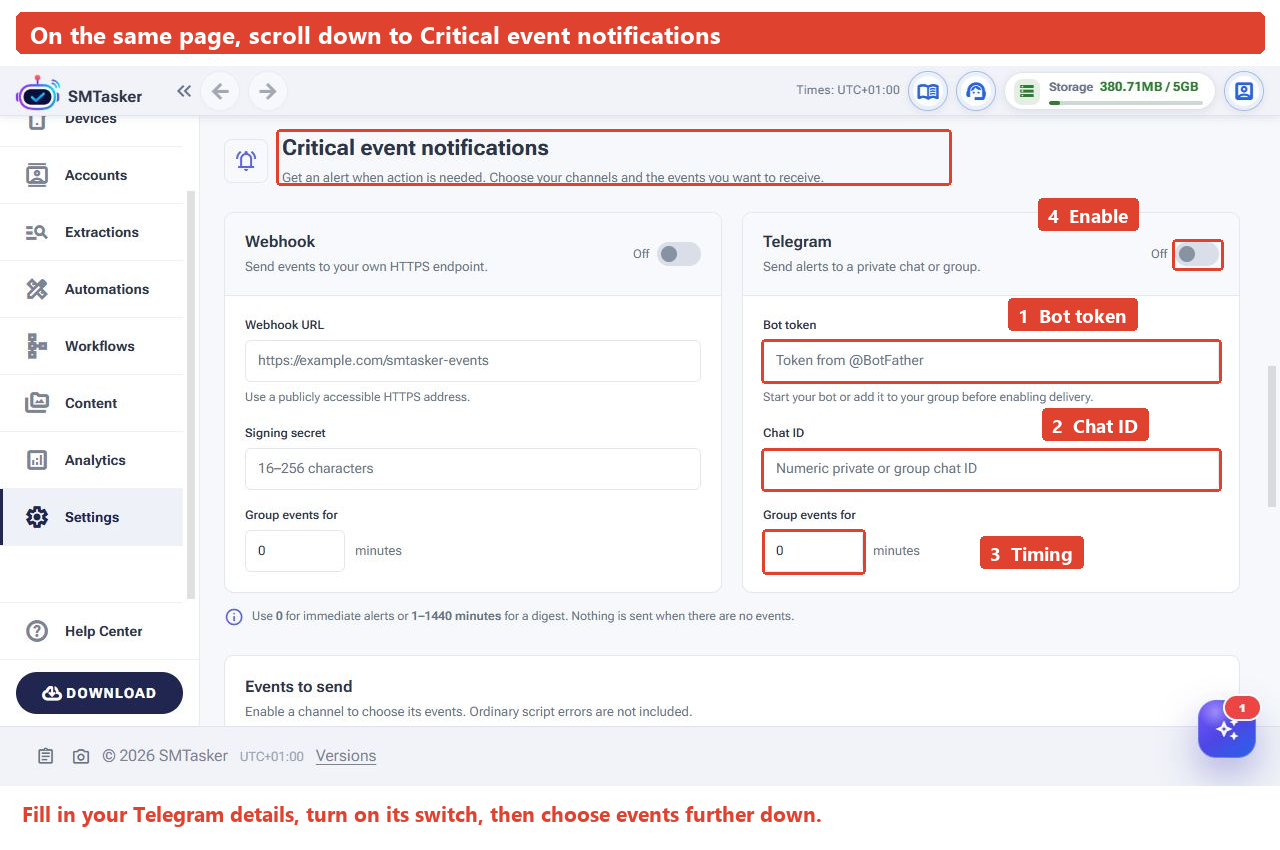
Prefer fewer messages? Set Group events for to a value from 1 to 1440 minutes instead. For example, 15 groups events into a digest—a summary—rather than requesting an immediate alert for each event. No events means no message. Telegram and Webhook can have different grouping values.
Step 5: Choose your events and save
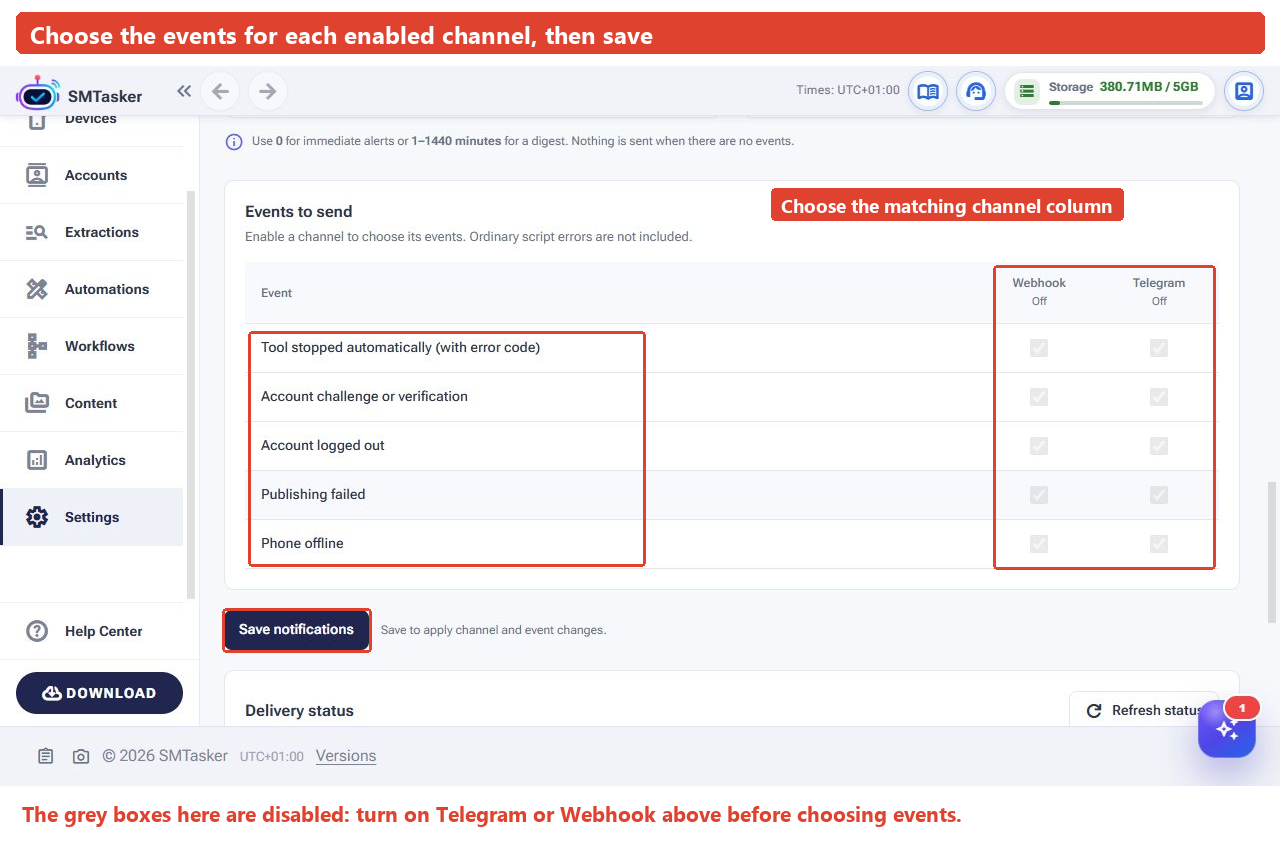
Scroll a little further to Events to send. Once Telegram is enabled, choose the boxes in the Telegram column. For a first setup, you can select all five so you receive each type of critical alert.
Click Save notifications below the table. This applies both your channel settings and event choices. If SMTasker shows a validation error, correct the indicated field and save again.
Step 6: Check that alerts reach you
After saving, leave this page and return to confirm your channel and event choices remain set. Saving the form alone does not confirm that Telegram can deliver a message.
When a selected event occurs, check your bot’s chat or the chosen group. In SMTasker, scroll to Delivery status and click Refresh status.
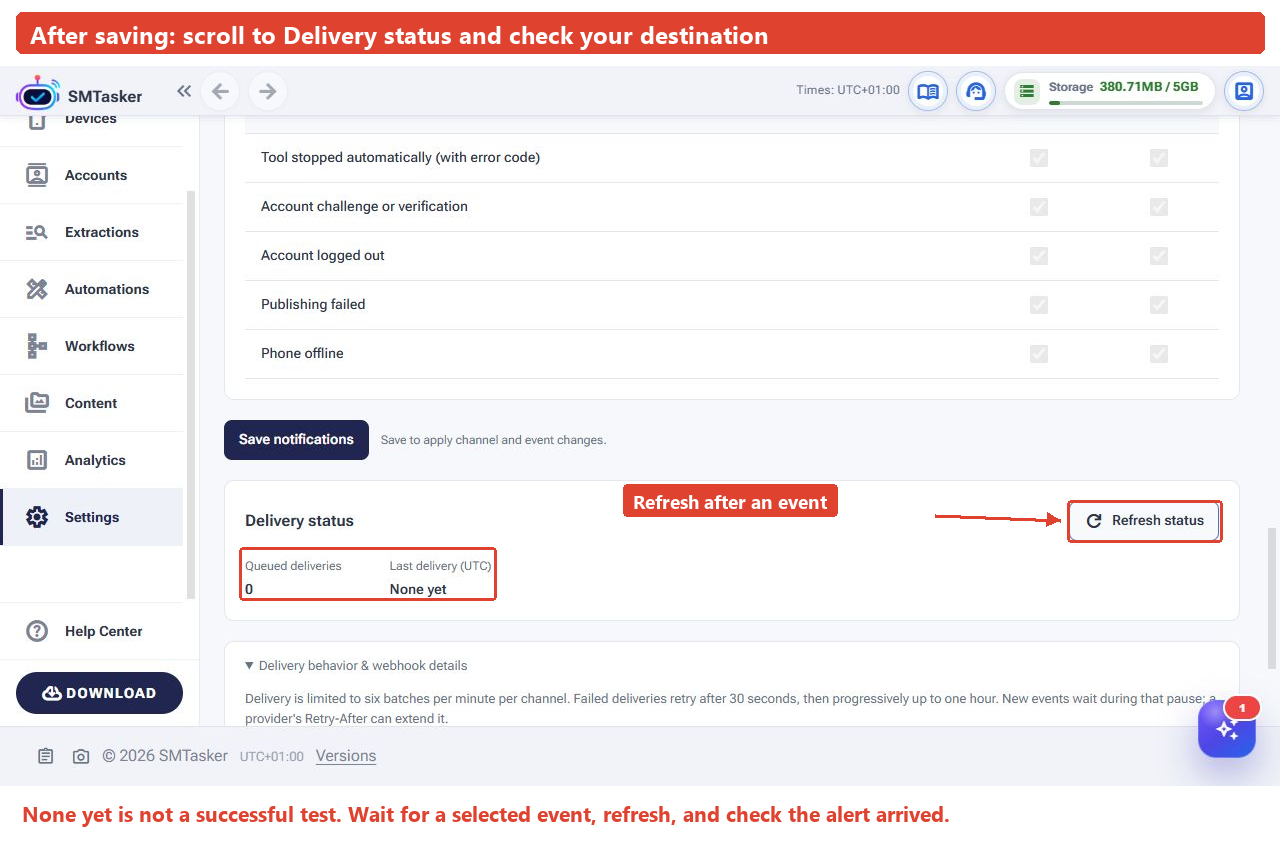
- Queued deliveries: items waiting to be delivered. Grouping or a retry delay can make them wait.
- Last delivery (UTC): delivery timing displayed in UTC. Compare it with the event you are checking.
- Nothing has arrived yet? First check whether a selected event has occurred since setup. There is no message when there are no events.
The current panel does not include a test-message button. Do not disconnect a working phone or log out a live account just to force an alert. Wait for a qualifying event, or ask support to help you check the setup safely.
Your first successful result: an alert for a selected event appears in the intended chat. Open SMTasker, inspect the affected phone, account or tool, and address the cause.
Optional: Send alerts to another system with a webhook
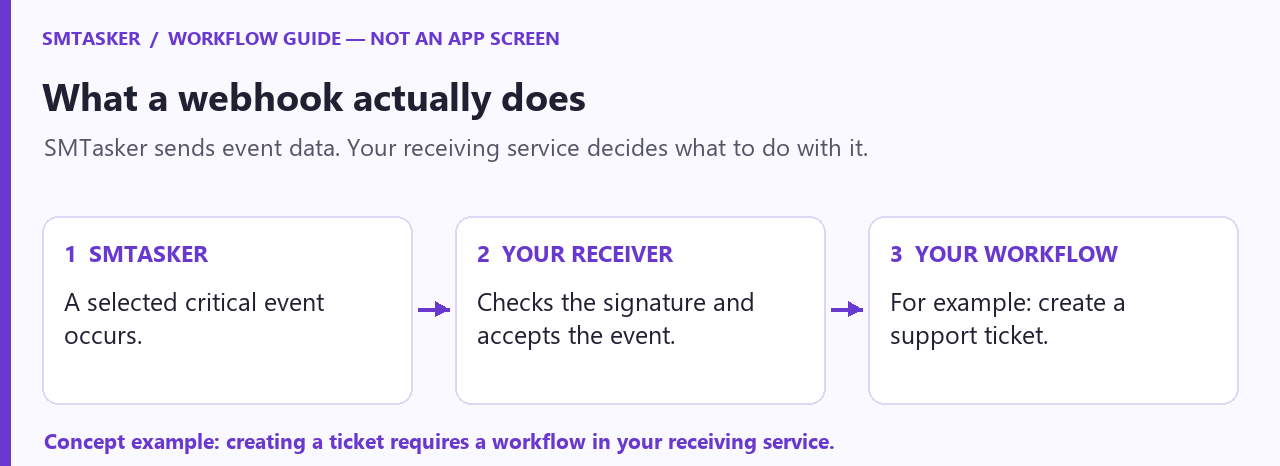
A webhook is a way for SMTasker to send event details to another service automatically. For example, your team could build a workflow that receives a publishing-failure event and creates a support ticket. SMTasker sends the event; the receiving service performs that follow-up.
First, get the receiving details
Ask the person setting up your receiving service for:
- A publicly accessible HTTPS webhook URL that accepts SMTasker’s event data.
- A signing secret, matching the receiver’s configuration. This is a private shared value used to check that an alert really came from SMTasker. The interface specifies 16–256 characters.
A website homepage, local computer address or the MCP server URL from the top of the page is not a substitute for a webhook receiver. Use a trusted service: alerts can contain details about your phones, accounts and tools.
Then, connect it in SMTasker
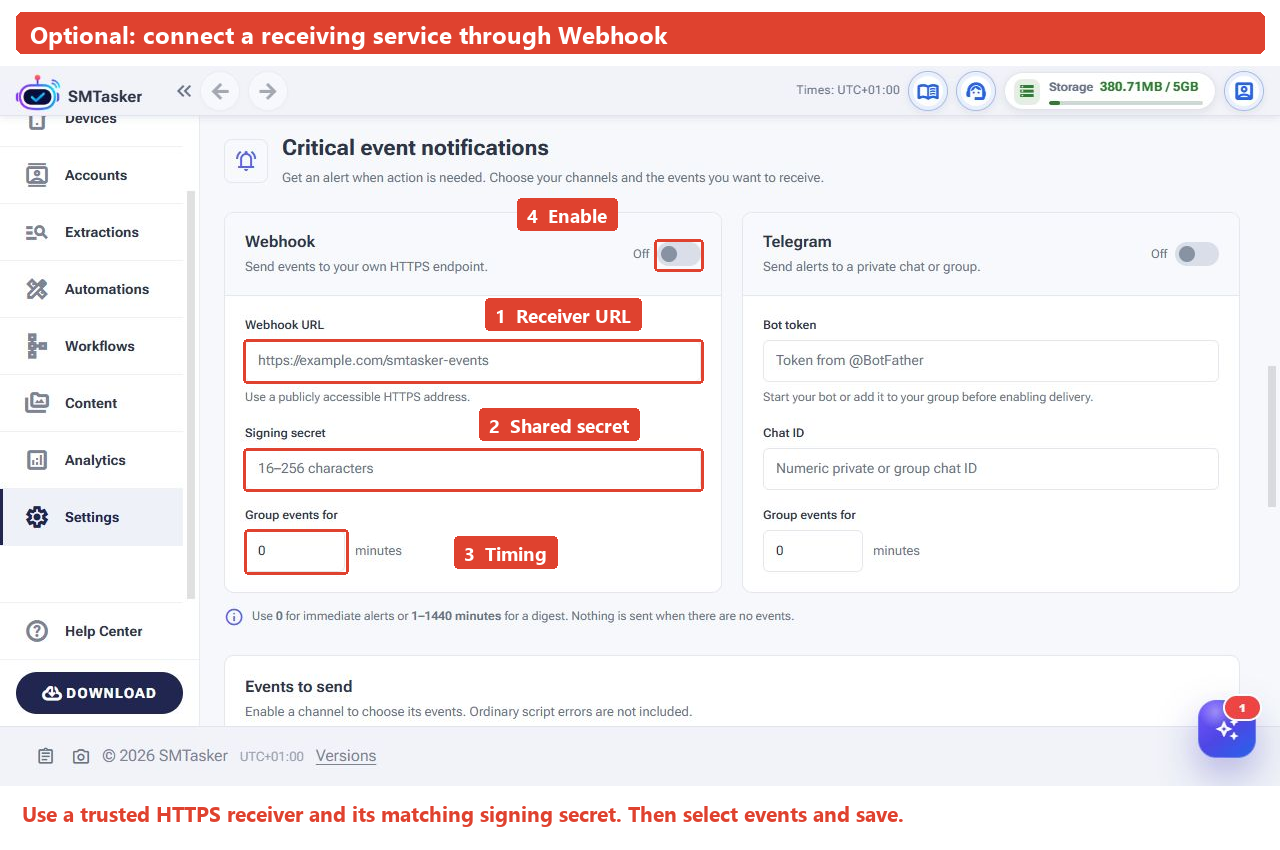
- Go to Settings → API & MCP Access → Critical event notifications.
- In the Webhook card, paste the receiver’s address into Webhook URL.
- Enter the matching Signing secret. Do not use your SMTasker login password or Telegram token.
- Set Group events for to 0 for no grouping delay, or choose a summary interval.
- Turn on Webhook. Under Events to send, choose events in the Webhook column, then click Save notifications.
After a selected event, use Refresh status and ask your receiver’s owner to confirm the event arrived and the intended workflow ran. If you enabled both channels, check each destination separately.
Technical handoff: details for the person building your receiver
SMTasker sends an HTTP POST with JSON containing version: 1 and an events array. Events contain a stable id, kind, occurredUtc, code, message, and relevant phone, account or tool IDs.
- Verify
X-SMTasker-Signature:sha256=followed by the lowercase hexadecimal HMAC-SHA256 oftimestamp + "." + rawBody, using the signing secret. - Read the Unix-seconds timestamp from
X-SMTasker-Timestamp. Reject stale timestamps and verify against the original raw request body. - Deduplicate by event ID: retries after an uncertain response may deliver an event again.
- Return HTTP
2xxto acknowledge receipt. Redirects are not followed.
The same details are available in SMTasker under Delivery behavior & webhook details.
If an alert does not arrive
Check in this order. Start with the shared setup before changing tokens or destinations.
| What you see | What to check next |
|---|---|
| Event boxes are grey | Enable the intended channel above the table. Choose its events, then save. |
| “None yet” and no alert | Confirm a selected critical event occurred after setup. Ordinary script errors do not qualify. |
| An alert seems delayed | Check the grouping interval and queued deliveries. Failed deliveries retry after 30 seconds, with progressively longer waits up to one hour; a provider’s requested delay can extend that. |
| Telegram still receives nothing | Check the token, the intended Chat ID and that you started the bot. For a group, confirm the bot is a member and can send messages. |
| The webhook receives nothing or rejects it | Ask the receiver’s owner to check HTTPS reachability, the URL, signature verification and its response. It must acknowledge with HTTP 2xx, without a redirect. |
Delivery is limited to six batches per minute per channel, so “immediate” does not mean guaranteed arrival within a fixed number of seconds. During a retry pause, new events wait too.
If you need help, send SMTasker support the channel, event type, approximate time and what Delivery status shows. Leave out bot tokens and signing secrets.
Change or stop your notifications
Return to the same section, adjust the events or grouping interval, and click Save notifications. To stop a channel, turn off its switch and save.
Once your alerts are reaching the right place, you can spend less time checking for problems and focus on the ones that need your attention.