Workflows: Find Users and Run a Campaign in One Place
Build your first SMTasker workflow: choose an audience source, assign accounts, set actions and limits, then review your campaign and check its results.
You know which audience you want to reach. Now you need to find those people, choose which of your accounts should engage with them, and decide what those accounts should do. Workflows brings those choices together in one campaign.
In this walkthrough, you will set up a simple workflow that finds followers of a relevant Instagram account and uses Follow to engage with that audience. You will see how to save your setup, review it before launching, and check its activity afterwards.
What can you use Workflows for?
- Build a focused audience campaign: find people through a relevant account, hashtag or comments, then choose an action such as Follow.
- Coordinate several actions: a Custom workflow supports up to three action types in the same campaign.
- Share a campaign across accounts: decide whether to divide the people found across your accounts or send the full audience to each one.
- Organize direct outreach: the Outreach workflow type offers a narrower, Contact-only path.
The main idea is simple: where to find people → which account finds them → which accounts take action.
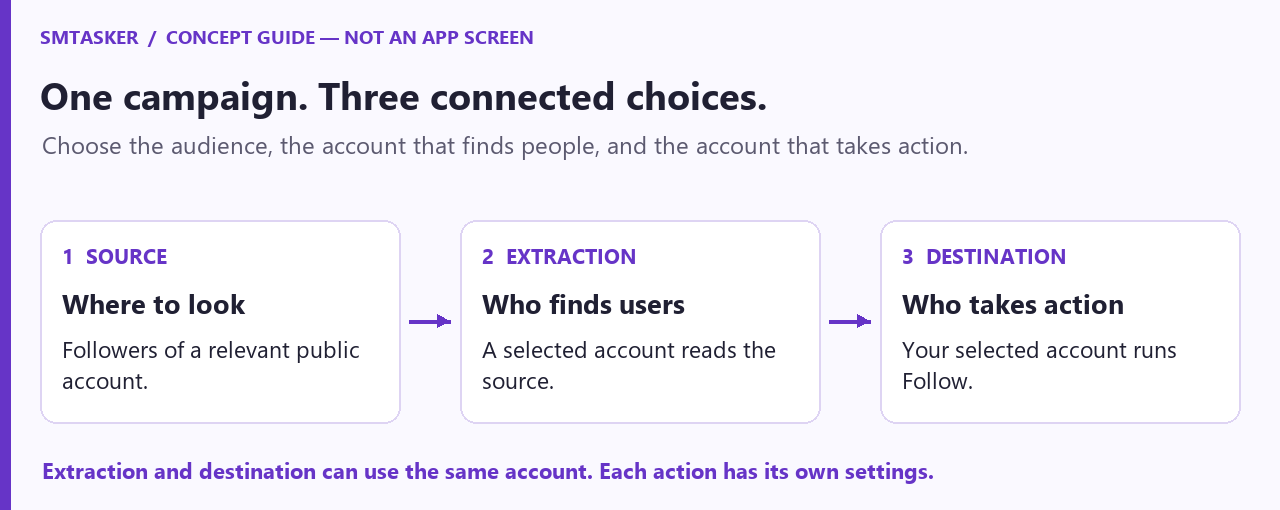
Before you start
Have an Instagram account connected to SMTasker and showing Valid, with its phone and local client available when you are ready to run the campaign. Also choose a source that fits the audience you want to reach.
Our example uses one account for both finding users and performing Follow. That keeps the first setup easy to understand. The screenshots show the current Instagram workflow wizard; do not assume the same choices are available for every social network.
Step 1: Create a workflow
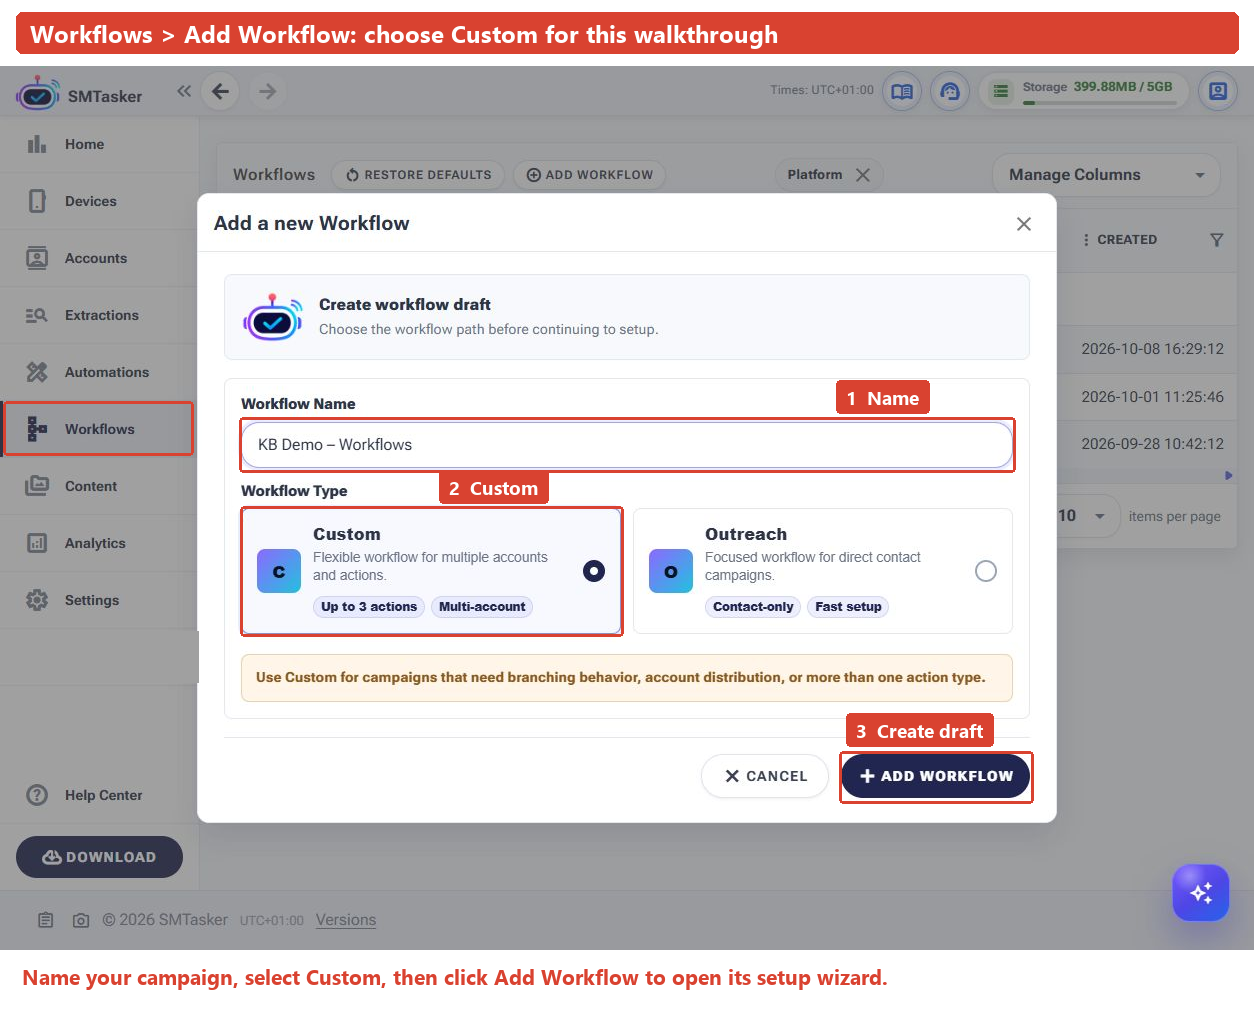
- In SMTasker, click Workflows in the left sidebar.
- Click Add Workflow.
- Enter a recognizable name, such as Fitness Audience – Follow. Our demonstration is named KB Demo – Workflows.
- Select Custom, then click Add Workflow in the dialog.
Custom or Outreach? Choose Custom for this lesson because we are setting up Follow. Choose Outreach when your campaign is specifically about direct contact; its creation card is labelled Contact-only. The steps below follow the Custom path.
Step 2: Set your goal
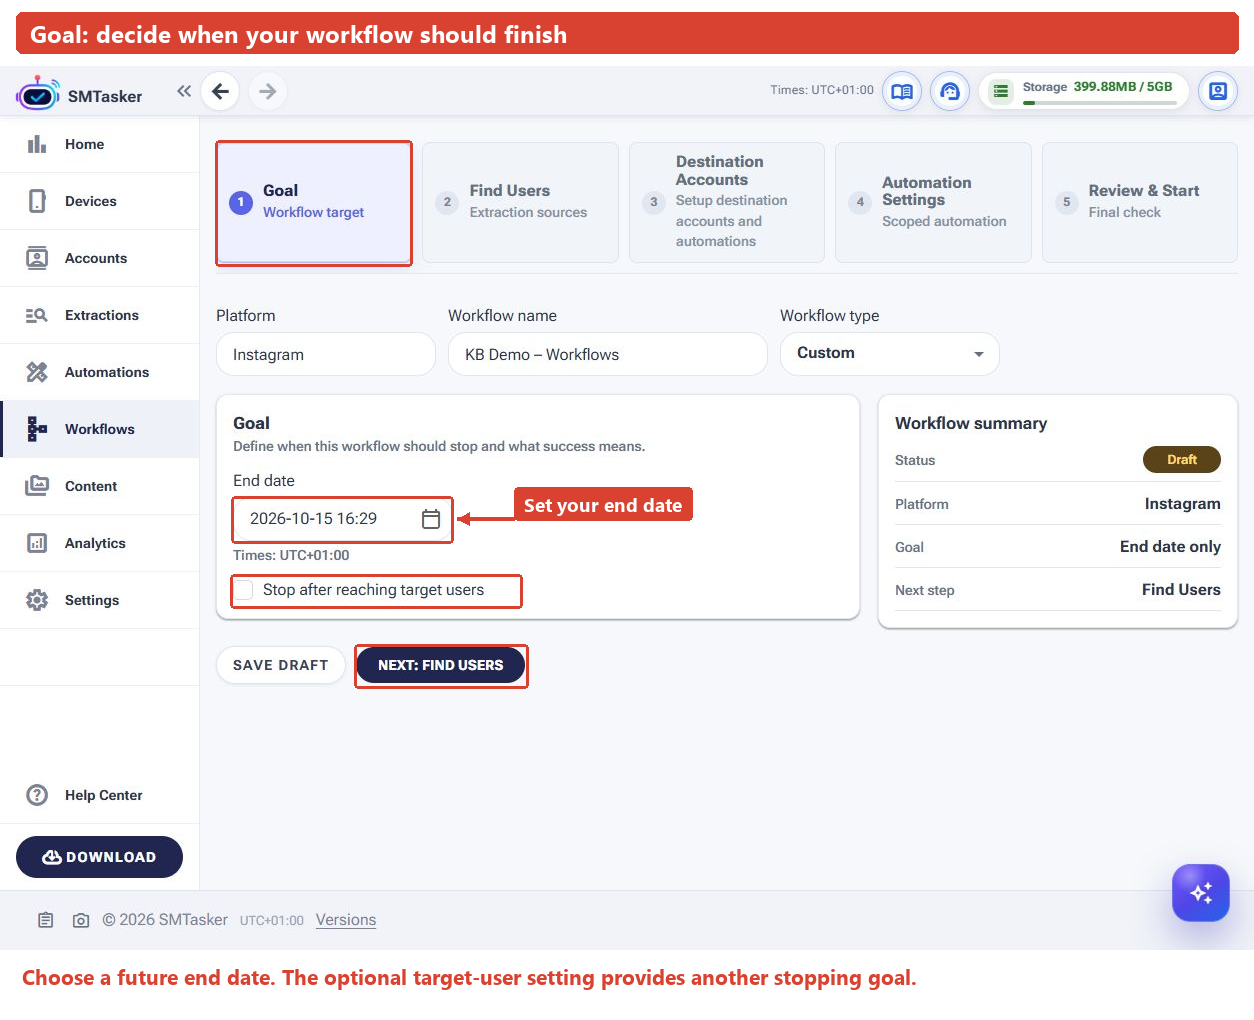
The first wizard step is Goal. Set the End date to when you want the campaign to finish. Check the time zone shown beside the date so the timing matches your intention.
You can also enable Stop after reaching target users if you want a user-count stopping goal. For this first example, leave it off and use an end date only. Choose your own future date rather than copying the old date in the screenshot.
Click Next: Find Users.
Step 3: Choose where to find users
In Find Users → Extraction Sources, choose where SMTasker should look for your audience. The current options include:
- Followers of target accounts.
- People commenting on specific post URLs.
- People commenting on the last X posts of specified accounts.
- Users from a hashtag search.
- Specific users you provide.
For our example:
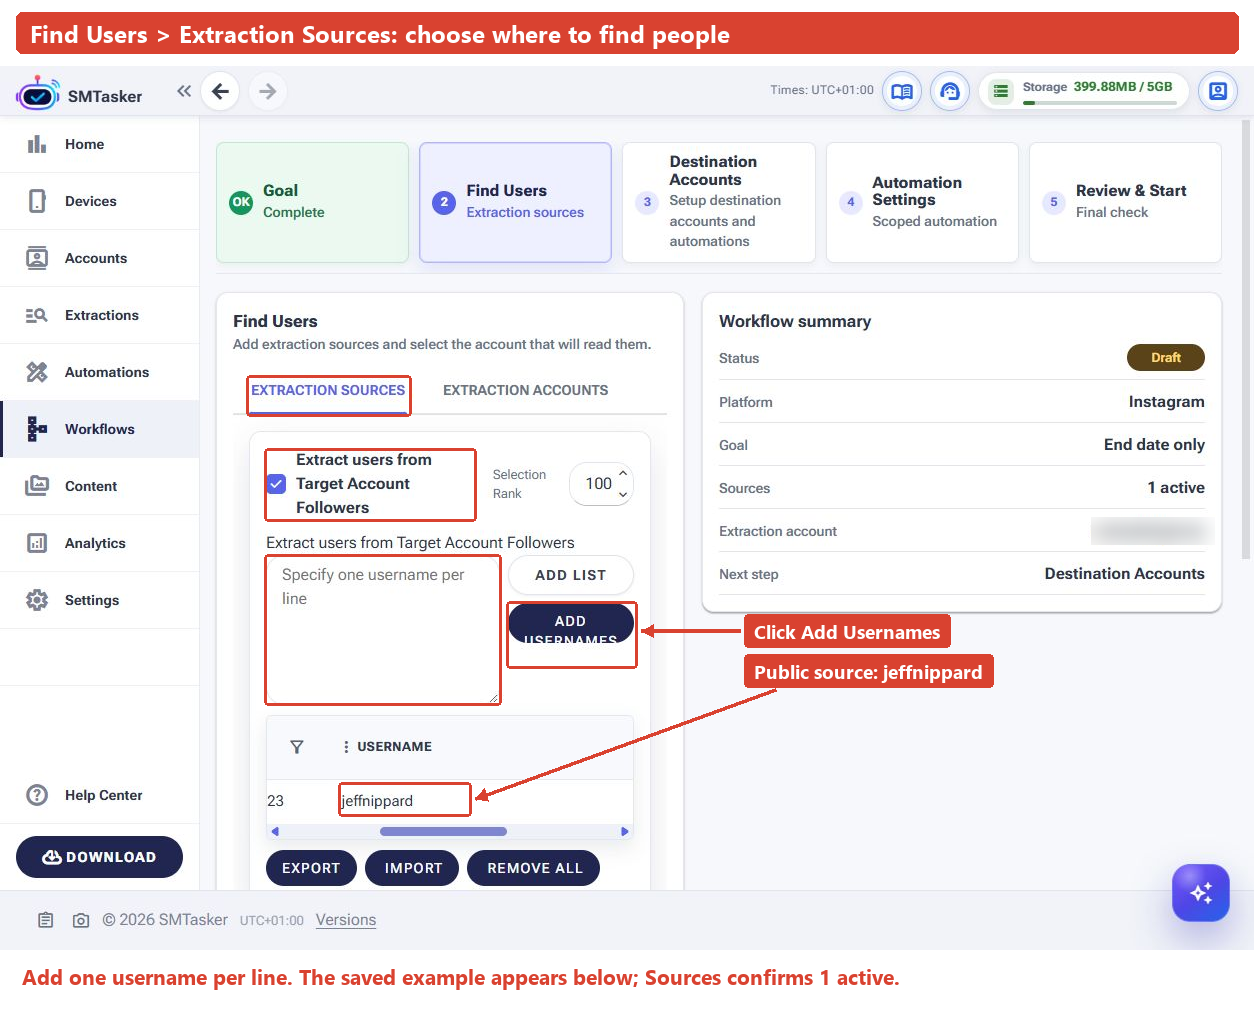
- Enable Extract users from Target Account Followers.
- Turn off source types you are not using. A checked source with an empty list is not a complete audience setup.
- Enter the source username, one per line. Our fitness-themed example uses
jeffnippard; choose a source that fits your own content. - Click Add Usernames.
- Check that the source appears in the table and the summary shows an active source.
Leave Selection Rank at its default for this one-source example. You do not need to adjust it to complete this walkthrough.
Choose the account that will read the source
Stay in Find Users and open Extraction Accounts. Select the account you want SMTasker to use to find those users. For this example, select one valid account you recognize.
The page also offers Use any valid account for extraction. Leave that unchecked when you want to choose the account yourself. If another account is already selected, check your intended account and clear any others you do not want included.
Click Next: Destination Accounts.
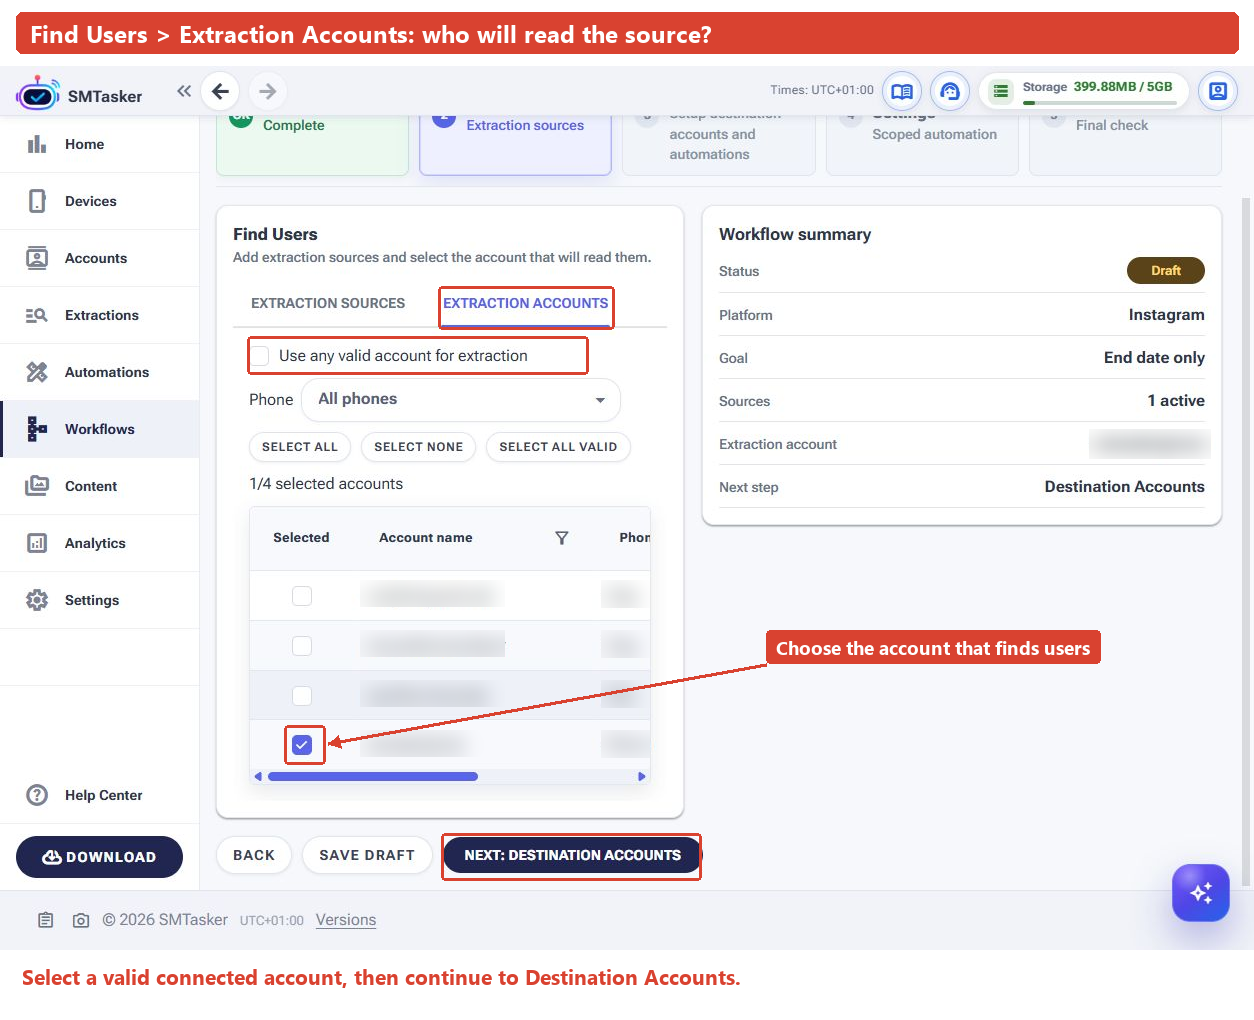
Step 4: Choose the accounts and actions
In Destination Accounts, select the account that should perform Follow. Use the same account as the previous step for this example, and check that its status is Valid.
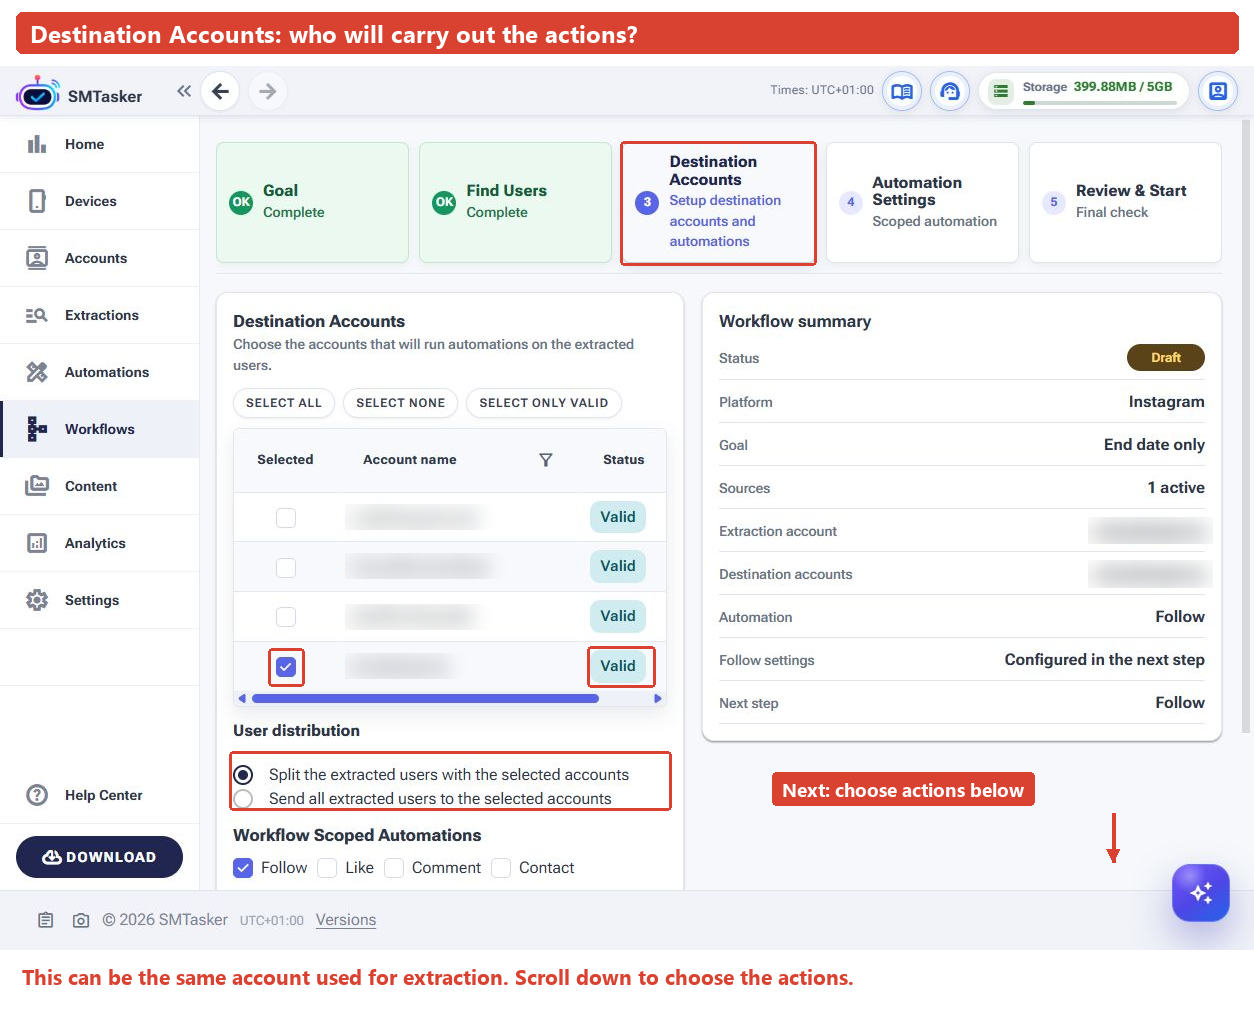
Decide how to distribute users
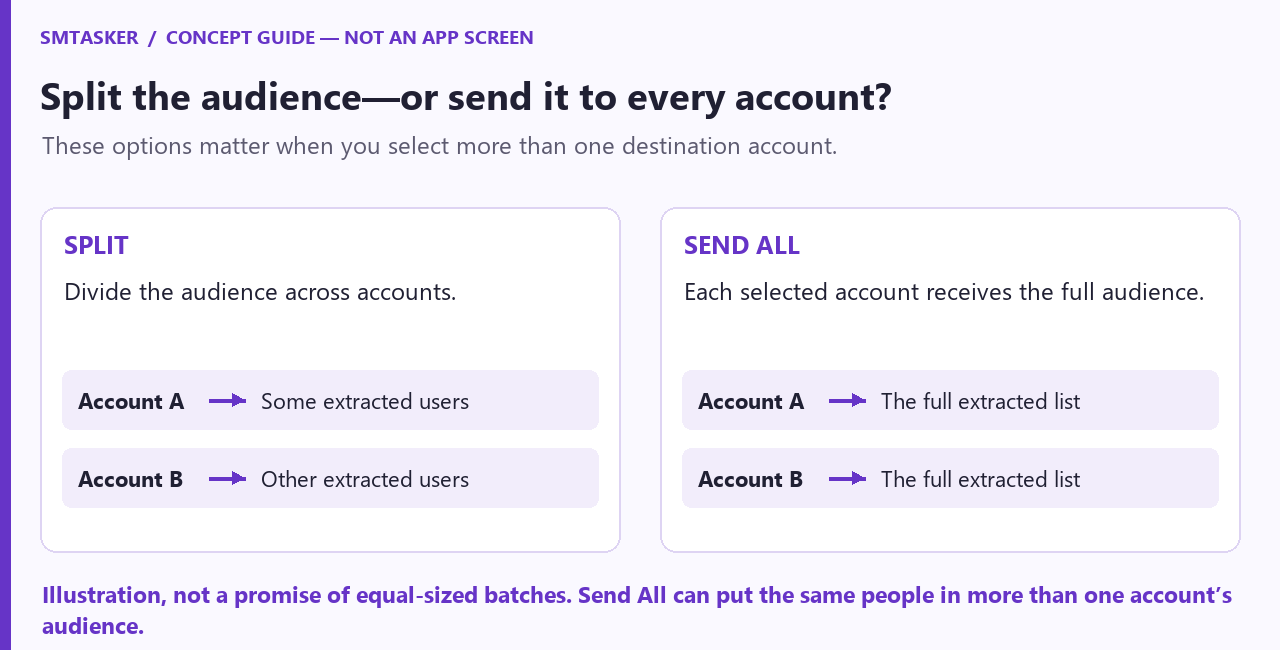
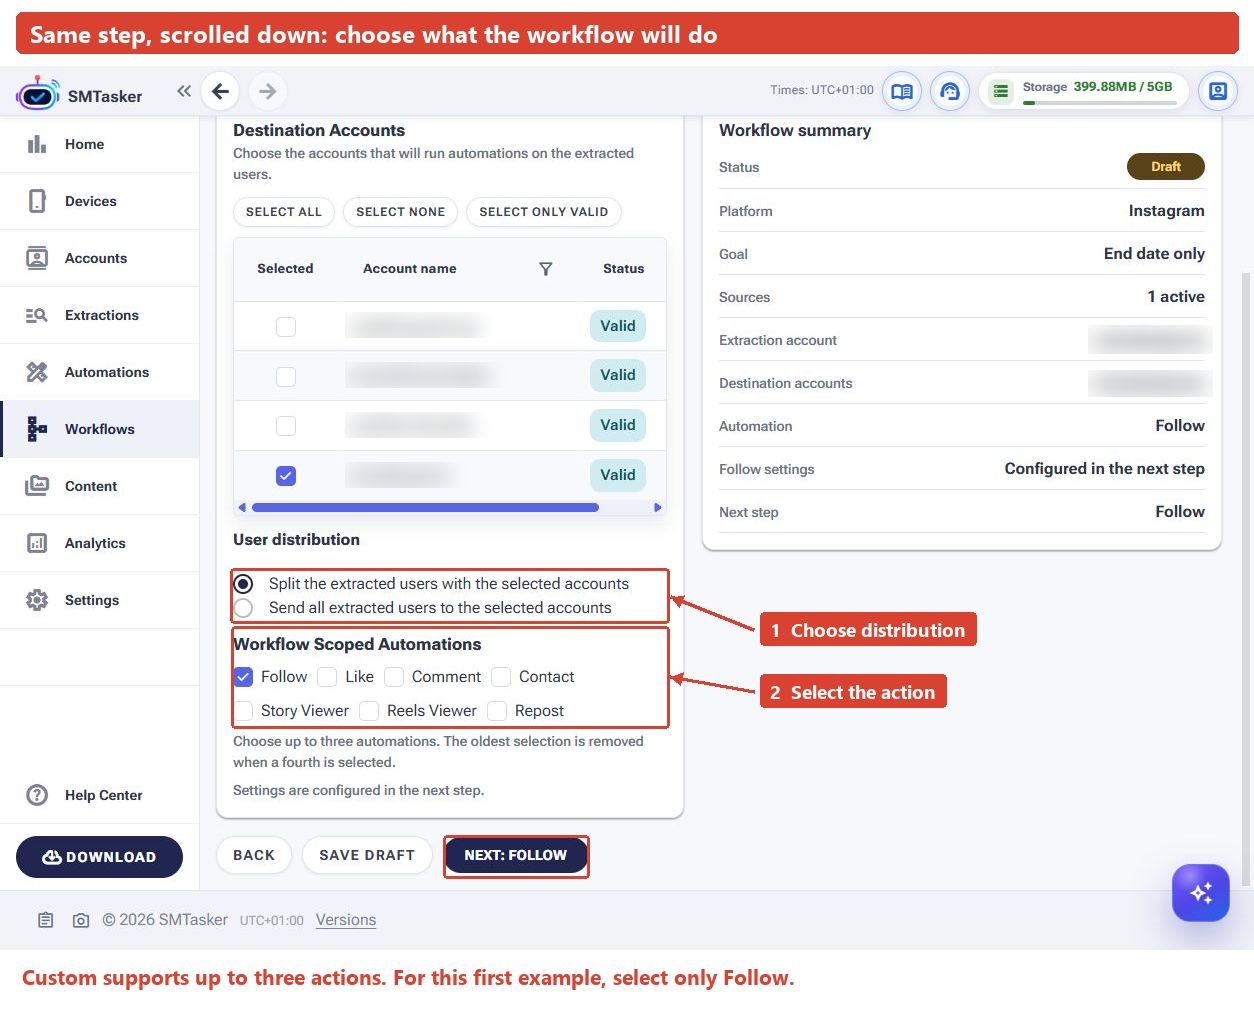
Scroll down to User distribution. With several destination accounts, you have two choices:
- Split the extracted users with the selected accounts: divide the audience across those accounts.
- Send all extracted users to the selected accounts: give the full audience to every selected account. The same people can therefore be included for more than one account.
For our one-account example, keep Split selected.
Choose what those accounts should do
Under Workflow Scoped Automations, select Follow, then click Next: Follow. “Scoped” simply means you are configuring the action inside this workflow.
Custom workflows offer Follow, Like, Comment, Contact, Story Viewer, Reels Viewer and Repost. You can select up to three. If you select a fourth, SMTasker removes the oldest selection, so check the final set before continuing.
Step 5: Set limits and working times
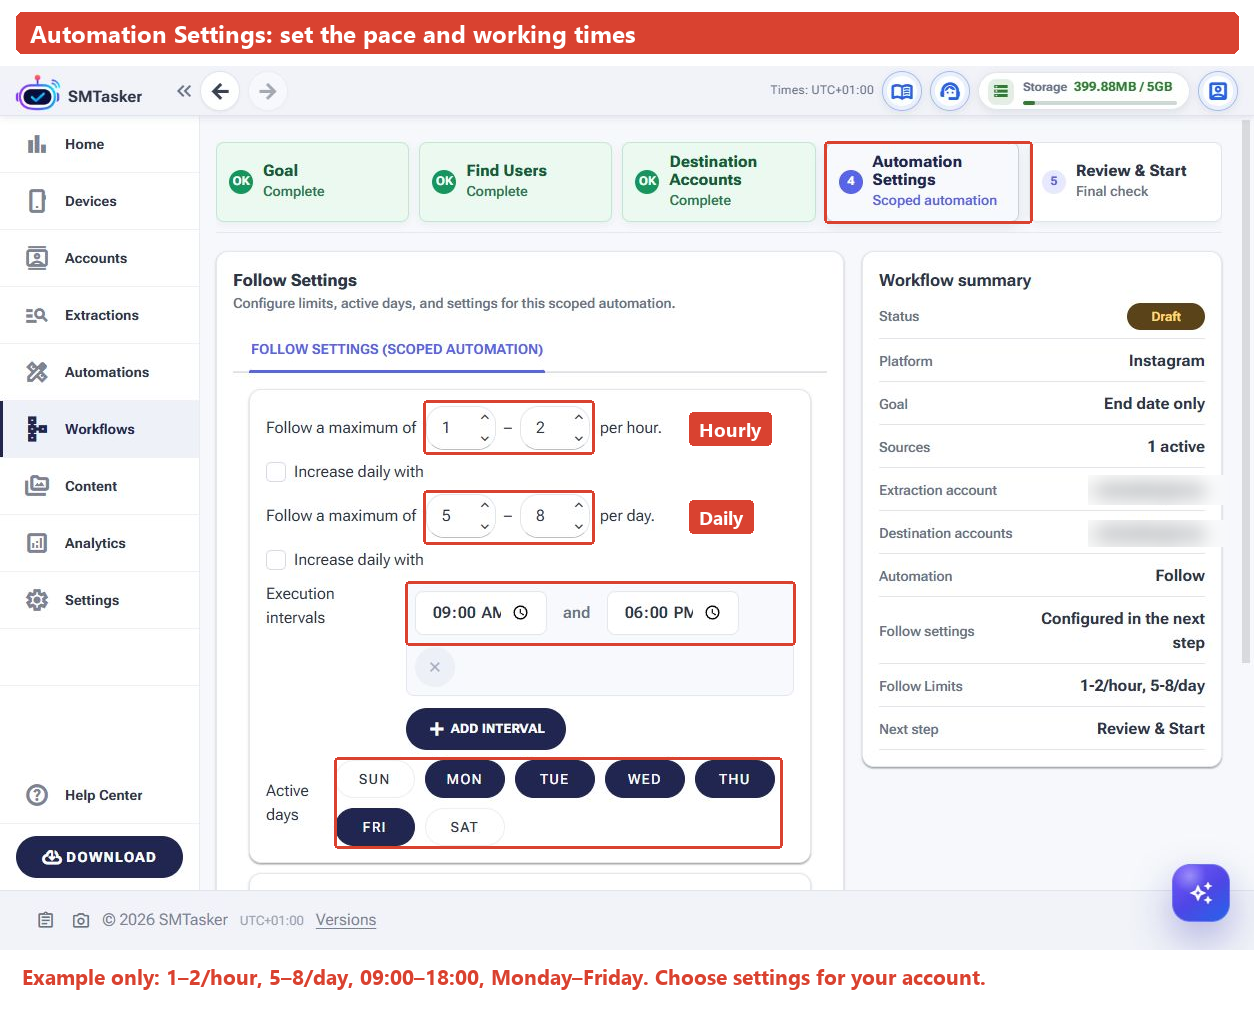
The Automation Settings step opens the settings for the action you selected. In our case, it shows Follow Settings (Scoped Automation).
Review the hourly and daily limits, Execution intervals and Active days. Our saved demonstration uses:
- Hourly: 1–2 follows.
- Daily: 5–8 follows, with automatic daily increases off.
- Working times: 09:00–18:00, Monday–Friday.
These are example settings, not a universal recommendation or a guarantee against platform restrictions. Choose a pace appropriate for your account and review its other running campaigns as well.
Scroll down to review the remaining Follow options, including profile-data filtering, skipping users who already follow your account, and muting after follow. Enable only the options you intend to use. Then continue to Review & Start.
Step 6: Review, save or start
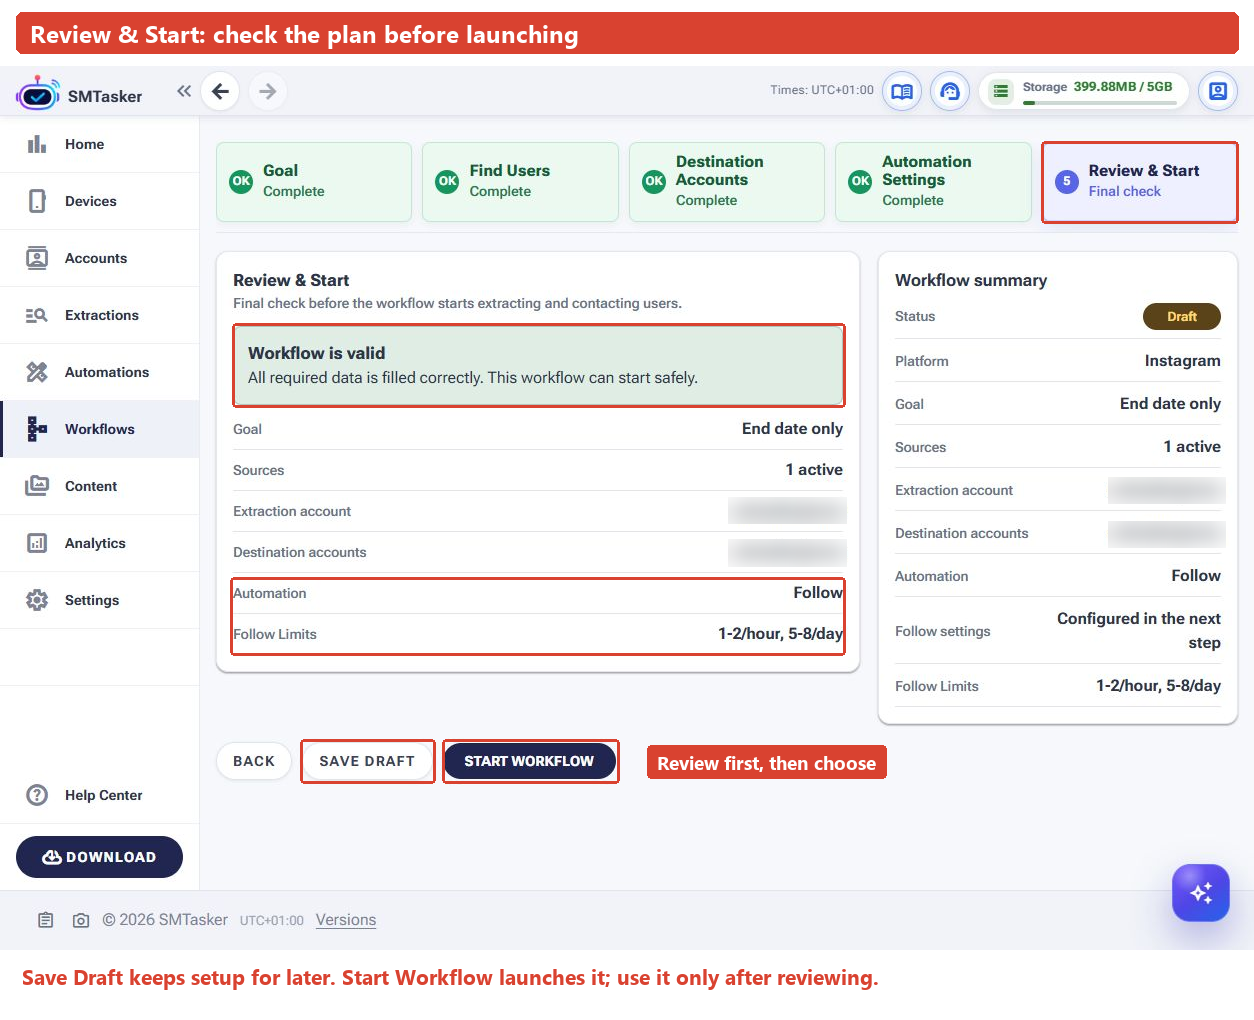
Check the review before launching: the goal, active sources, extraction account, destination accounts, selected action and its limits should all match your plan. If something is wrong, use Back or the wizard steps to correct it.
When the required setup is complete, the review displays Workflow is valid. This is a setup check—not a promise of growth or protection from social-platform restrictions.
- Save Draft: keep the setup so you can return to it later.
- Start Workflow: launch the campaign. Use this only when you are ready for SMTasker to find users and perform the selected actions.
Review your action choices carefully. The post-creation screen says that scoped automation selections are locked after creation, although destination accounts can still be changed.
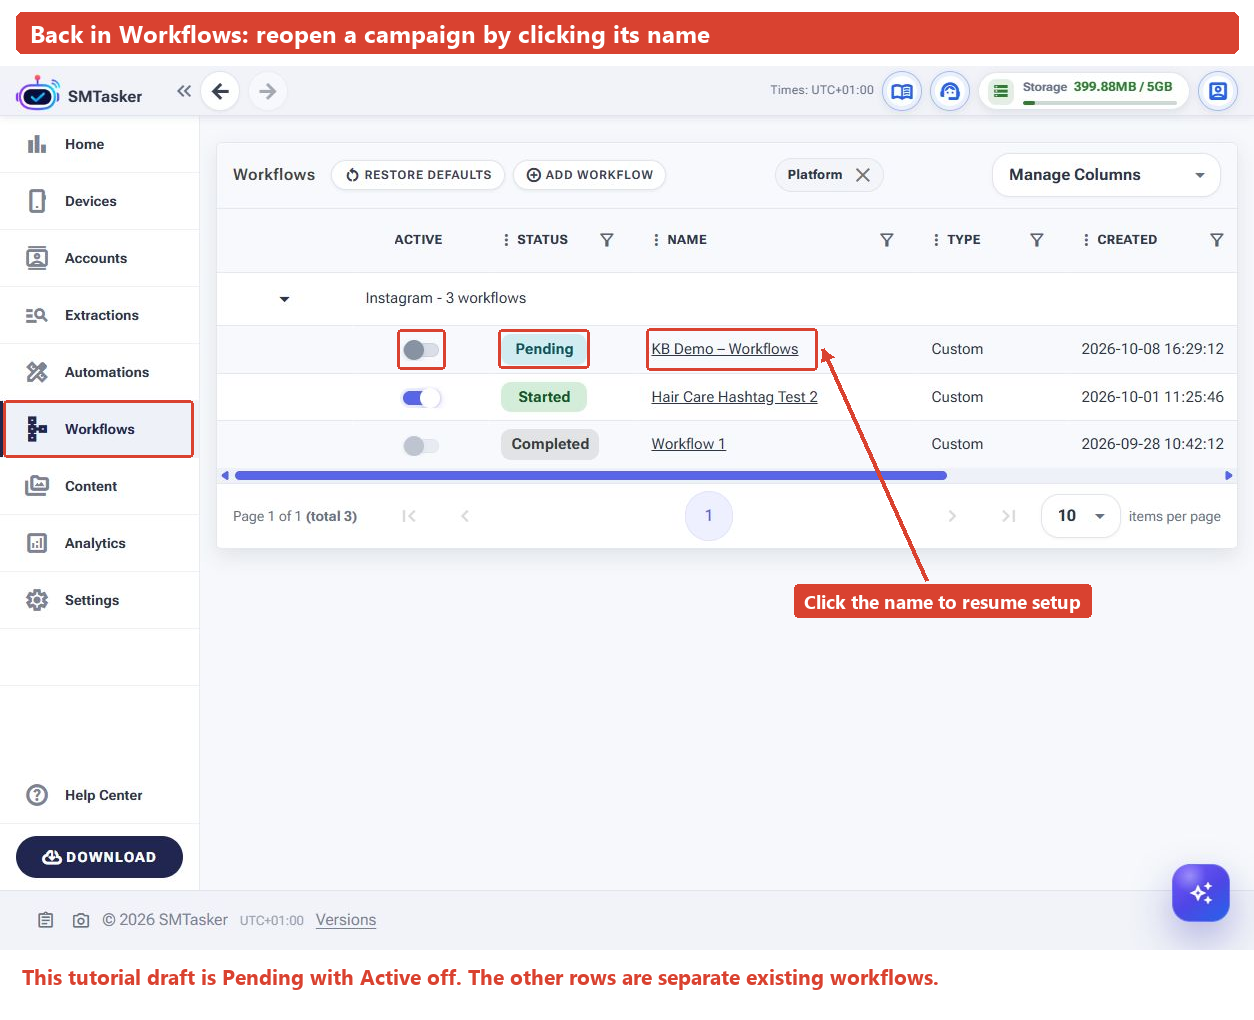
To resume later, open Workflows and click your workflow’s name. In our saved example, the list shows Pending with the Active switch off, while the wizard calls it a Draft.
Check what your workflow is doing
After launching your own workflow, open it from the list and use these tabs:
- Results: inspect the extracted-user count and recorded rows, including the account, source and username.
- Statistics: see the workflow’s action-count chart over time.
- Activity Log: inspect the available activity entries when you need to understand what happened.
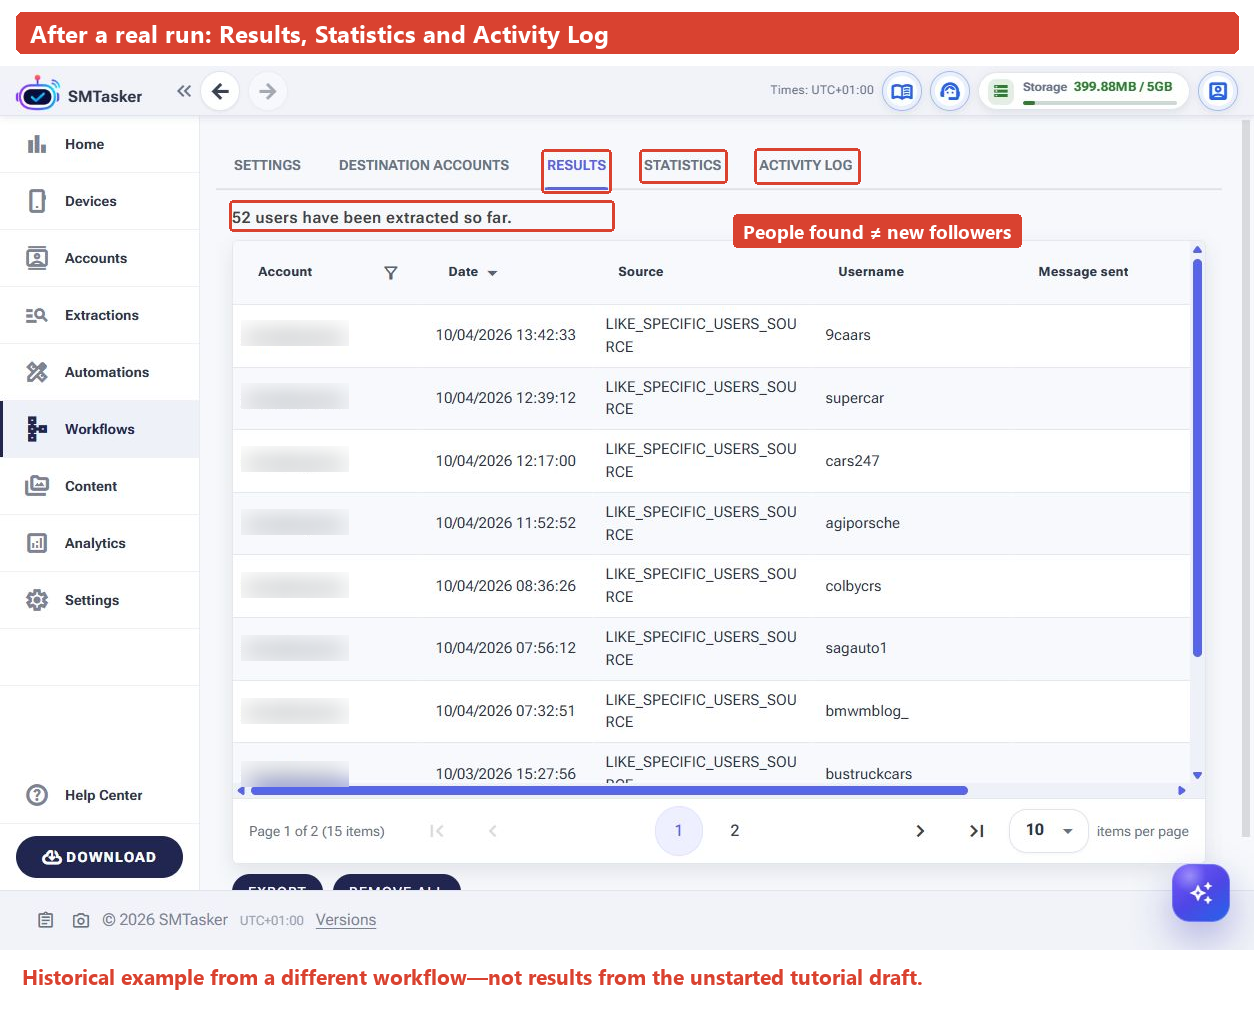
People found and actions recorded are not the same as new followers, replies or sales. Use these screens to understand execution, then assess whether the campaign is attracting the audience you want.
If something does not look right
| What you see | What to check |
|---|---|
| No active sources | Enable the intended source, enter its usernames or URLs, and click the matching Add button. Typing alone does not add the list. |
| A warning about the extraction account | Return to Find Users → Extraction Accounts and select the account that should read your sources. Check that it is valid. |
| An action disappeared from your selection | Custom allows up to three. Selecting a fourth removes the oldest selection. |
| The workflow is saved but not running | Check whether it is still a draft/Pending with Active off. Saving is not the same as starting. |
| A started workflow is not doing what you expect | Check phone/client connectivity, account status, the end date, active days, execution intervals, limits, and the Activity Log before increasing anything. |
| The workflow shows Completed | Review its end date and stopping goal. Check the recorded results rather than assuming the campaign is still active. |
If you still need help, use Contact Support in SMTasker. Include the workflow name, the step or tab you are on, and the exact message you see.
Build on your first workflow
Once you understand the first campaign, adapt it to another audience source, distribute work across more accounts, or build a Custom campaign with another action. For direct-contact campaigns, explore the Outreach path.
Keep one clear goal per campaign. Start with a setup you can explain, review what it does, and add complexity only when it serves that goal.