What Can AI Do for You?
Your AI assistant can do more than suggest what to click. Connect it to SMTasker and it can check your workspace, explain what needs attention, and help set up supported automations.
What could you ask your assistant to do?
Imagine opening your AI app and asking, “Which of my automations needs attention first?” Instead of giving general advice, a connected assistant can look at the information SMTasker makes available and help you understand your own setup.
Here are three useful ways to work with it:
- Understand your workspace. Ask it to check devices or automations and explain the most important issue in plain English.
- Prepare a setup. Describe the account, audience and goal. Ask it to propose settings and sources for a supported automation.
- Make an agreed change. With permission, it can update supported settings for you. You then check the saved result in SMTasker.
These are examples of requests, not results from your account. The assistant must actually inspect your workspace before telling you what it found.
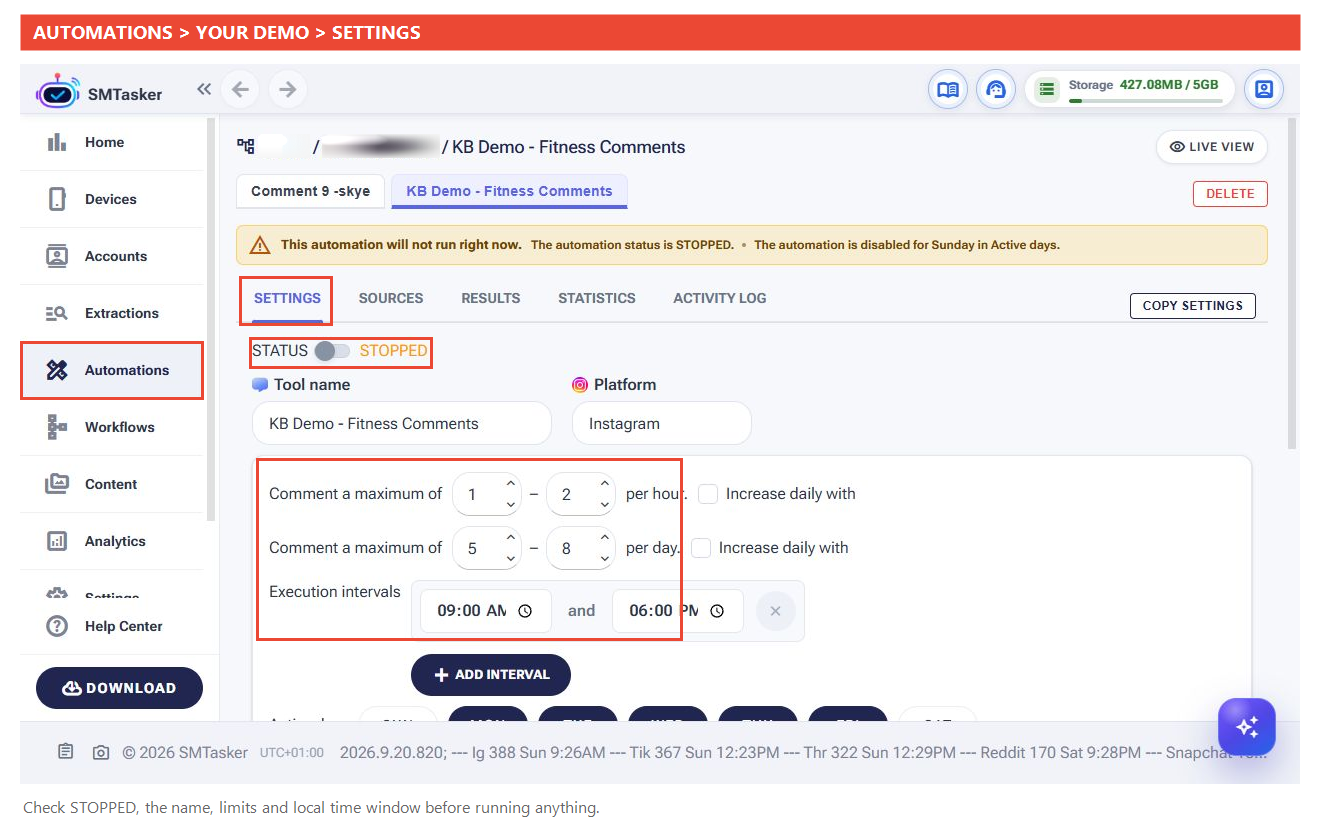
Here is a real outcome: in our walkthrough, we asked Skye to prepare a fitness Comment automation. It saved the name, limits, schedule, sources and AI comment instructions. We checked those settings in SMTasker and left the automation stopped.
What is MCP, in simple terms?
MCP is the connection between your AI app and SMTasker. Without that connection, the assistant can discuss SMTasker but does not automatically know what is happening in your account. With it, the assistant can request information and carry out supported actions.
You still talk to the assistant normally. You do not need to write code to ask a question or explain the setup you want.
The connection uses a SMTasker API key: a private access code that you create for the assistant. You choose whether that key allows it to read information only or also make changes.
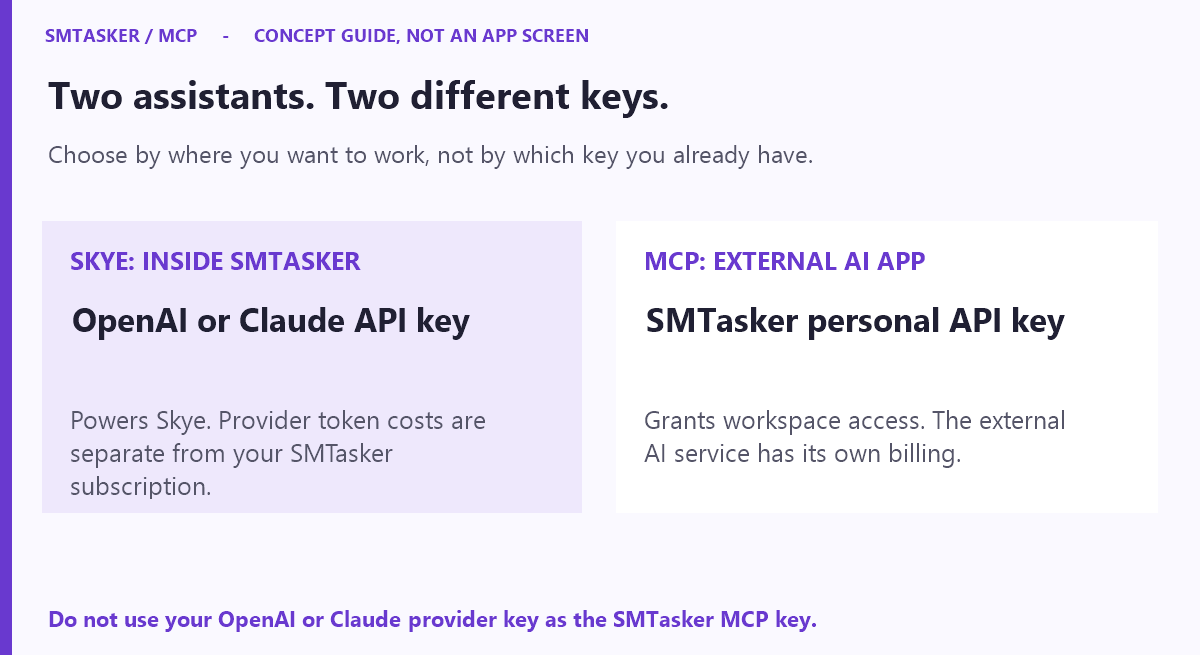
You do not need both routes. Skye is already inside SMTasker. MCP is how you connect an outside assistant such as Codex; it is not another chatbot you have to learn.
Should I use Skye or connect another AI app?
Choose Skye if you want to work inside SMTasker. It is the built-in assistant. Follow Getting Started with Skye if that is the experience you prefer.
Choose MCP if you want to work from an external AI app. For example, you can connect Codex and ask it to help with your SMTasker workspace from there.
Both routes can help manage supported SMTasker tools. They are not identical in every detail: availability and approval controls can differ. In Settings → API & MCP Access → Limits & availability, you can check the current MCP limitations.
Choose the assistant you want to work with, then use it to describe your goal. You can still open SMTasker and edit settings yourself; the assistant is an additional way to manage your existing workspace.
Start by looking. Allow changes when you are ready.
We recommend starting with Read data permission only. Your assistant can retrieve information, but that key does not allow it to change your setup. This gives you a simple way to try the connection.
Later, a key with Make changes enabled allows supported edits. Read-only access is a starting point—not the limit of what MCP can do.
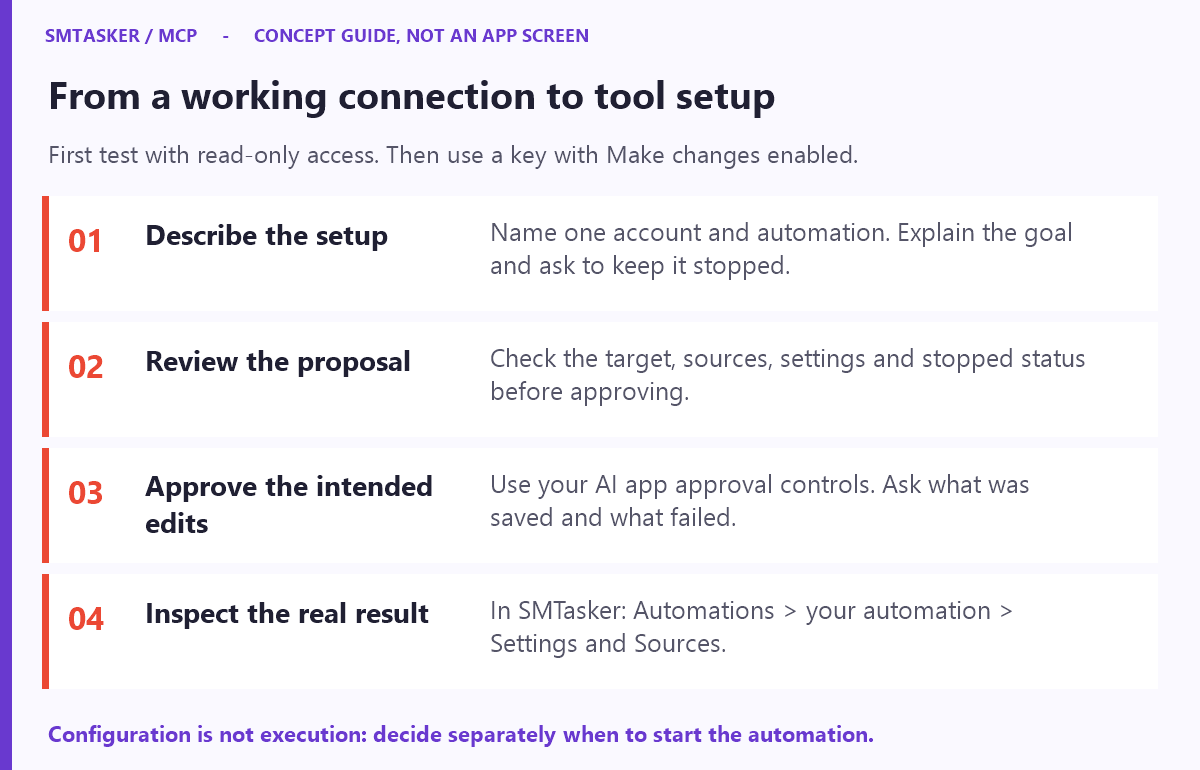
For example, you could ask the assistant to prepare a Comment automation while leaving it stopped. Review its proposal, approve the intended edits using your AI app’s controls, and check the automation in SMTasker before deciding to run it.
You control access. Use an AI app you trust, keep its key private, and revoke that key in SMTasker when you no longer need the connection. Skye’s approval setting does not control an external AI app.
Does AI replace my phone or run everything automatically?
No—the assistant helps manage the setup; SMTasker runs the automation. Preparing or saving settings is different from starting a tool. Device-based actions still need the appropriate connected device, a ready account and the required platform support.
For your first task, ask the assistant to leave the automation stopped. Check what it saved before deciding to run it. If a reply says it cannot access something or complete an action, ask what it could verify rather than assuming the task is done.
What does it cost?
Skye uses your OpenAI or Anthropic API key. The provider charges for that AI usage separately from your SMTasker subscription.
MCP lets you use your external AI app, whose own plan and usage charges apply. If your existing plan covers that usage, it may mean fewer additional AI costs. It is not automatically free, cheaper or unlimited—check the plan you use.
One more distinction: using Codex to set up AI-generated comments does not pay for generating those comments later. An automation that uses SMTasker’s AI features still needs its own provider configuration, and provider usage charges still apply.
Your path through this series
- What Can AI Do for You? You are here.
- Connect Codex to SMTasker. Create access, connect, and ask one read-only question.
- Check Your Workspace with AI. Understand what needs attention and what to check first.
- Let Your AI Make Changes. Allow supported edits and stay in control of the request.
- Set Up Your First Automation with AI. Turn an agreed plan into a setup you can inspect before running.
- Improve an Existing Automation with AI. Make and verify one focused change without rebuilding your setup.
- Fix AI Connection Problems. Find the next check for the symptom you see.
All seven parts are available now. The practical screenshots use real Skye demonstrations and saved SMTasker settings; they are not Codex screenshots. Find the lessons in Use AI to Manage SMTasker. Getting Started with Skye is an alternative route in the same category, not an extra requirement for Codex.
Already connected but stuck? See the quick connection checks or ask SMTasker support. Send the error, not your private key.