Skye: Your AI Manager Inside SMTasker
Skye is the AI manager inside SMTasker. You can ask it to explain your accounts, investigate a problem, or prepare an automation in everyday language—without first learning where every setting lives.
Start by asking Skye to explain your workspace without changing anything. Then follow a separate fitness-account example to review and apply a Comment automation setup while keeping it stopped. Finish with optional ideas for troubleshooting and reports.
Prefer to watch? Start with the video
Watch the full Skye tutorial on YouTube →
Before you start
- Sign in to the SMTasker app. Skye is inside the app, not on this Knowledge Base page.
- Connect your own OpenAI or Anthropic (Claude) API key. Follow the AI configuration guide if you have not connected a provider.
- For the hands-on example: have an account added to SMTasker and identify the Comment automation you want to work on. You can still follow the first three steps if you are not ready to configure an automation.
Step 1: Click the purple Skye button
Open the SMTasker Home screen. In the bottom-right corner, click the purple button with white sparkles highlighted below.
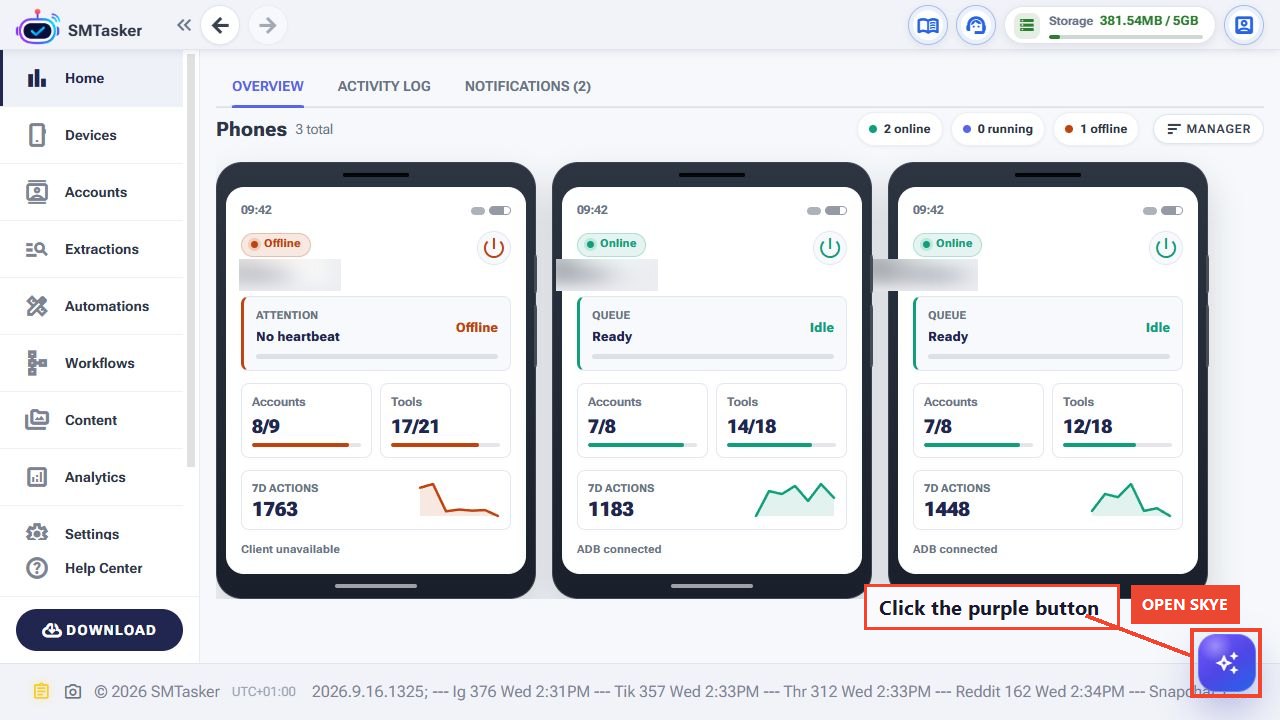
You should now see the Skye chat window. If a previous conversation is open, click New chat on the left. Keep related questions in one chat; start a new one when you move to a different task.
Step 2: Find the message box and check permissions
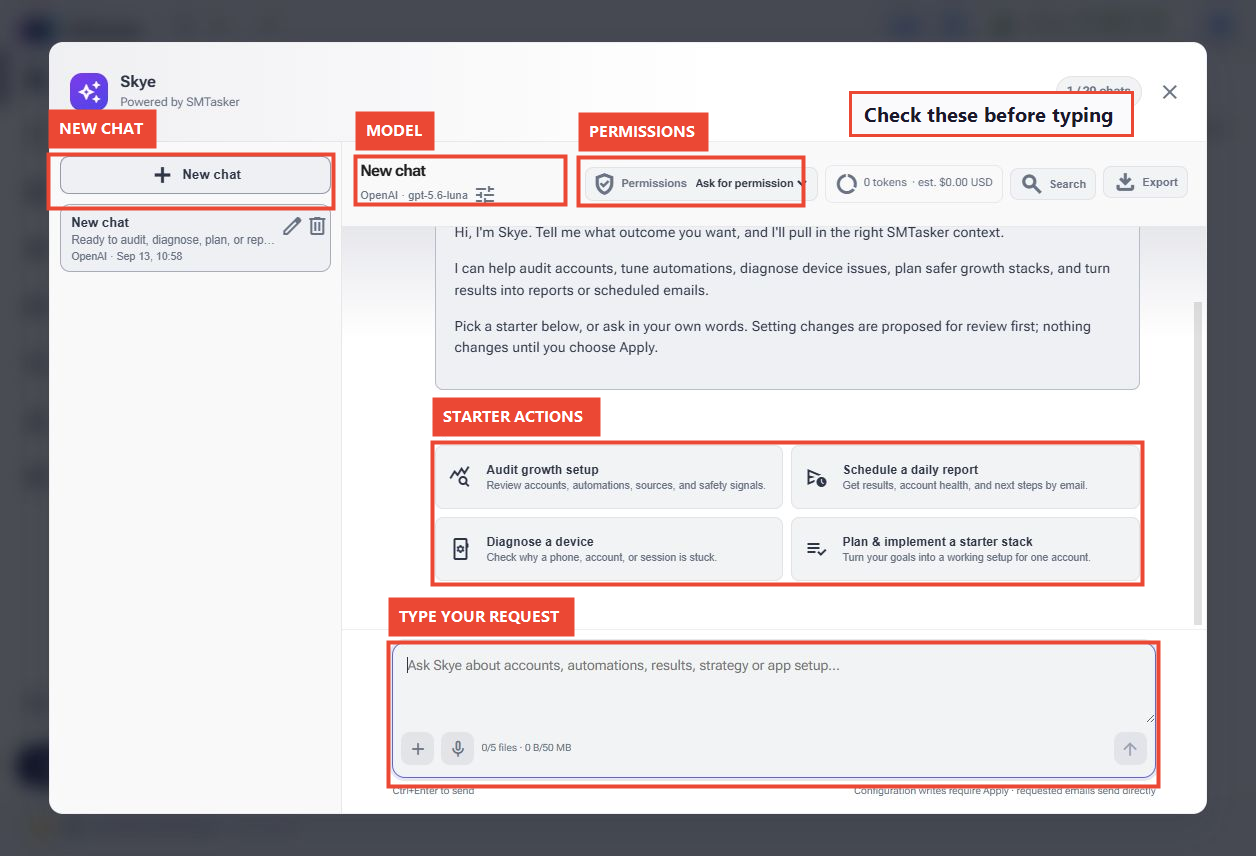
- Check the provider and model near the top. Use an available model from your connected provider. Your model names may differ from the screenshot.
- Keep Permissions on Ask for permission. Skye can inspect the setup, but proposed configuration changes are presented for your review before you apply them.
- Click the message box at the bottom. Type your request, then click the up-arrow Send button in its lower-right corner. The interface also shows Ctrl + Enter to send.
The welcome screen also offers starting points such as Audit growth setup, Diagnose a device, Schedule a daily report, and Plan & implement a starter stack. You do not have to use a preset: typing your own request works too.
Step 3: Ask Skye to check your setup
Start with a read-only check. Copy this request into the message box and send it:
Check my workspace without changing anything. Tell me which devices or automations need attention. Explain the most important issue in simple terms and tell me what to check first.
The screenshot below shows that exact request and its actual reply. Skye checks the workspace rather than giving a generic checklist. In this example, the phones are connected, but two LinkedIn accounts need attention.
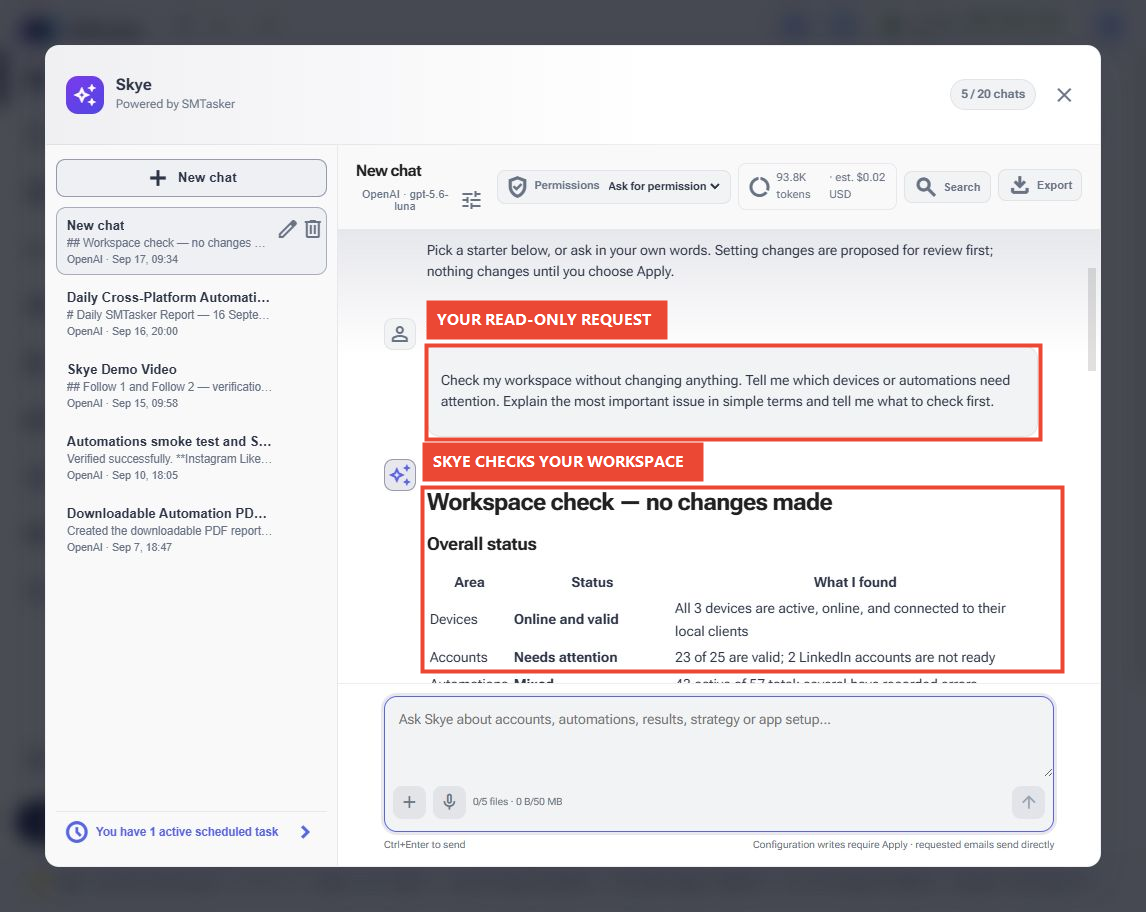
Scroll through the reply to Most important issue and What to check first. Here, one account needs a human confirmation and another is not logged in. Skye recommends opening Accounts and resolving those access issues before investigating the related automations.
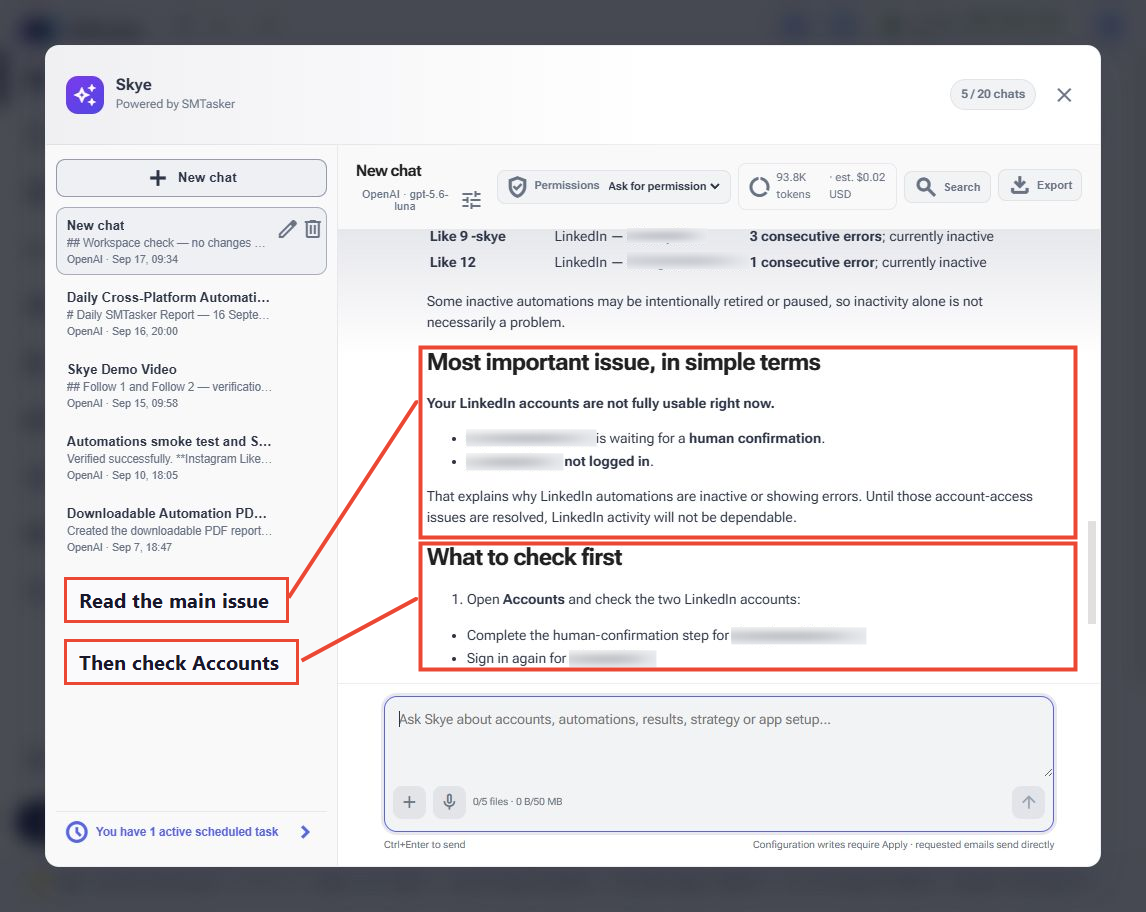
What does that mean? A connected phone does not guarantee that every social account on it is ready. An account may still need you to sign in or complete a confirmation. Likewise, an inactive automation is not automatically broken: you may have intentionally stopped it.
If you need a simpler explanation, continue in the same chat. For this example, a useful follow-up would be:
Explain the account-access issue in simple terms. Where should I check the affected account, and what needs my manual attention? Do not change anything.
What you have learned: give Skye a read-only request, read the findings, and ask for the first practical check. The example above made no configuration changes. You remain in control of what happens next.
Step 4: Describe the automation you want
Now move from “explain my setup” to “help me configure it.” Our example uses an existing Instagram Comment automation for a fitness account. A Comment automation controls how SMTasker comments on posts; its settings determine when and how often it operates, while its sources determine which posts or users it works from.
The next screenshots come from a separate recorded fitness-automation demo, not the read-only audit above. To try a similar task, adapt this suggested prompt with your own account and automation names:
Help me configure [automation name] for [account name]. This is a fitness account aimed at people interested in home workouts and everyday fitness. Suggest relevant sources, a gradual starting schedule, and natural comments that respond to each post. Keep the automation stopped while I review it. Explain what you propose before applying anything.
If you do not know the automation’s name, ask Skye to list the Comment automations for your account first. Use an already-stopped automation for this practice. If you would rather create a new one with AI, follow Set Up Your First Automation with AI; that walkthrough shows a complete new setup. Do not create a duplicate just to repeat the example below.
Notice what you gave Skye: the account, the task, the audience, the desired writing style, and the instruction to keep it stopped. You described an outcome instead of entering every setting yourself.
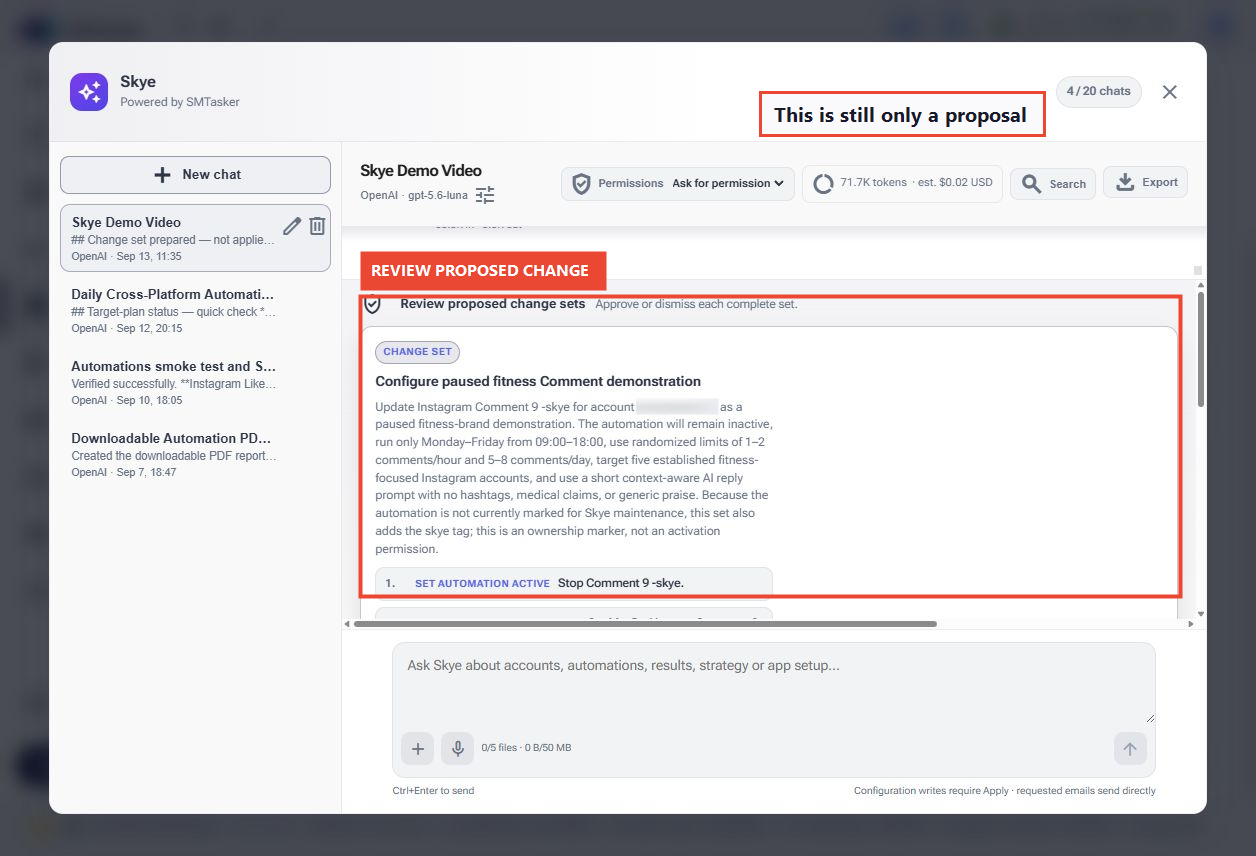
In the demo, the proposed setup includes:
- Status: keep the automation inactive while it is reviewed.
- Schedule: operate on weekdays within a defined time window.
- Limits: use small hourly and daily ranges rather than unrestricted activity.
- Sources: choose fitness-related accounts as starting points for finding posts.
- Comment instructions: write a short, relevant reply using the post’s caption as context, instead of repeating one fixed comment.
Step 5: Refine the plan, then approve the right changes
You can ask for a correction without starting over. In the recorded demo, the Specific Users source still showed only two items. Skye prepared a corrective proposal to replace that list with six fitness-related users, including gymaholic, while keeping the automation inactive.
For a similar correction in your own workspace, you could ask:
Check the Specific Users source for [automation name]. It is not showing the list I expected. Propose the corrected list, including [the source you want to add]. Show me the complete list before replacing anything, and keep the automation stopped.
Read Review proposed change sets. A change set is a group of changes you can approve together. In this screenshot, the proposed list is nike, menshealthmag, womenshealthmag, crossfit, toneitup, and gymaholic. Those are public source usernames, not the private account being managed.
Check the target account and automation, the complete replacement list, and the promise to leave other settings unchanged. Only proceed if all of them match your intent.
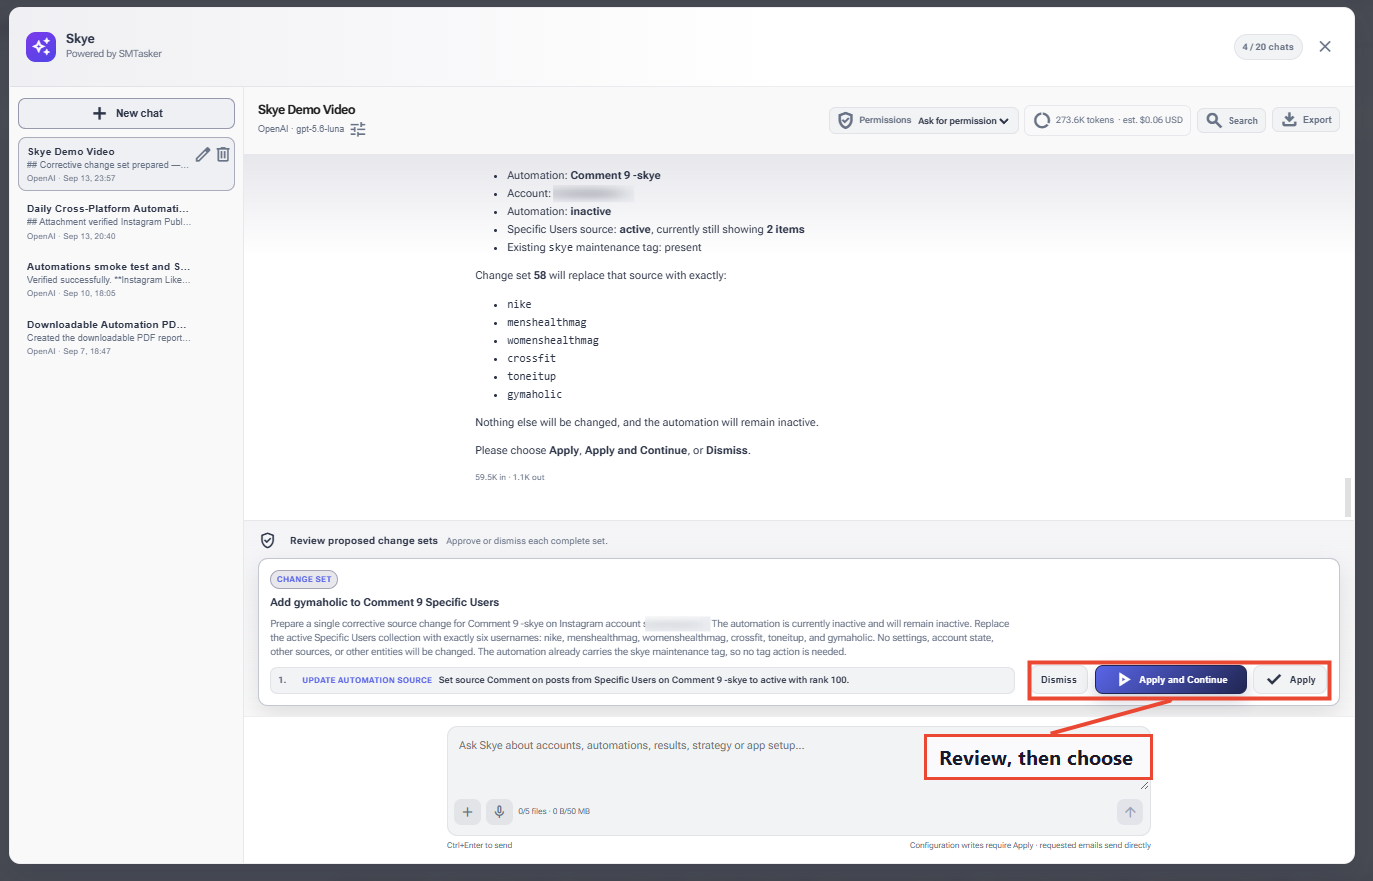
Choose the button that matches your decision:
- Dismiss: do not apply this proposal. Use this if it is wrong or you decide not to proceed.
- Apply: approve the displayed changes.
- Apply and Continue: approve the changes and continue the related workflow. Read any further proposals before approving them.
For this walkthrough, choose Apply only after you understand the proposal. You do not need to approve a change just because Skye suggested it.
Step 6: Check what changed in the actual automation
After approving a proposal, wait for its completion message. A proposal is only a plan; an applied change should also be visible in the product. If Skye reports a partial failure, ask what completed before repeating the request.
The screenshots below show the saved fitness automation, including the corrected six-user source list. Checking these screens is how you confirm the result yourself.
Now check the actual setup, not just the chat response:
- Close Skye with the X at the top-right of its window. Open Automations from the app’s sidebar and open the automation named in the proposal.
- Open Settings. Confirm its status is Stopped. Check its hourly and daily limits, execution interval, and active days. In the demo, those limits are 1–2 comments per hour and 5–8 per day, with Monday through Friday selected.
- Find the Comment field further down Settings. The demo uses AI instructions that take the post caption as context. This is how the comment can respond to the post instead of repeating identical text.
- Open Sources. Check the users or other targeting inputs that were actually saved. Are they relevant to the audience you described?
The AI prompt Skye filled in
Here is the actual saved Comment field from our demo automation. Skye wrote instructions for the AI, rather than one fixed comment to repeat on every post.
Where to find it: choose Automations in the left sidebar, open the Comment automation Skye configured, then select its Settings tab. This is the tab inside the automation, not the main Settings item in the sidebar.
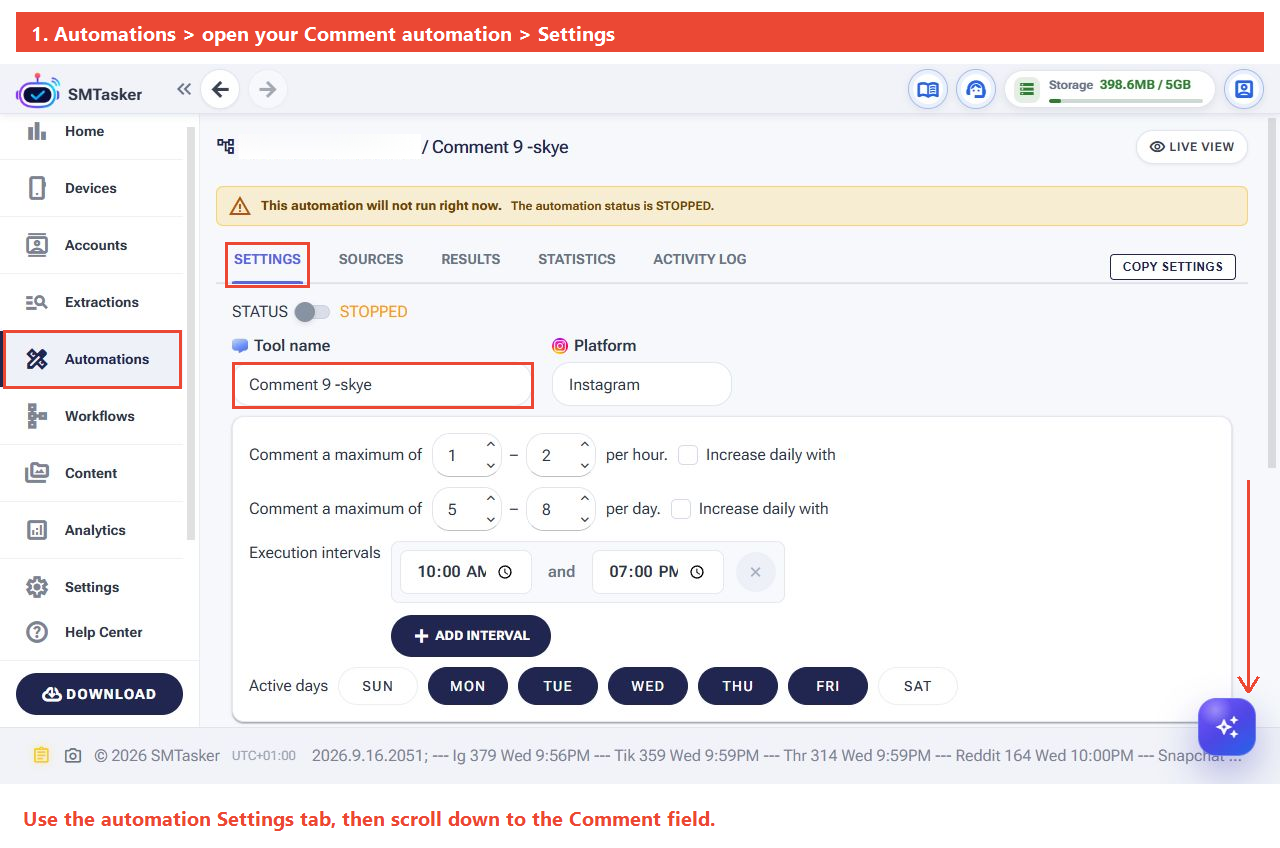
Scroll down on that same page, past the hourly and daily limits, execution intervals and active days, until you reach Comment. That is where Skye saved the prompt:
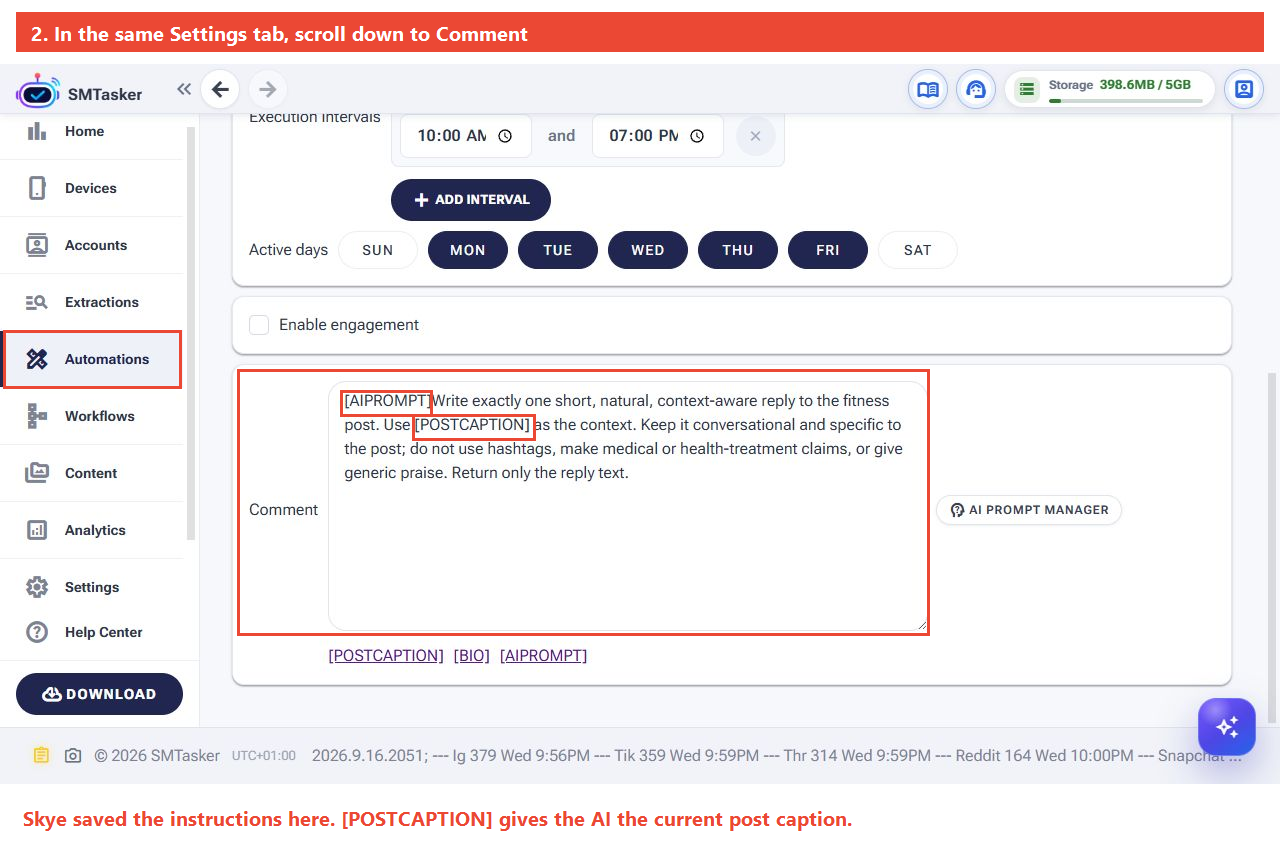
Here is how to read it:
- [AIPROMPT] tells SMTasker to use the following instructions to generate a reply with AI.
- [POSTCAPTION] supplies the caption of the post being commented on, so the reply can relate to that specific post.
- The remaining instructions ask for one short, natural fitness-related reply, without hashtags, medical claims or generic praise. These are the rules Skye wrote for our example, not a template you must use for every account.
You do not need to paste the prompt again if Skye has already saved it. Read the field and check that the topic and instructions match what you requested. AI commenting also needs a configured AI provider and API key in Settings. Keep the automation stopped while you finish checking its settings and sources.
Next, open Sources and check the saved entries:
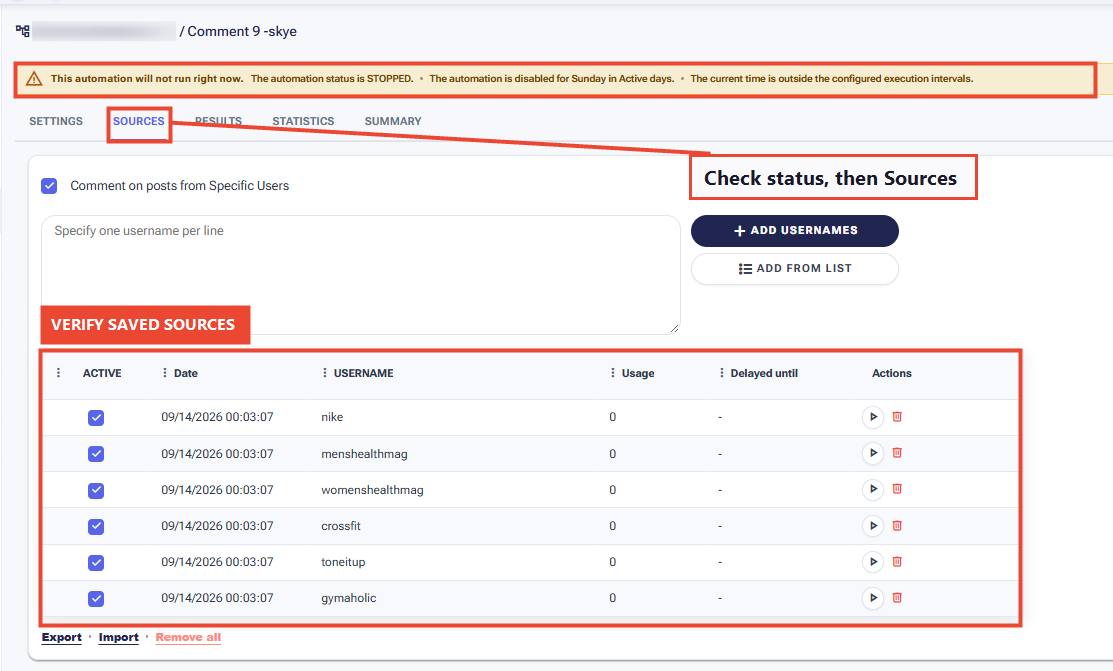
If a source is missing or the setup is not what you wanted, reopen Skye and describe the difference. For example: “The Sources tab is still showing the old list. Check what was saved and propose a correction; keep it stopped.” The source-list revision pictured in Step 5 demonstrates that follow-up workflow.
You have now used Skye to turn a plain-language goal into an actual SMTasker configuration. Keep it stopped until you are satisfied. Starting the automation is a separate decision; execution still depends on the connected phone, account state, schedule and platform support.
Use the same approach for other tasks
The fitness example teaches the pattern, not a command you have to memorize. Give Skye a clear target, explain the result you want, and ask it to show its plan. The following examples are optional—choose the one that helps you today. Replace bracketed names with your own; they are suggested requests, not claims that these tasks have already run.
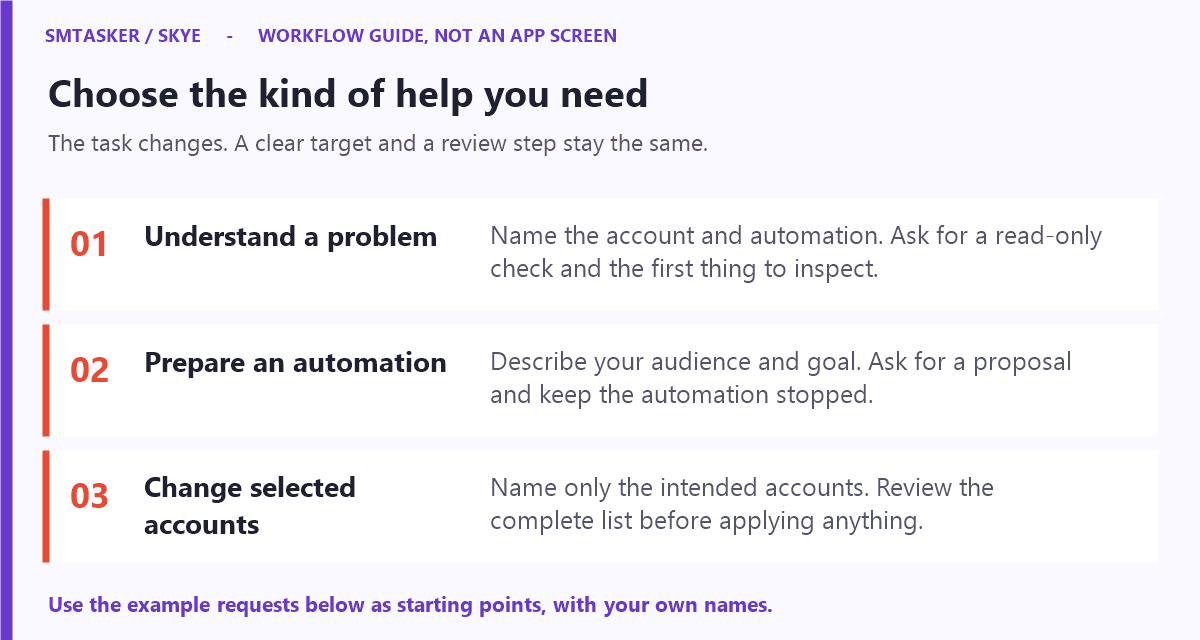
Find out why something stopped
Why is [automation name] on [account name] not running? Check the device, account status, schedule and sources. Explain the cause you can identify without changing anything.
Use the answer to narrow down the problem. Ask “What should I check first?” if the response contains several findings. If a fix requires configuration changes, request a proposal and review it.
Prepare another supported automation
Help me prepare a [supported automation] for [account]. My audience is [description]. Explain suitable sources and settings, and keep it stopped until I review the setup.
Skye can help with supported Like, Follow, Story Viewer, messaging, publishing and other workflows. Availability depends on the platform and the tools supported in your workspace; do not assume every action works on every social network.
Make a consistent change across selected accounts
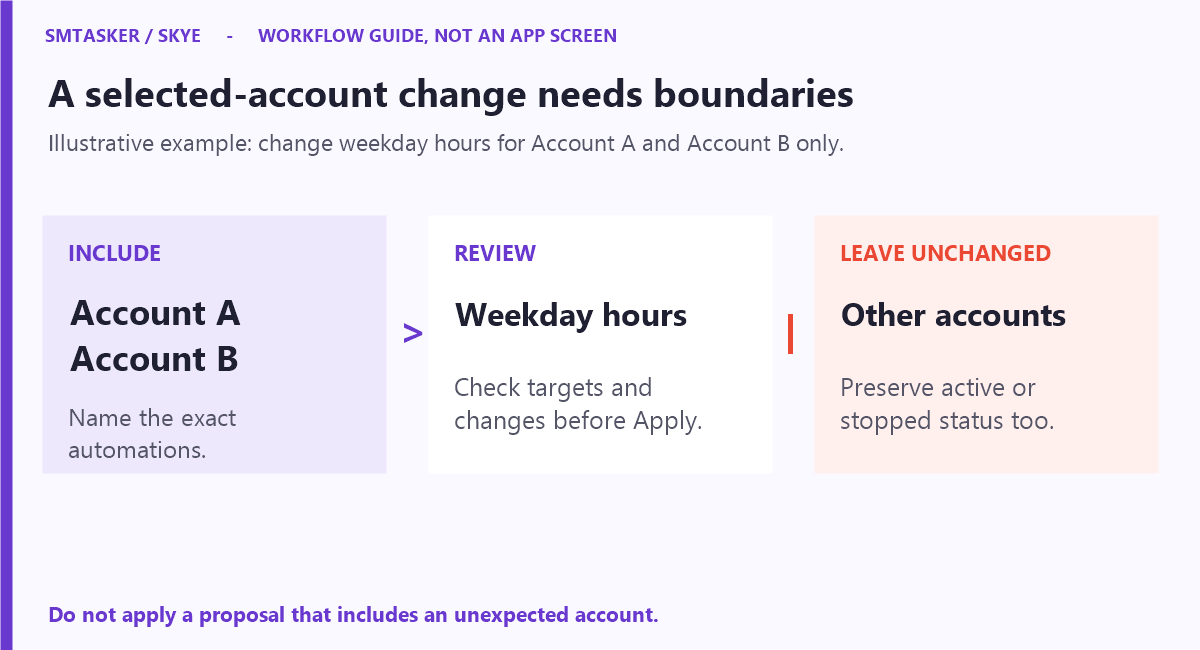
For [account A] and [account B] only, propose weekday operating hours for their [automation type]. Show me exactly which automations would change. Leave every other account alone and preserve each automation’s active or stopped status.
This is useful when you manage several accounts and want to avoid repeating the same edit manually. Check the full list of affected accounts before applying it.
Email a report to yourself
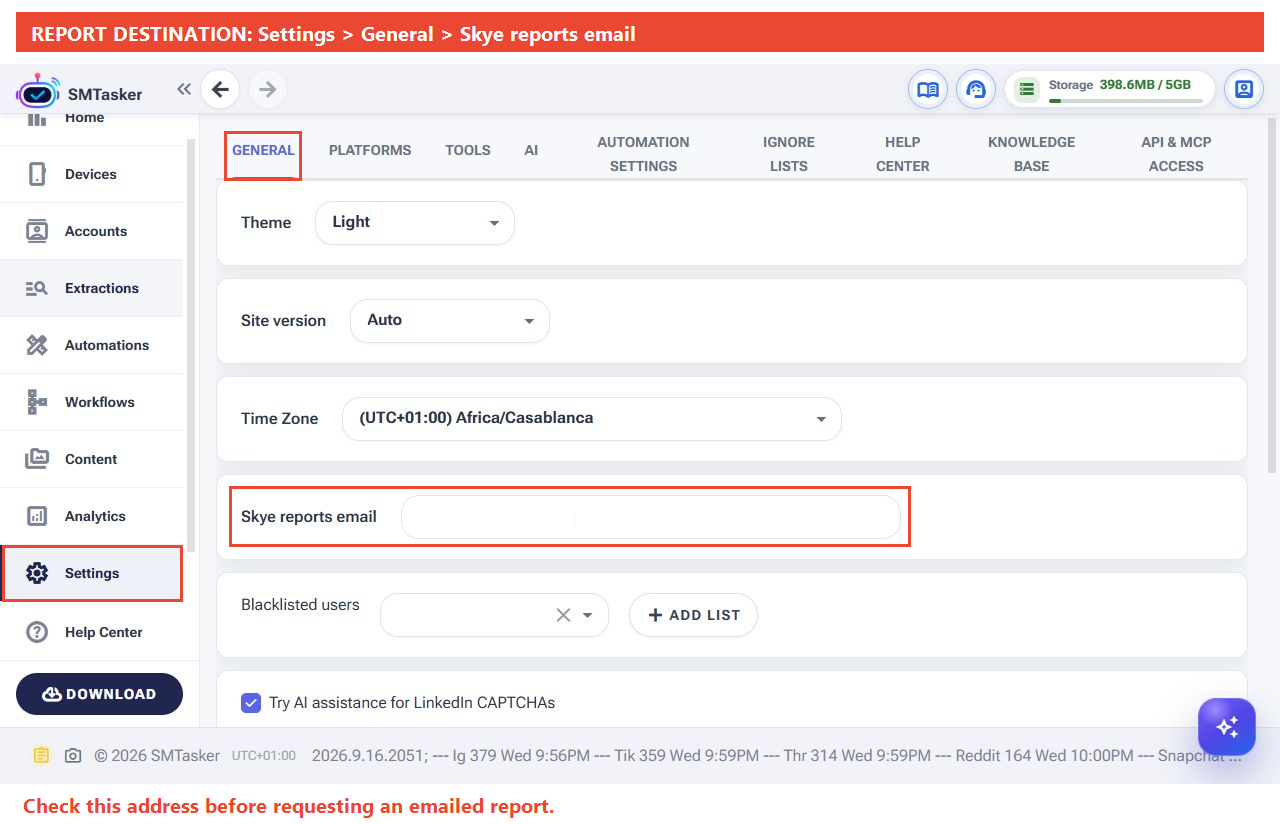
Want a workspace summary in your inbox? First, open Settings → General and check the Skye reports email field. Set and save the address where you want to receive your reports before asking Skye to send one.
Skye sends reports to your configured reports address. It cannot send to arbitrary addresses you type into chat or to a list of recipients. It is for your workspace reports, not for emailing customers or running email campaigns.
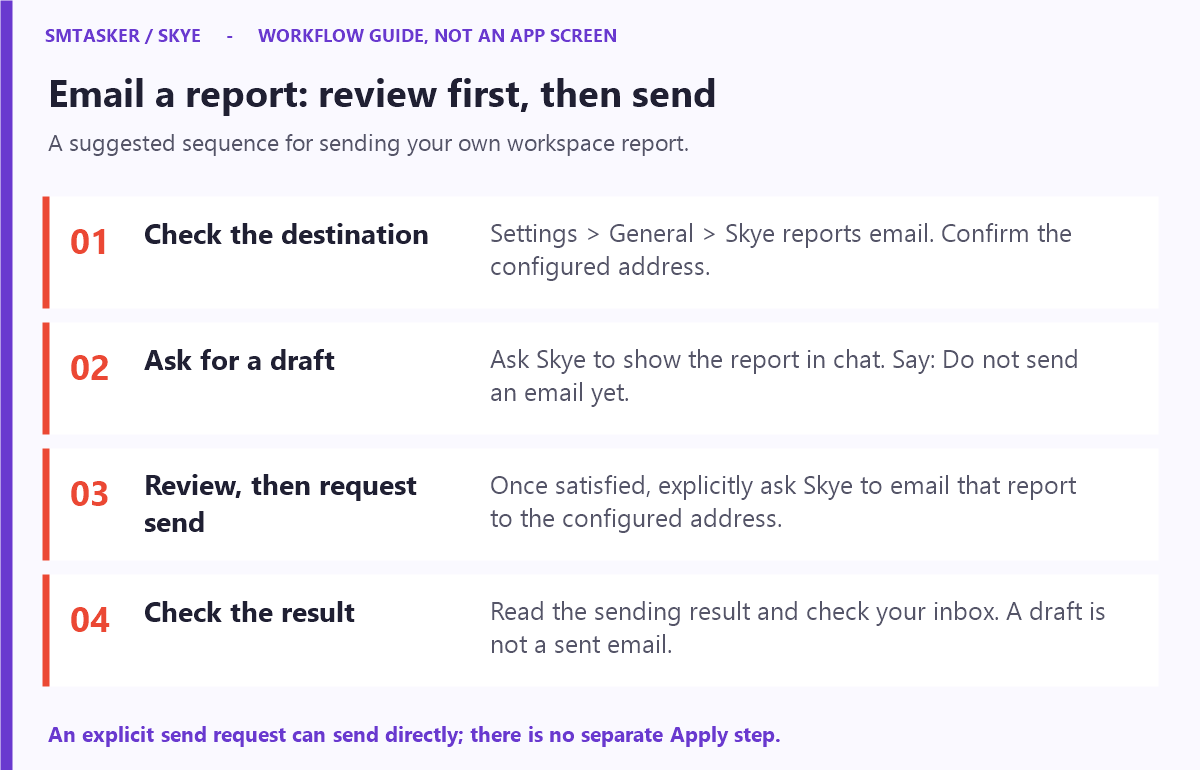
Start by asking for a draft you can read in the conversation:
Prepare a short report on my workspace. Explain what needs attention and what I should check first. Show it here so I can review it. Do not send an email yet.
Read the report and ask for any corrections. When you are happy with it, say:
Send this report by email to my configured Skye reports address.
Prepare a recurring report
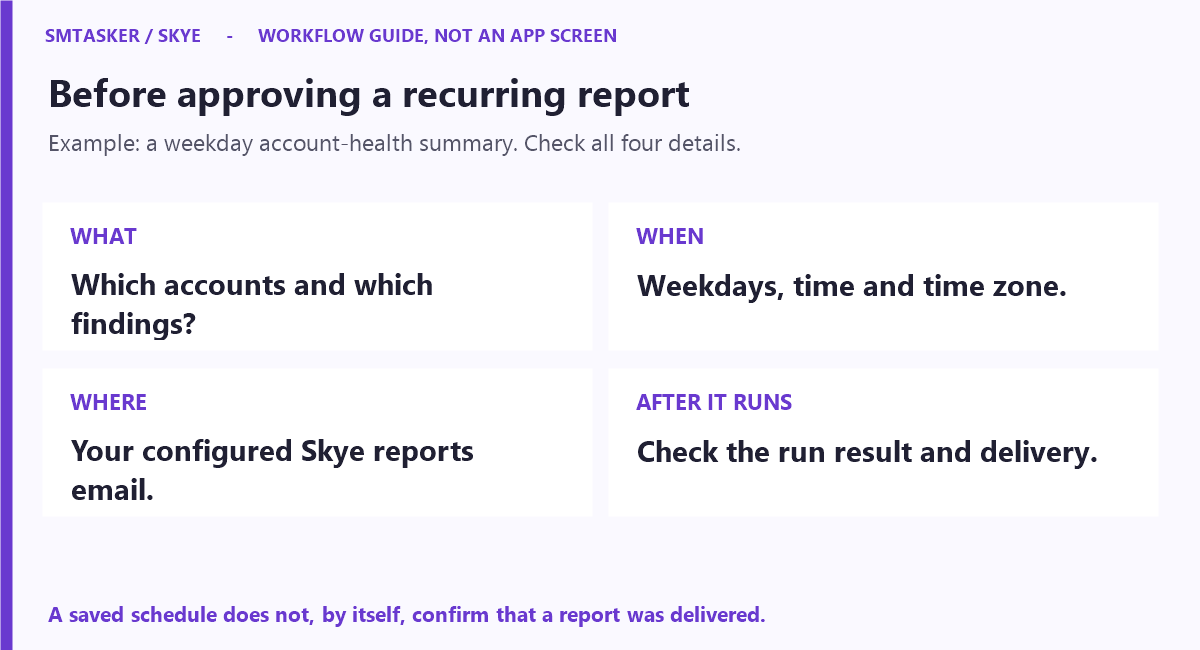
Prepare a weekday account-health report for 8 a.m. Include device availability, errors and automations that need attention. Show me the time zone, schedule and configured reports email before I approve the recurring task. Do not send an email now.
Review when it will run, which accounts it covers, and the address saved in Settings → General → Skye reports email. A saved schedule does not confirm delivery: check the report or delivery result after it runs.
If you are unsure or something goes wrong
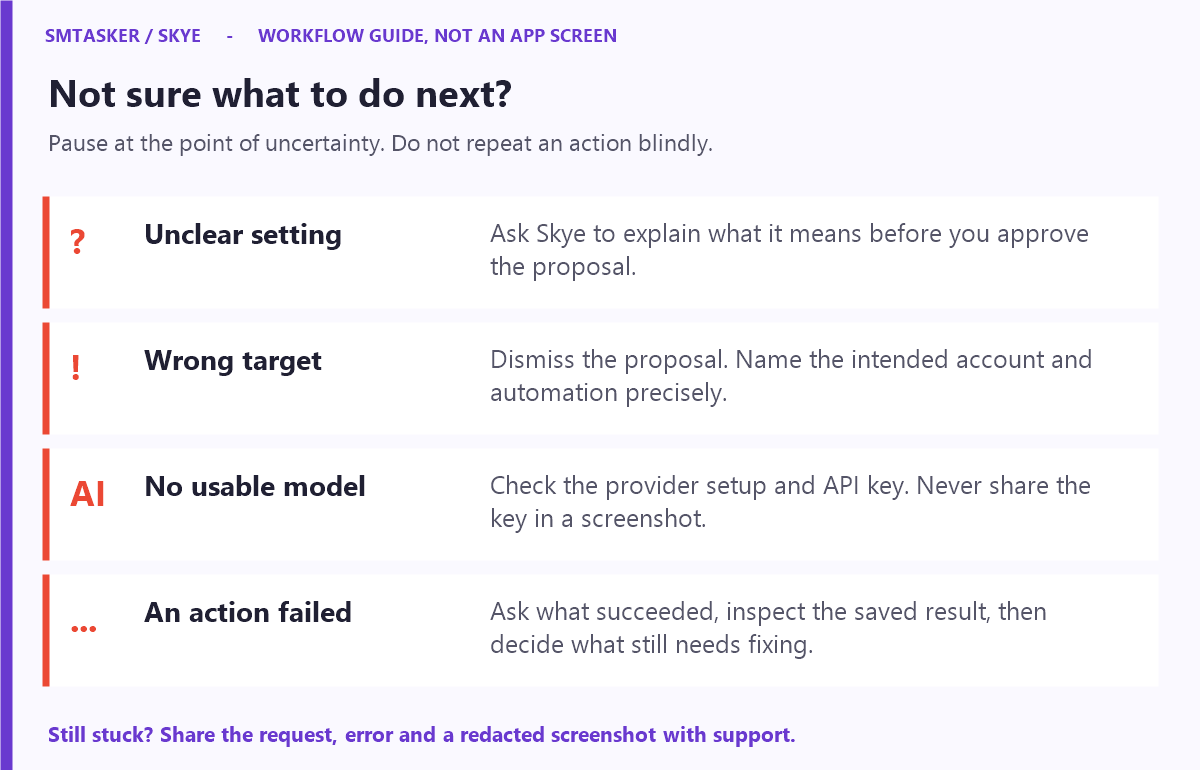
- You do not understand a setting: ask “What does this mean, and why are you proposing it?” before clicking Apply.
- Skye selected the wrong account: dismiss the proposal and name the exact target.
- No provider or model is usable: check your connected API key and provider configuration.
- Something failed after Apply: ask what succeeded, inspect the affected automation, and avoid approving the same action again without checking.
- You want to undo a change: tell Skye exactly what changed and ask what recovery options are available before approving another edit. Do not assume every action can be undone, especially an email or social action that was already sent. Contact support if the recovery path is unclear.
For additional help, contact SMTasker support with the request, error and a screenshot. Do not include API keys or passwords.
Your next step: try one read-only check in your own workspace. When you are comfortable, use Set Up Your First Automation with AI to build and inspect a new stopped example, or return to the full series.