Connect Codex to SMTasker
Connect Codex to SMTasker so it can answer questions about your own workspace. In this walkthrough, you will create read-only access, ask Codex to help with the connection, and try one simple question.
Before you start
Open SMTasker in your browser and Codex on your computer, signed in. This guide uses a local Codex setup, not a task running only in the cloud.
You will collect two things from SMTasker: a server URL (the address to connect to) and an API key (a private code that allows access). This is a SMTasker key, not your login password or an OpenAI key.
The SMTasker screenshots below show where to click. The Codex instructions use suggested prompts; its replies and any approval steps can vary. They are not screenshots of a completed Codex connection.
Your goal for this lesson: get one answer based on your SMTasker data, without changing an account or automation. You do not need to set up Skye or buy an OpenAI API key just to create the SMTasker connection; your Codex access and its own usage terms still apply.
Step 1: Enable access in SMTasker
In SMTasker: click Settings in the sidebar, then open API & MCP Access. Turn on MCP access if it is off.
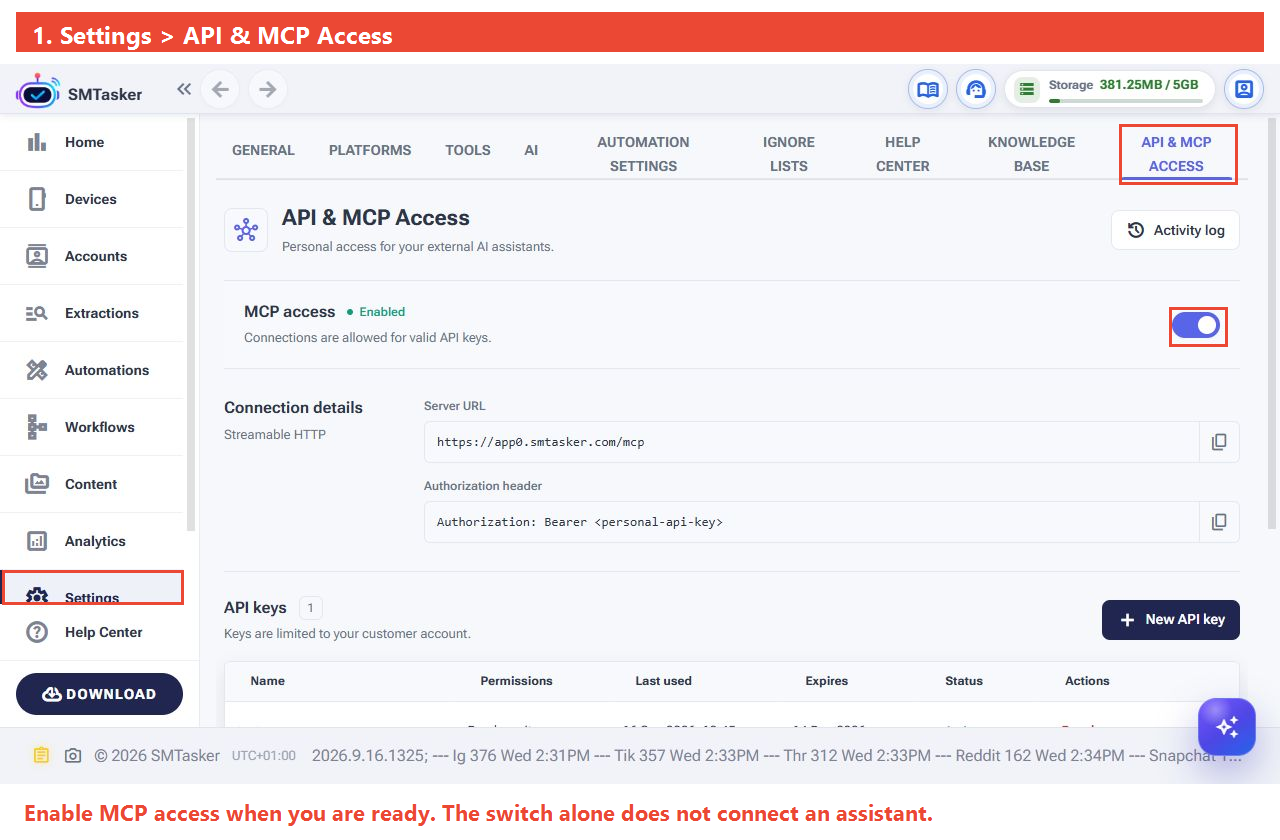
Step 2: Give Codex permission to look, not change
Stay on that page. Scroll down to API keys, then click New API key.
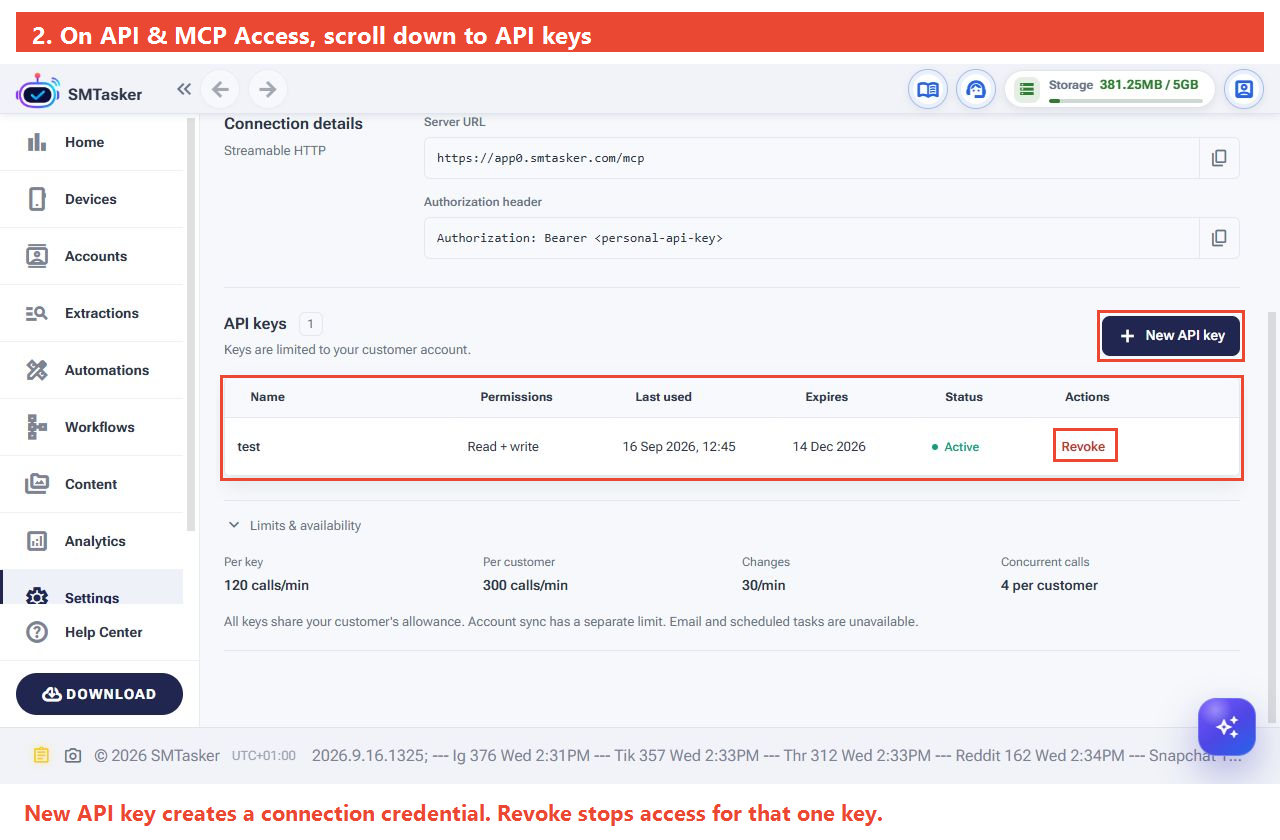
- Enter a name you will recognize, such as Codex — read-only test.
- Choose when the key should expire. After that date, you will need a replacement to keep using the connection.
- Keep Read data checked. Leave Make changes unchecked.
- Click Create key, then copy and store the generated code privately as instructed on screen.
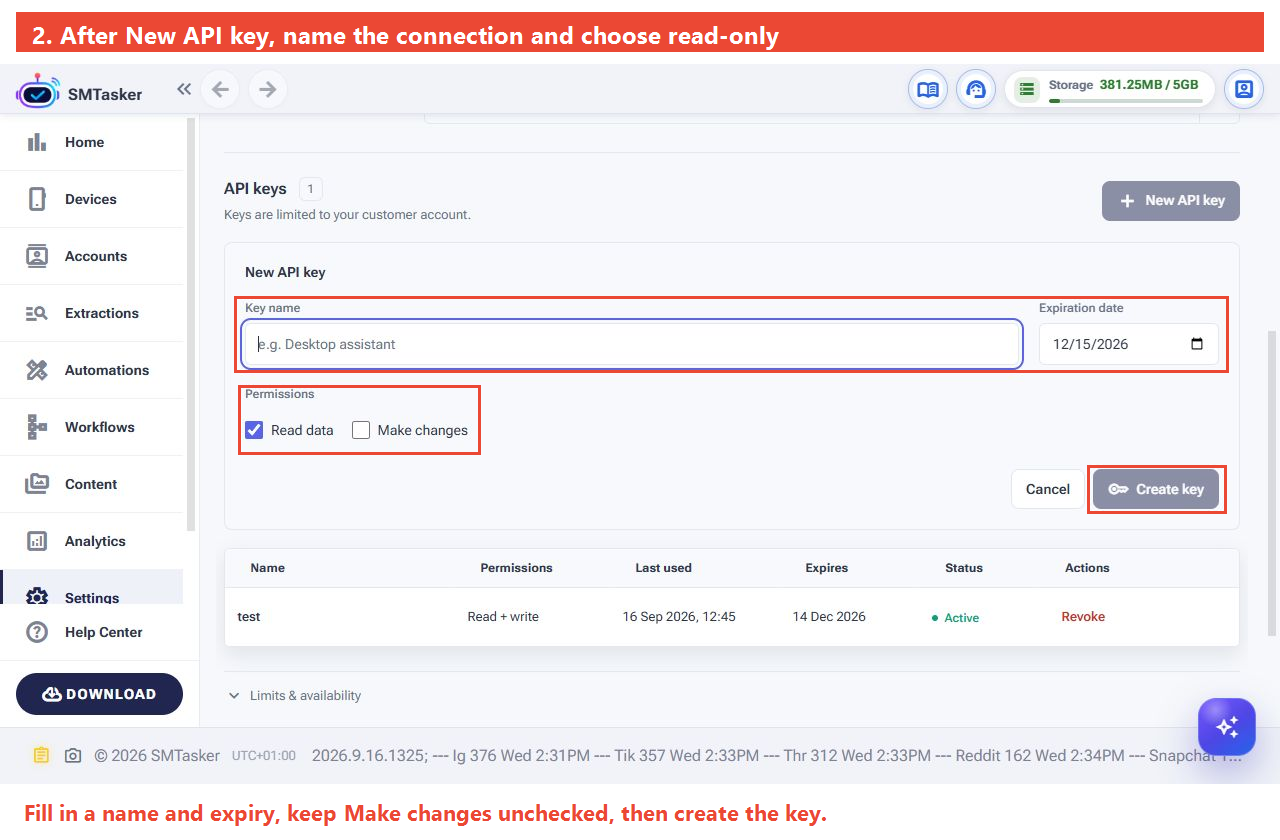
Keep the generated code private. It grants access to your workspace information. Do not paste it into an ordinary chat, screenshot or support message. You will enter it privately during the next step.
Read-only does not mean “no access”: the assistant can retrieve workspace information allowed by that key. Use a connection and AI account you trust.
Step 3: Ask Codex to connect
In SMTasker: scroll back to Connection details and copy the Server URL.
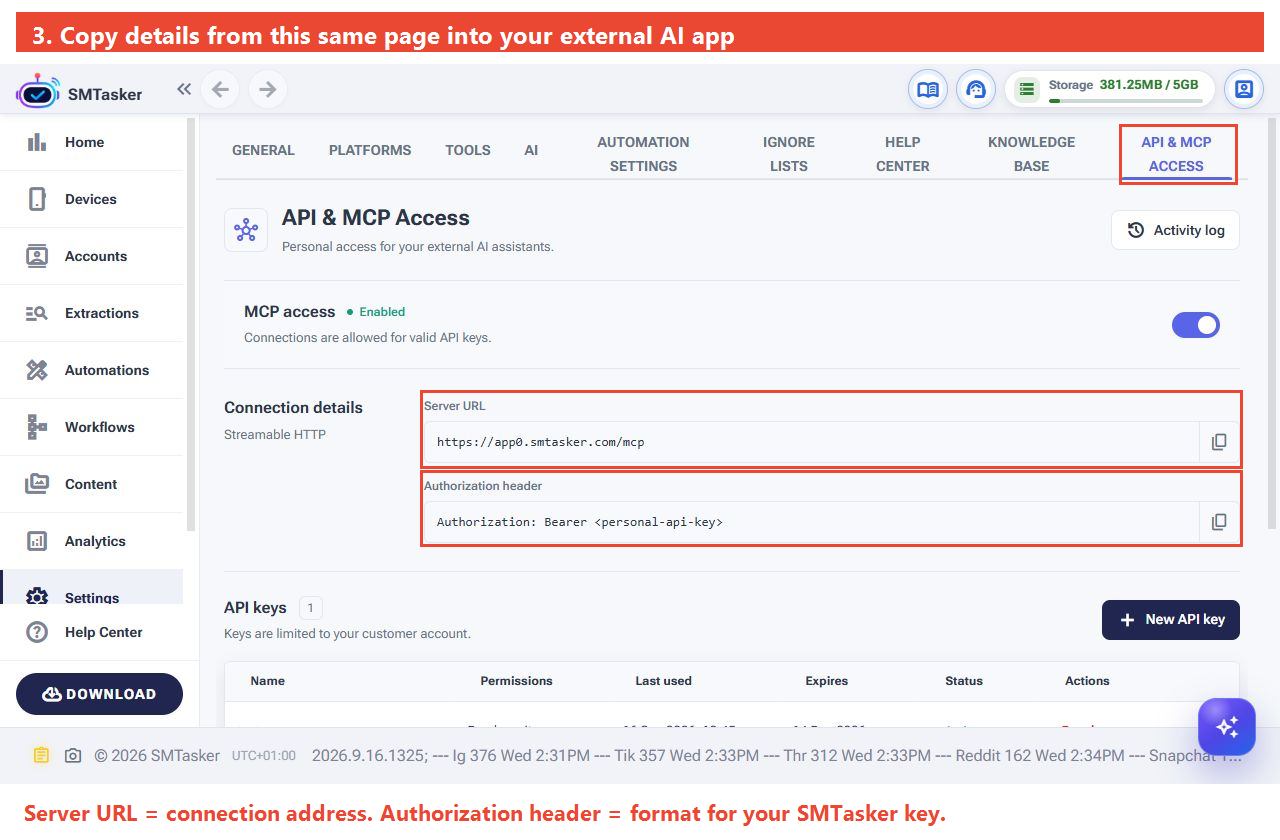
In Codex: open a local task. Copy the message below, replace PASTE_YOUR_SERVER_URL_HERE with your address, and send it. The technical details are included for Codex—you do not need to memorize them.
Help me connect Codex on this computer to SMTasker. I am a beginner; guide me one step at a time.
Server URL: PASTE_YOUR_SERVER_URL_HERE
Use Streamable HTTP with a SMTasker API key sent as an Authorization: Bearer header.I have a read-only key. Explain a private local way to enter it outside this chat, without echoing it or saving it in a shared project. Prefer referencing a local environment variable for the bearer token rather than putting the secret in connection configuration. Do not display the key. Preserve my other connections and approval settings. If you need my approval or a manual step, explain it. Tell me if I need to restart Codex or open a new task, then help me test the connection without changing anything in SMTasker.
Follow the instructions Codex gives for your computer. Review any proposed connection changes before approving them. If it cannot configure the connection itself, ask it to show you exactly which setting you need to open.
Enter the key only in the private entry method it explains. If that method is unclear, ask for clarification before entering anything. Saving the connection settings is not proof it works yet—the next step checks that.
Before entering the code, you should know where to enter it, where it will be stored, and how Codex will read it. If the instructions ask you to paste the secret into the conversation or a shared file, stop and ask for a private method instead. Do not paste the entire header template into a field that asks only for the key.
Step 4: Ask your first question
After completing any restart or new-task step Codex requests, send this message:
Use my SMTasker connection to give me a short summary of my workspace. Tell me what information you actually checked and one thing I should look at first. Explain it in simple terms. Do not change anything. If you cannot access the workspace, tell me what prevented it.
You are looking for an answer about your workspace, not a general explanation of SMTasker. Codex should identify what it retrieved and explain any information it could not access.
Compare a detail in the answer with your SMTasker account. If it only gives general advice, ask: “Did you use the SMTasker connection, or is this general advice?”
Step 5: Confirm the request in SMTasker
This extra check is useful if you want confirmation or Codex’s answer was unclear.
Return to Settings → API & MCP Access, click Activity log at the top-right, then Refresh. Look for the time of your question and the name you gave the key.
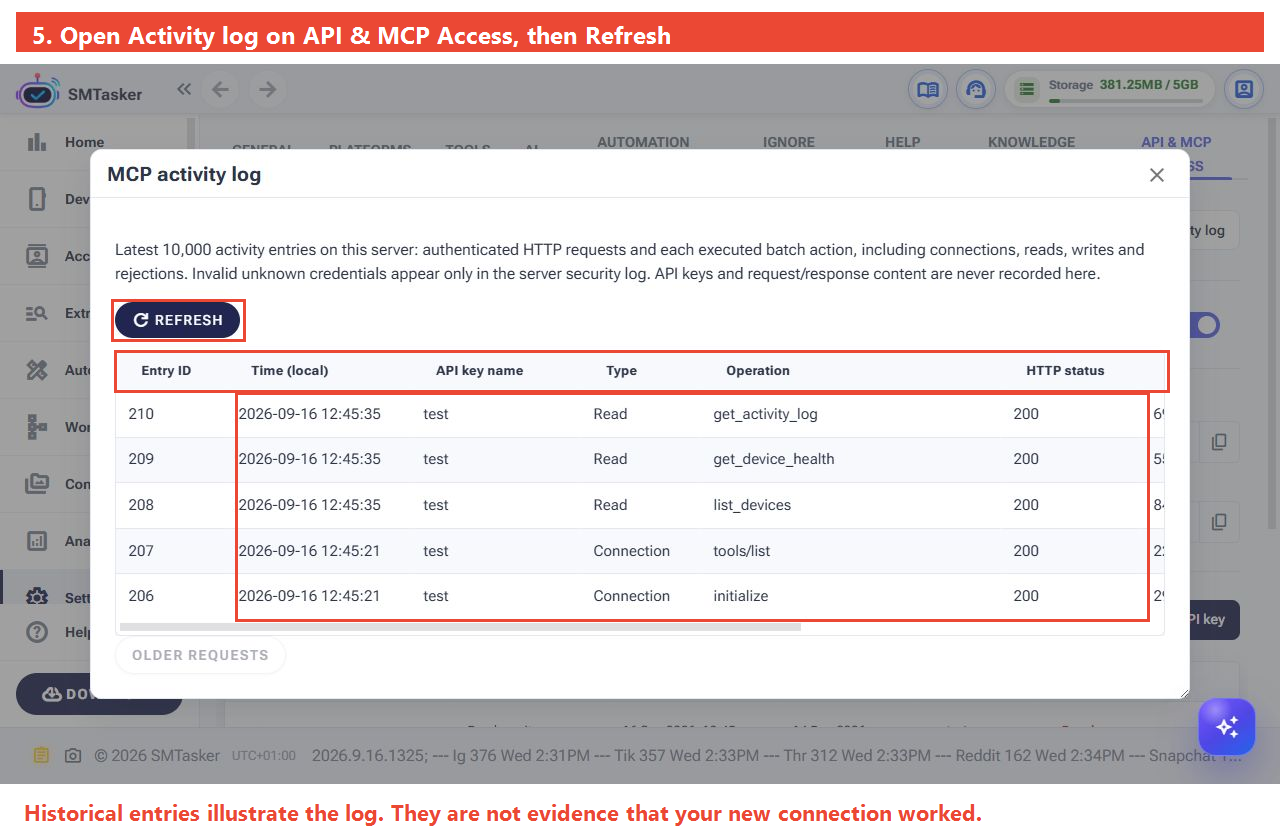
The log helps confirm there was a request. Read its outcome alongside Codex’s reply; a recorded request alone does not prove the whole question was answered.
If you get stuck
- Codex cannot find the connection: ask whether its setup needs a restart or a new local task.
- The connection is rejected: check that MCP access is enabled and the key has not expired or been revoked. Confirm you used the generated SMTasker key, not the header placeholder.
- It worked before restarting, but not now: ask Codex whether the private key is available to its current session. Do not paste the key into chat to diagnose it.
- Codex asks for details you do not understand: ask it to explain one step at a time. If you are still stuck, contact SMTasker support with the error and the step you reached, without sending your key.
Your first connection is ready
Once Codex retrieves real information, you have completed this lesson. Keep read-only access while you explore questions about your workspace.
Next, follow Check Your Workspace with AI to turn an answer into a useful next step. Later, Make changes permission allows supported edits. It is not needed for this read-only test.
To stop this connection, return to the API keys table in SMTasker and Revoke the key you created.
For billing, see what it costs. This connection uses your external AI app, not Skye’s provider key.
Connection reference: OpenAI’s MCP documentation. This guide uses its support for a remote connection and bearer authentication; exact setup steps can differ by installed version.