Set Up Your First Automation with AI
Describe a goal, review the proposal and inspect a prepared automation before running it.
Describe the setup you want, review the assistant’s proposal, and check the saved settings in SMTasker. The goal of this lesson is a prepared automation—not an automation that starts running before you are ready.
Choose one small job
We will use an Instagram Comment automation as the example. Start with one account and a clear audience, such as fitness. Do not ask the assistant to configure every tool at once.
Our new example is called KB Demo – Fitness Comments. It uses posts from crossfit and nike, with short AI-generated comments based on each post’s caption. It stays stopped throughout this walkthrough.
This walkthrough creates one new automation. Have your account name ready and choose a distinct demo name. If that automation already exists from an earlier attempt, ask the assistant to inspect it instead of creating it again.
A Comment automation determines when and how often SMTasker comments. Its sources tell it where to find posts. The AI prompt gives instructions for writing each comment. You will check all three in the saved setup.
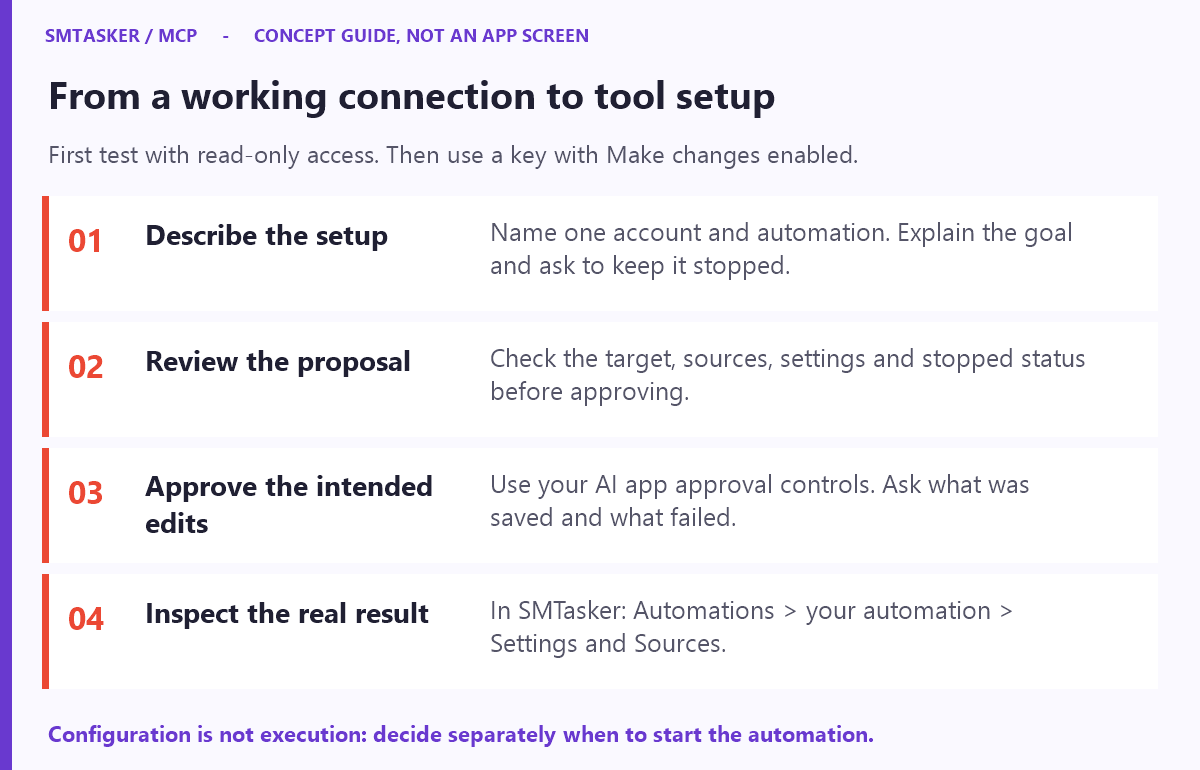
Step 1: Describe the result you want
In your AI conversation: replace ACCOUNT_NAME below. This matches our demonstration request, with the private username replaced. Do not include its password.
Help me prepare one NEW Instagram Comment automation for ACCOUNT_NAME named KB Demo – Fitness Comments. This is a tutorial example and must stay inactive/stopped. First inspect the supported settings and propose the setup; do not apply it yet.
Use only the public sources crossfit and nike. Propose short, relevant AI comments based on the post caption, with no hashtags, links, medical claims or generic praise.
Use example limits of 1-2 comments per hour and 5-8 per day, Monday-Friday 09:00-18:00 in the existing timezone. Explain the settings simply.
Do not modify existing automations, account/device settings, tags, credentials or global AI settings. Do not start anything, send emails or schedule tasks. If a requested feature is unavailable, say so instead of silently substituting it.
Choose sources and activity levels appropriate for your own account. These names and numbers are teaching examples, not recommendations for every account.
If the assistant cannot find the account or a required setting, resolve that first. A plausible-looking plan is not evidence that it inspected the right account.
Step 2: Read the proposal like a checklist
Here is Skye’s actual proposal for this demo, shown in two consecutive views so the text stays readable. Nothing in this proposal has been approved yet.
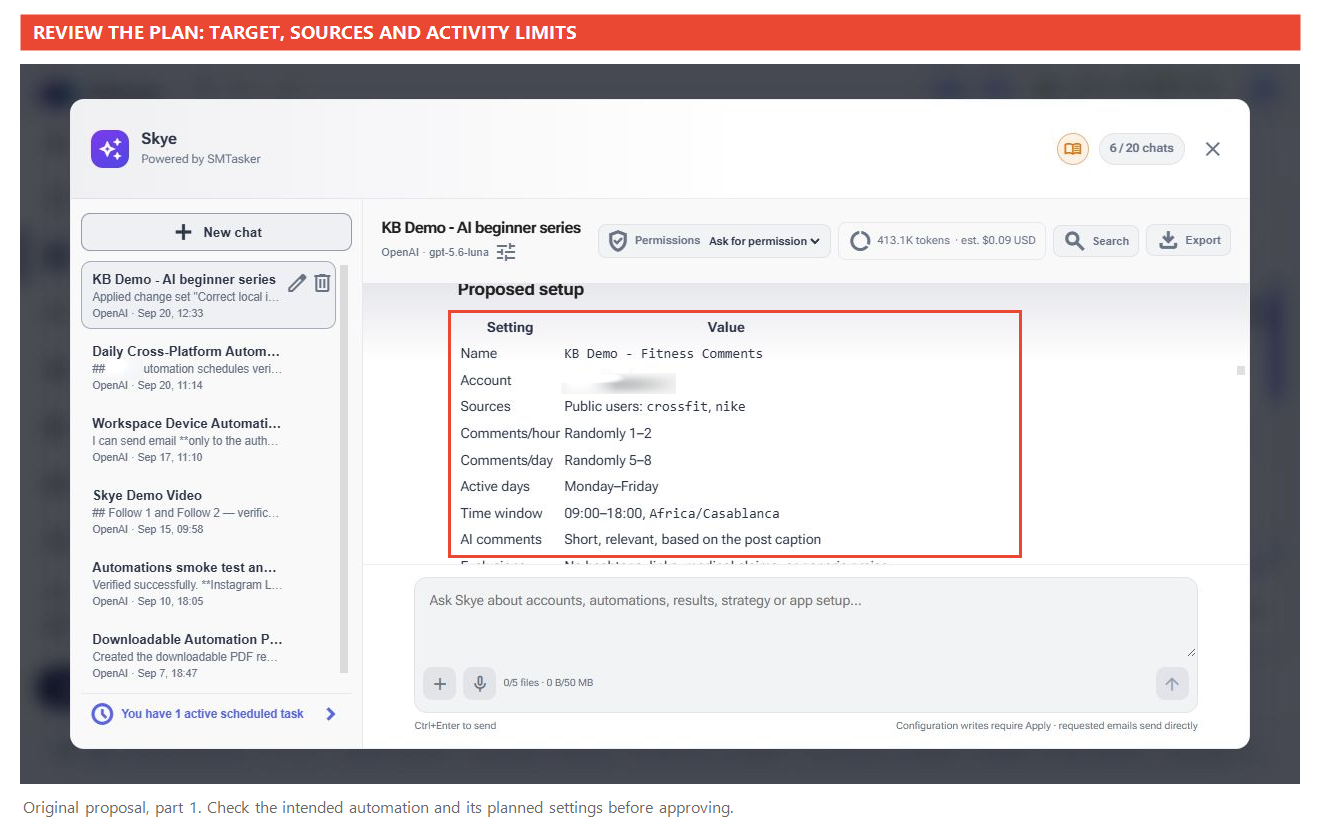
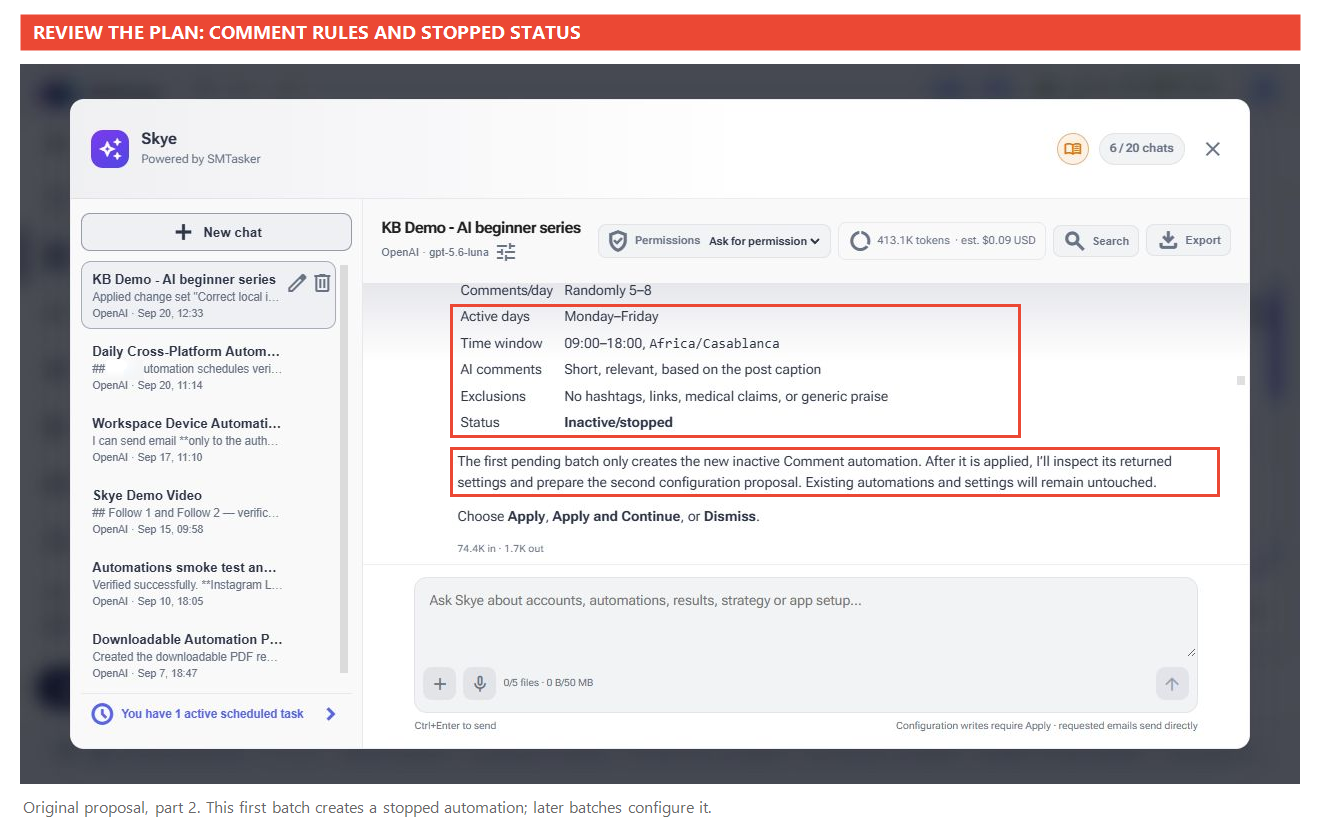
You do not need to understand every setting at once. Check these five decisions:
- Account: is this the account you intended?
- Sources: will these lead to the kind of posts you want?
- Comments: does the approach match your voice and the post’s context?
- Schedule and limits: are these appropriate for your account, rather than copied from someone else’s example?
- Status: will the automation remain stopped?
Ask the assistant to explain anything unclear. If it proposes AI-generated comments, confirm the required AI setup is available; connecting through MCP does not itself configure every AI feature used by an automation.
Step 3: Approve only the agreed setup
When you are satisfied, give a specific instruction. If the proposal is incomplete, do not approve it yet.
Apply only the setup we just agreed for the named account and automation. Keep it stopped. Do not start it or change other automations. Afterwards, summarize exactly what was saved and tell me where to inspect it in SMTasker.
Review any permission request from your AI app. If the action differs from the agreed plan, do not approve it. If the assistant reports a failure or partial result, ask what was saved before trying again—you do not want a duplicate automation.
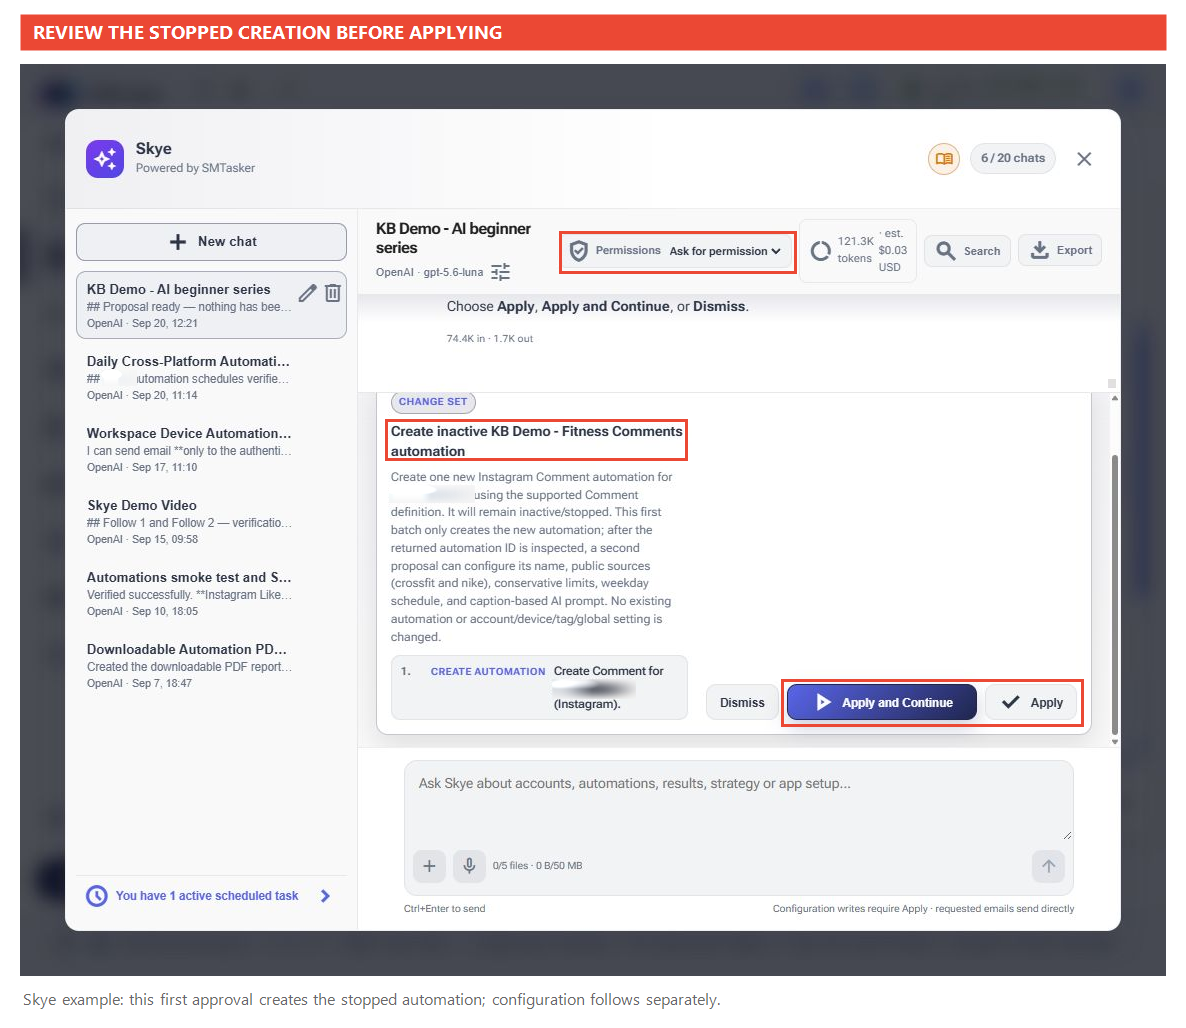
In Skye, Apply and Continue continues the conversation after that batch. With an external assistant, review its own approval controls—do not expect this exact screen.
Step 4: Open the automation and check it
In SMTasker: open Automations from the sidebar and locate the named automation. Check its account and stopped status. Open the relevant settings and sources and compare them with the agreed proposal.
If you used Skye, close its window with the X first. Check the exact new demo name—another Comment automation on the same account is not the one you just created.
Open KB Demo – Fitness Comments → Settings. This is the automation’s tab, not the main Settings page in the sidebar.
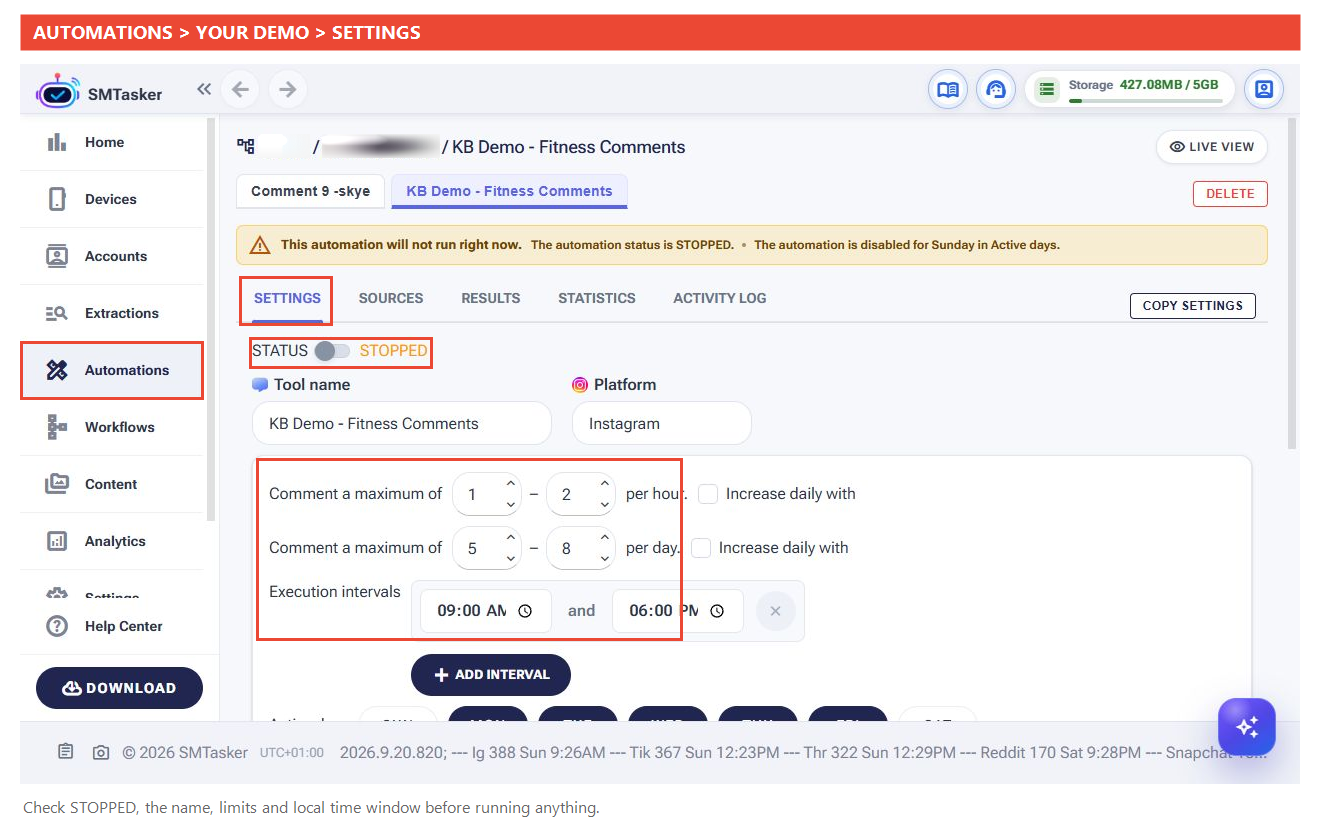
Check visible times too. Our first saved interval displayed one hour later than requested. We asked for a correction and checked this page again. If something differs, name that field and ask for a correction to this automation only—not a new automation.
For an AI comment setup, read the saved prompt as well as the assistant’s chat summary. Check that sources and limits are actually saved. If something is missing, ask for a correction to that specific item rather than restarting the entire setup.
Step 5: Read the comment instructions
On the same Settings tab, scroll down to Comment. Check the selected weekdays and the text the assistant saved.
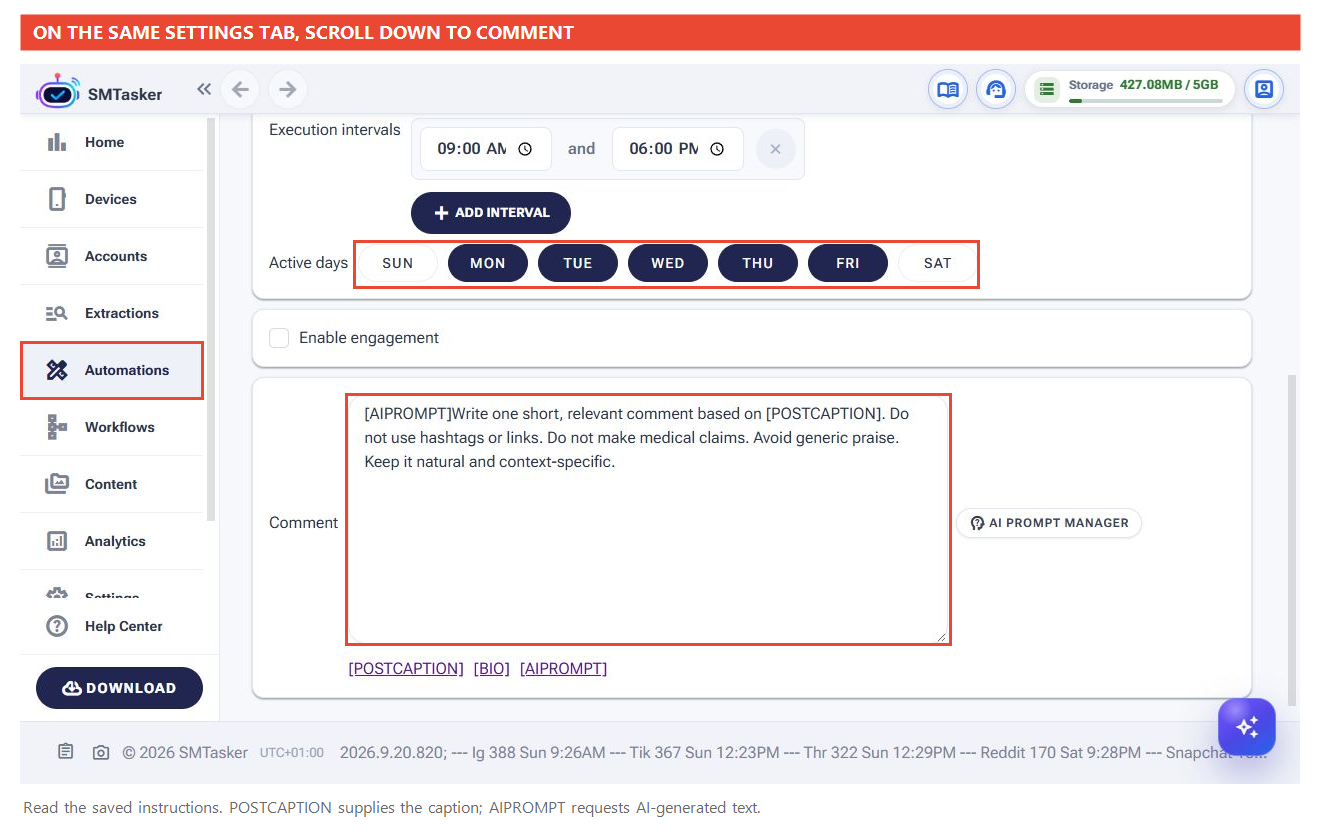
[AIPROMPT]Write one short, relevant comment based on [POSTCAPTION]. Do not use hashtags or links. Do not make medical claims. Avoid generic praise. Keep it natural and context-specific.
[AIPROMPT] requests AI-generated text. [POSTCAPTION] supplies the post caption as context. This is an instruction for generating comments, not a finished comment to post word for word. Configure the required AI provider in Settings → AI before running AI-generated comments; MCP access does not replace that setup.
Step 6: Check sources and keep it stopped
Scroll back up and open Sources. Check that Comment on posts from Specific Users is enabled and that crossfit and nike are present and active in its table.
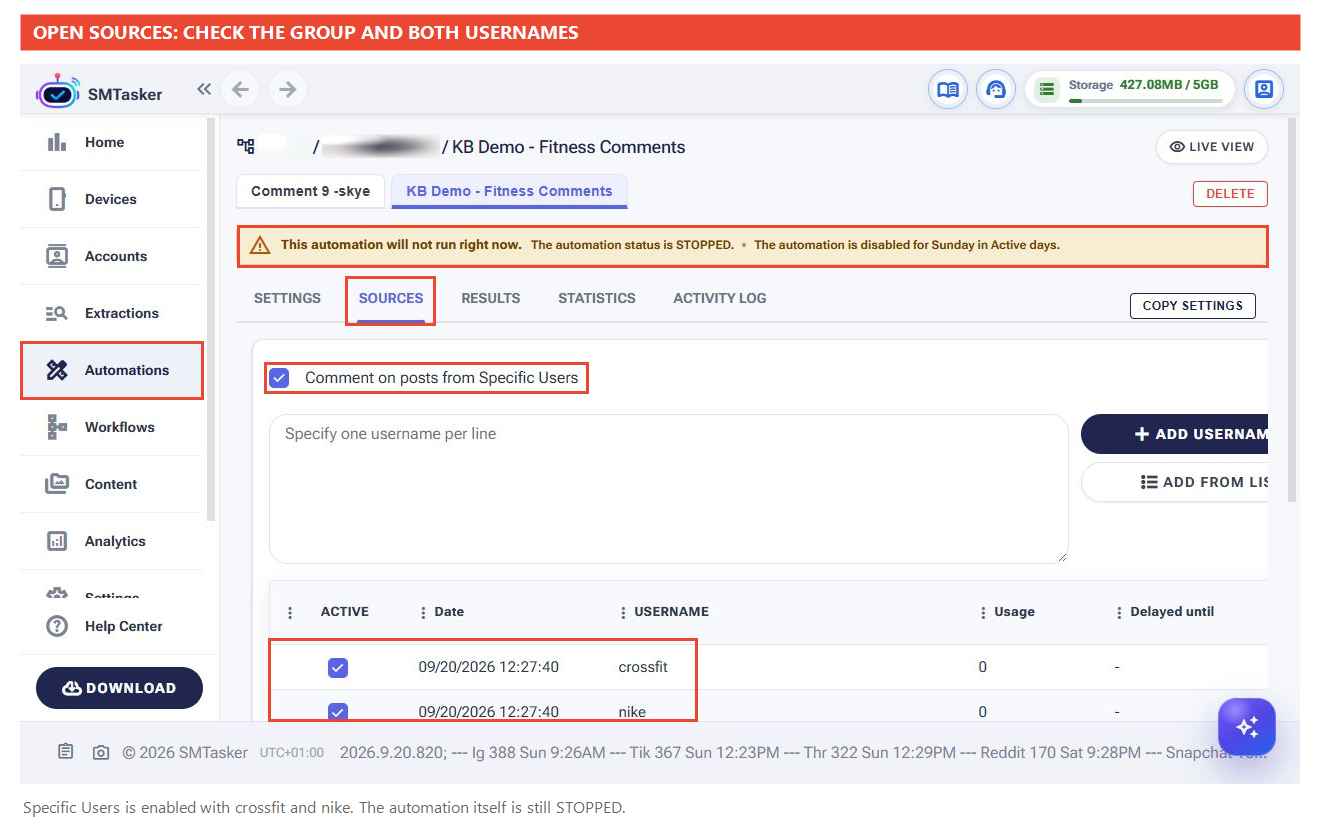
Enabling a source means the tool can use it when it runs. It is different from starting the automation.
If the names are present but the source group is off: ask the assistant to enable that specific group while keeping the automation stopped. If a name is missing, ask it to inspect the saved list before adding it again. Our example needed a separate approval for enabling the source group.
Next: follow Improve an Existing Automation with AI to make one focused change to this stopped example. Or return to Use AI to Manage SMTasker.